Chat Priority Logs(Beta)
Team managers and analysts can download a report that captures the initial priority of chats, and the escalation rules executed by the system subsequently.
Download Report
To download template user summary report,
- Click "Generate Report" in the "Chat Priority Logs(Beta)" section to display the calendar in the pop-up window.
- Select the date range from the given calendar and click "OK". A pop-up will be displayed notifying that the request is queued for processing the report. Refer the image below.
- Click "View Requested Reports" to view the status of the requested report. The requested report will be initially in "Pending" status.

- Once the status changes to "Available", the admin can click the "Download Icon" to download the report. Refer the image below.
Team manager can also schedule a report. Click here for more information on scheduling a report.

The Team Name and the Selected Date Range are provided as a header in the excel file.
The following information will be displayed in the report:
- CS1: Chat ID
- Chat Creation Timestamp: Time stamp of chat creation
- Chat Status: Current status of the chat
- Channel:* The channel that the chat is created on
- Asset:* The asset name that the chat is created on
- Website Id:* The website that the chat is initiated from (only applicable for live chat channel)
- Initial Priority:* The priority of the chat at the time of chat creation
- Number of Escalations:* Total number of escalations executed
- Assigned Priority:* The priority of the chat at the time of chat assignment
- Chat Assigned Timestamp:* Time stamp of chat assignment
- Assigned Agent:* The last assigned agent’s name
- Escalated To Priority:
- Time stamp that the chat is being escalated to the mentioned priority
- This column will be left blank if the chat is not escalated to this priority or if the chats initial priority is higher than the mentioned priority
- In case the chat is transferred between multiple agents, for secondary agents the initial priority will be left blank.
Priority Escalated By:
- SYSTEM: If the priority escalated by the system automatically
- Team manager’s name: If the priority is escalated by the team manager manually
To Schedule a Report
- Click "Schedule Report" button on the Offline Reports screen.
The following pop-up window appears.
- Select the "File Format".
- It is recommended to select .xls option for reports on email channel as .csv files are likely to be malformed with email body content.
- Select the "Periodicity".
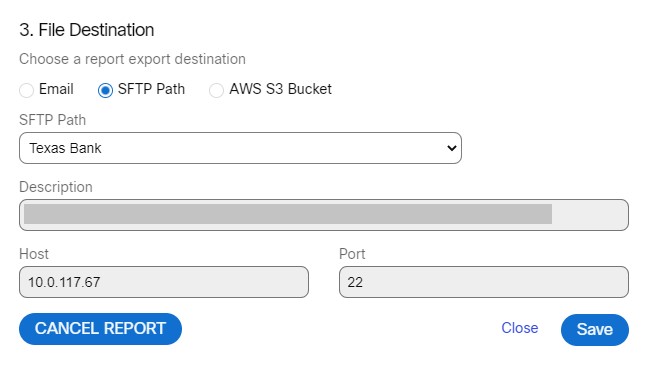
- Select the "File Destination".
- If you select "Email" radio button, a text box appears.
- Enter the email ids of the list of users to whom the report has to be sent.
- If you select "SFTP Path" radio button, the list of SFTP paths configured by the client admin under File Destinations screen (Client Admin Console > Settings > File Destinations) will appear.

- Select the "SFTP Path".
- If you select "AWS S3 Bucket" radio button, the list of AWS S3 Buckets configured by the client admin under File Destinations screen (Client Admin Console > Settings > File Destinations) will appear.
- Select the "AWS S3 Bucket".
- Click "Save".
A confirmation message appears on the screen.
To Cancel a Scheduled Report
- Click "Schedule Report" button in the respective report section. The Schedule Report pop-up window will be displayed.
- Click "Cancel Report".
The report will be cancelled and a confirmation message appears on the screen.
Updated about 3 years ago
