Surveys
Collecting feedback through surveys is an effective way to obtain vital information about a conversation. Businesses can gain valuable insights into their chats by analyzing and categorizing the data collected. This is why administrative users can oversee customer and agent surveys to capture feedback from both parties. Additionally, these surveys can be shared with multiple teams for further analysis.
The Surveys screen is categorized into two tabs:
- Customer surveys
- Agent surveys
Add Customer Survey
To add a customer survey, follow these steps:
- Login to Webex Engage.
- Click the Try new version button on the top-right corner of the application.
You will navigate to the Webex Engage React version dashboard.
- Navigate to Assets> Surveys. By default, a Customer surveys tab is pre-selected.
- Click Add survey. The following screen appears.
- Select the Customer surveys radio button.
- Basic details: Enter Survey Name and Description.
- Enter the Survey prompt message that you wish to send while initiating a survey.
- Select the teams from the Shared teams drop-down to share the survey with other teams.
You can preview the survey-prompt message configured for the Livechat and Webpage on the right side of the Surveys screen and make required edits, if any. - Click Next.
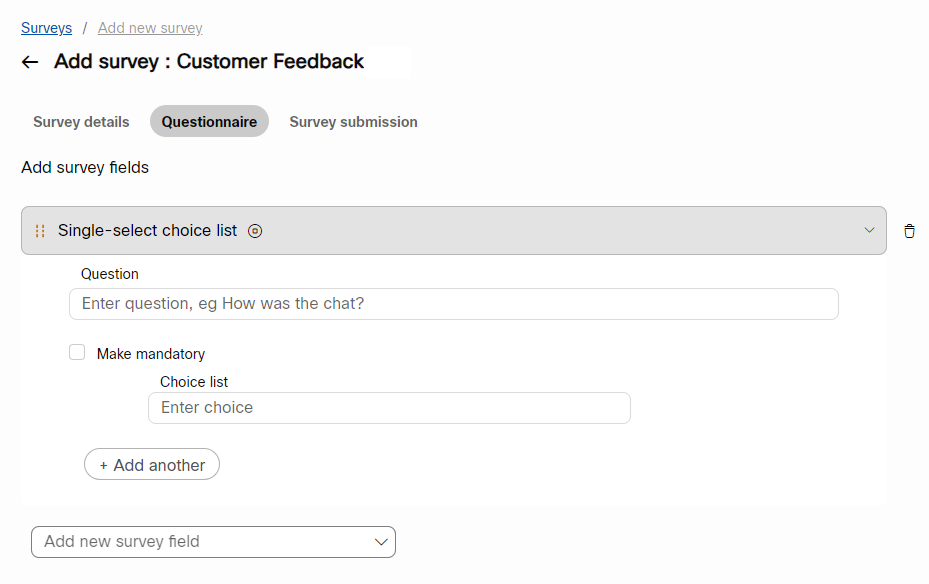
You will navigate to the following screen.
- Select an option from the Add new survey field drop-down to configure a questionnaire.

- Enter the Question.
- Select the Mark mandatory checkbox to make a question mandatory.
Single-select choice list: If you select this option, a choice list field appears. You can configure radio buttons or a drop-down list.
Multi-select choice list: If you select this option, a choice list field appears. You can configure a multiple-choice drop-down list.
Dropdown: If you select this option, the dropdown options field appears. You can choose to add multiple options.
Rate chat: If you select this option, thumbs up and thumbs down options appear.
Star rating: If you select this option, you can configure the number of stars on a scale of 1 to 5.
Number rating: If you select this option, you can configure the number on a scale of 1 to 10.
Text filed: If you select this option, you can configure a placeholder for short descriptive responses.
Textarea: If you select this option, you can configure a placeholder for long descriptive responses.
You can preview the survey questionnaire configured for the Livechat and Webpage on the right side of the Surveys screen.
- Click Next. You will navigate to the Survey Submission tab.
You can preview the post-chat survey submission message configured for the Livechat and Webpage on the right side of the Surveys screen.
- Enter the thank you message in the text field and click Submit.
A success message appears on the screen, and you will be navigated to the survey's dashboard.
In the basic details section, a bell notification is sent to all the teams configured in the Shared teams field.
Note:
A survey will not be activated until the team manager configures the trigger settings and initiates a survey on the team manager console (settings>manage>surveys).
Add New Agent Survey
To add an agent survey, follow these steps:
- Click the Try New Version on the top-right corner of the Admin Console screen.
You will navigate to the Webex Engage React version dashboard.
- Navigate to Assets> Surveys.

- Click the Agent surveys tab.
- Click Add survey.
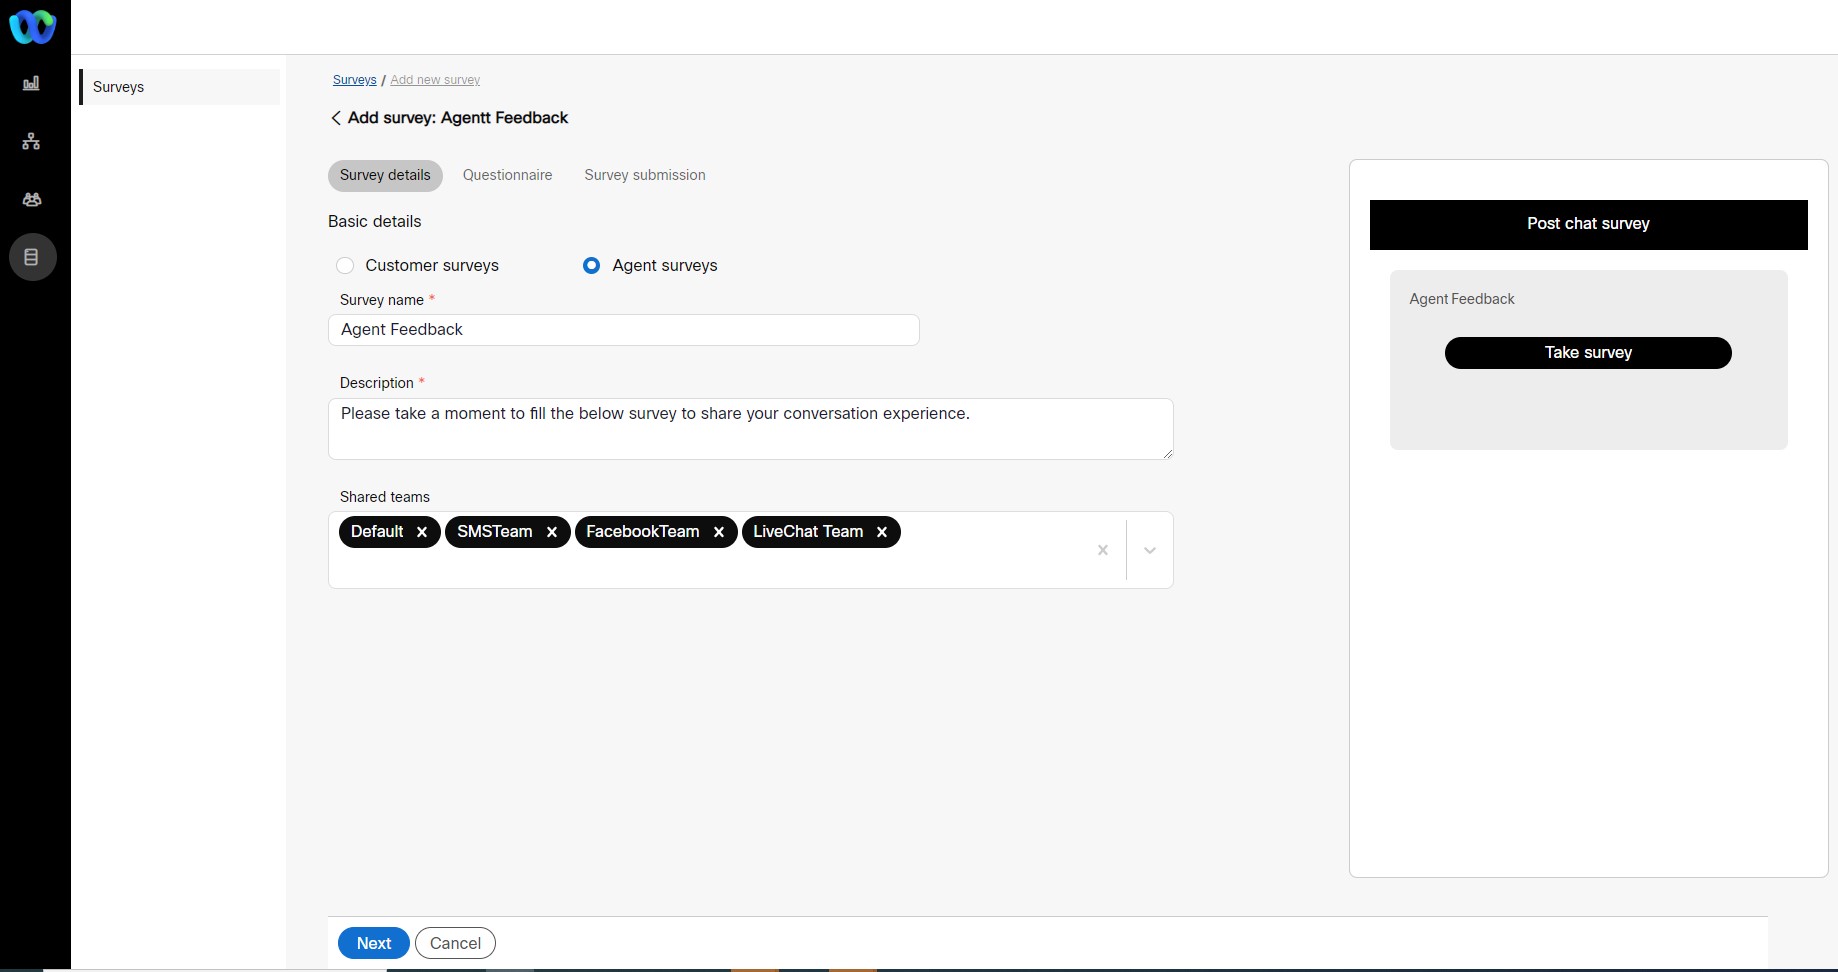
- Select the Agent surveys radio button.

- Basic Details: Enter Survey name and Description.
- Select the teams from the Shared teams drop-down to share the survey with other teams.
You can preview the post-back message configured for the Livechat and Webpage on the right side of the Surveys screen and make required edits, if any. Further, you can re-arrange the questions in the order of your choice before saving a questionnaire. - Click Next.
You will navigate to the following screen.
- Select an option from the Add new survey field drop-down to configure a questionnaire.

- Enter the Question.
- Select the Mark mandatory checkbox to make a question mandatory.
Single-select choice list: If you select this option, a choice list field appears. You can configure radio buttons or a drop-down list.
Multi-select choice list: If you select this option, a choice list field appears. You can configure a multiple-choice drop-down list.
Star rating: If you select this option, you can configure a number of stars on a scale of 1 to 5.
Number rating: If you select this option, you can configure a number on a scale of 1 to 10.
Text filed: If you select this option, you can configure a placeholder for short descriptive responses.
Textarea: If you select this option, you can configure a placeholder for long descriptive responses.
Dropdown: If you select this option, the dropdown options field appears. You can choose to add multiple options.
Rate chat: If you select this option, thumbs up and thumbs down options appear.
You can preview the questionnaire while configuring an agent survey on the right side of the Surveys screen. Further, you can re-arrange the questions in the order of your choice before saving a questionnaire.
- Click Next. You will navigate to the Survey submission tab.
- Enter the message in the Thank you message field.
- Click Submit.
The survey submission success message appears on the screen, and you will navigate to the survey's dashboard.
Sort surveys
The Add filter feature helps to sort and view the Survey table results with the help of AND and OR operands.
To sort table results, follow these steps:
- Click the Add filter button above the Template table results.

A Search drop-down appears, displaying all the column names in the list.
- Select a filter criterion, enter the value in the text field, and click Apply.
The relevant results will appear on the screen.
- You can further sort the table results using the AND and OR operands.
- You can click the Hide filters button to hide the existing filters.
- You can also click the Clear filters button to reset or clear the existing filters.
Customise Display of Table
The Customise Display helps you select a list of columns you want to preview in the table results.
To view customise table results, follow these steps:
- Click the Customise display drop-down on the top-right corner of the results table.
- Choose the required columns from the list by selecting the checkboxes adjacent to each column name.
You can instantly view the results on the screen by checking and unchecking the checkboxes.
Note
By default, Name and Actions columns are preselected and cannot be disabled.
Updated about 2 years ago
