Templates
The Webex Engage application enables you to configure and manage new templates and template groups. These templates are shared across various teams by default. The templates can be organized into groups for easier access and management.

Note:
The templates created by a client admin cannot be modified or deleted by a team or group admin.
To navigate to templates:
- Navigate to Admin Console > Assets > Templates.
- Template screen appears. An admin can create new groups and add templates under those groups.
The following template details are displayed:
- ID: Refers template name.
- Channel: Refers to the agent's message channel (SMS/Facebook/Apple Messages for Business/LiveChat/Twitter/WhatsApp/Email/API) throughout the chat.
- Template: Refers to the customized message with the variables in tags.
- Actions: Refers to the activities performed on the template (i.e.) Edit and Delete.
In the Templates page, the client admin can,
- Upload Templates
- Create a New Template Group
- Delete Template Group
- Add New Template
- Edit Template
- Delete Template
Detailed information on each of the features is provided in the subsequent sections.
Upload Templates
Upload templates functionality helps bulk upload templates at once by reducing the time taken to create templates.
To upload templates, follow these steps:
- Navigate to Admin Console > Assets > Templates.
- Click Upload Template on the top-right corner of the templates screen.
The following page appears on the screen.
- Click the Download sample file here link.
A sample file is downloaded. - Open the sample file and enter the following details in the respective cells:
Note
- All fields in the sample file are mandatory.
- Do not edit or change the column header names and ensure that the team names are comma-separated in the TeamNames column.
Channel: Enter the name of the channel, such as All, SMS, Email, Facebook, Twitter, Livechat, API, Apple Messages for Business, or WhatsApp.
TemplateGroup: Enter the name of the template group.
TemplateName: Enter the name of the template.
Text: Compose the template text as per the configured character limit for each channel template on the Webex Engage application.
Locked: Enter Yes to lock the template or No to keep it unlocked.
TemplateNames: Enter the team names as comma-separated values. TemplateNames is an optional column. By default, templates are shared across all teams. Enter the template names if you want to exclude sending them to specific teams, and the template will only be shared with the teams not mentioned in the TeamNames column.

Note
- The Template Name field accepts all Unicode and special characters.
- We recommend using ABC instead of AMB terminology in the Upload Templates file, as we are yet to update it in the backend systems.
- Delete the help notes in the .csv file before uploading it.
- Save the file.
- Click Upload File.
Upload the file only in the .csv format.
Note
- The upload templates file name must be unique.
- The file size must not exceed 5 MB, and it accommodates a maximum of 1000 templates per upload.
- Text Template column supports all the Unicode characters.
- Use the Pipe symbol (|) as a delimiter to enter multiline text in the Text column.
- In the upload templates file, even If a single template text record ends with a delimiter-pipe symbol (|), all the records in that file must end with the same delimiter.
- Click Track Upload Status on the top-right corner of the Upload Templates screen to view the status of your uploaded files.
You will navigate to the following screen.
- Select a date range in the Show Activity Date Range field and click Apply.
- Click Search.
The relevant search results will appear on the screen. - Optionally, enter a file name in the Search field to filter the table results.
The Status column shows the status of the uploaded file as Completed, Completed with errors, or Failed. - If the uploaded file fails the validation or gets uploaded with errors, you will view a report in the Actions column.
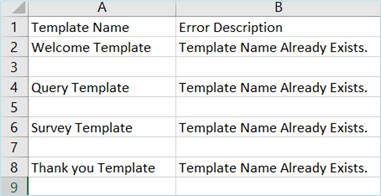
- Click the Download Report in the Actions column.
- Fix the errors in the file based on the report's findings.
- Return to Step 6 to upload the file again.
Create New Template Group
To create a new template group, follow these steps:
- Navigate to Admin Console > Assets > Templates.

- Click the Add icon adjacent to the Template Groups. The Add Template Group pop-up window appears.
- Enter Group Name and click Add.
The success message appears on the screen.
Delete Template Group
To delete a template group, follow these steps:
- Navigate to Admin Console > Assets > Templates.

- Click the Delete icon adjacent to the template group name that needs to be deleted.
A confirmation pop-up window is displayed.
- Click Ok .
The success message appears on the screen.
Add New Template
This feature enables the client admins to add message template formats for each channel.
To add a new template, follow these steps:
- Navigate to Admin Console > Assets > Templates.

- Select a Template group in which you want to create a template.
- Click the Add Template button on the top-right corner of the templates screen.
You can create the templates for all channels or any of the following channels:
- SMS
- Livechat
- API
- Apple Messages for Business

SMS Template
To create an SMS template (or All Channels template), follow these steps:
- Click the All or SMS tab.
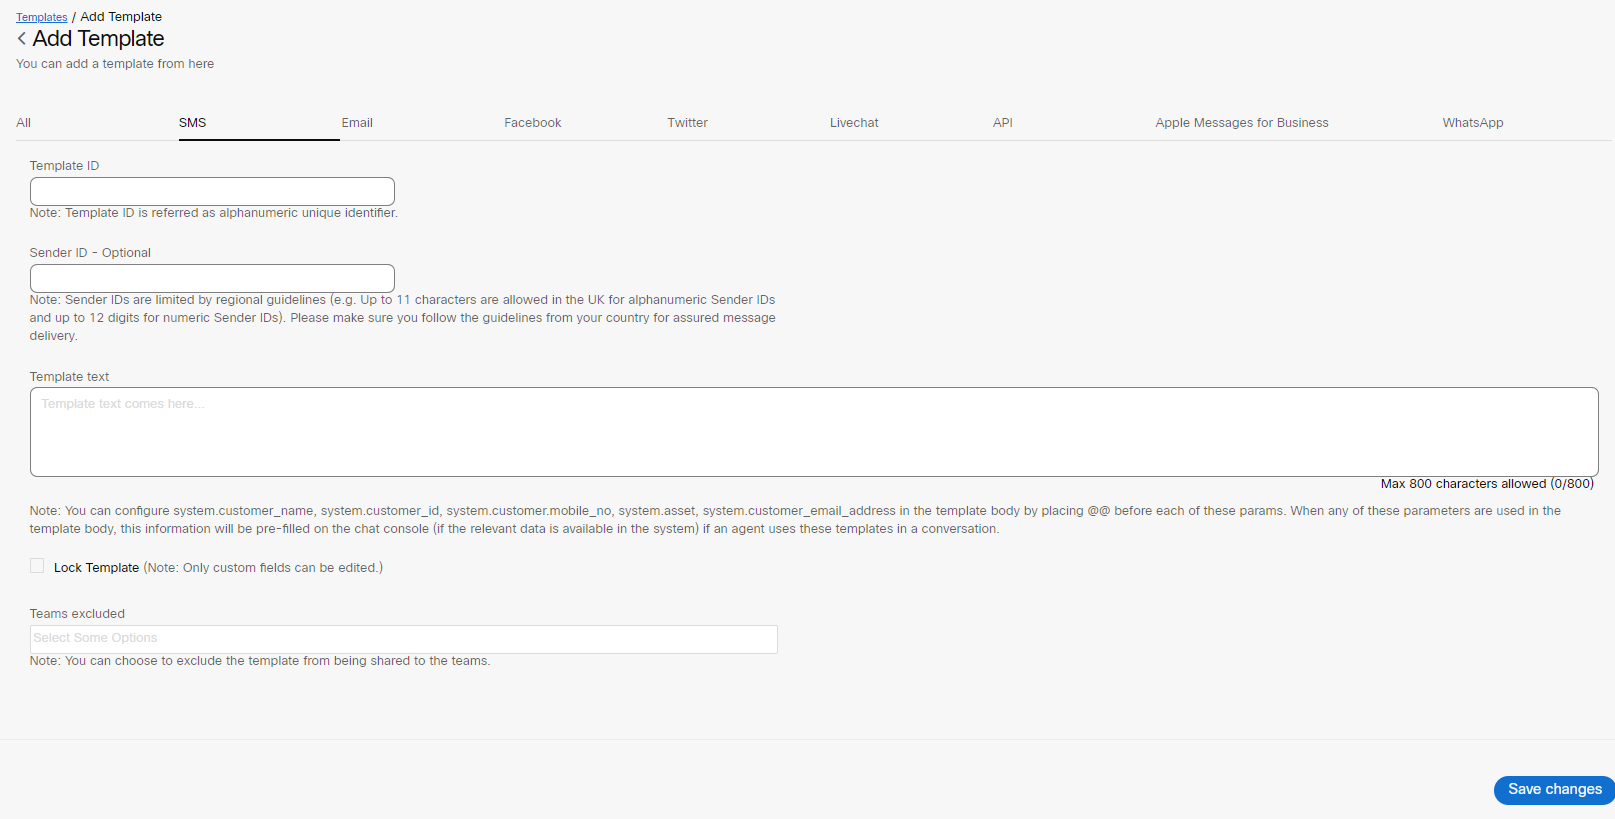
- Enter a Template Name in the Template ID field.
Note
The default Sender ID (short code assigned to the team if SMS is enabled as a Channel) is loaded automatically while creating a template. This feature allows the client admin to easily create and keep track of the templates.
- Custom Fields: Enter custom/editable fields in the template body using chevron(<>) brackets. Custom fields are editable fields even in locked templates.
- System Parameters: Enter @@ to view the list of system parameters. You can select any of these parameters and compose the template text. When you include any of these parameters in the template text, the dynamic substitution of values occurs when an agent uses these templates in a conversation.


Note:
In the absence of relevant values for the configured parameters, the parameters will render in chevron braces and are yellow highlighted.
- Compose the message in the Template Text field. A maximum of 800 characters can be entered in the text box.
- Select the Lock Template checkbox to lock specific templates. When locked, only custom/dynamic fields can be edited by the agents. A lock icon is displayed corresponding to the template. Refer to the image below.

Teams excluded
By default, the SMS template is shared across all teams. But you can avoid sharing it with specific teams using the Teams excluded feature.
- Select a list of teams you want to exclude from the Teams excluded drop-down list, and the template will only be shared with the teams, not on the list.
- Click Save changes.
The success message appears on the screen.
Email Template
To create an Email template, follow these steps:
- Click the Email tab.
The following screen appears.
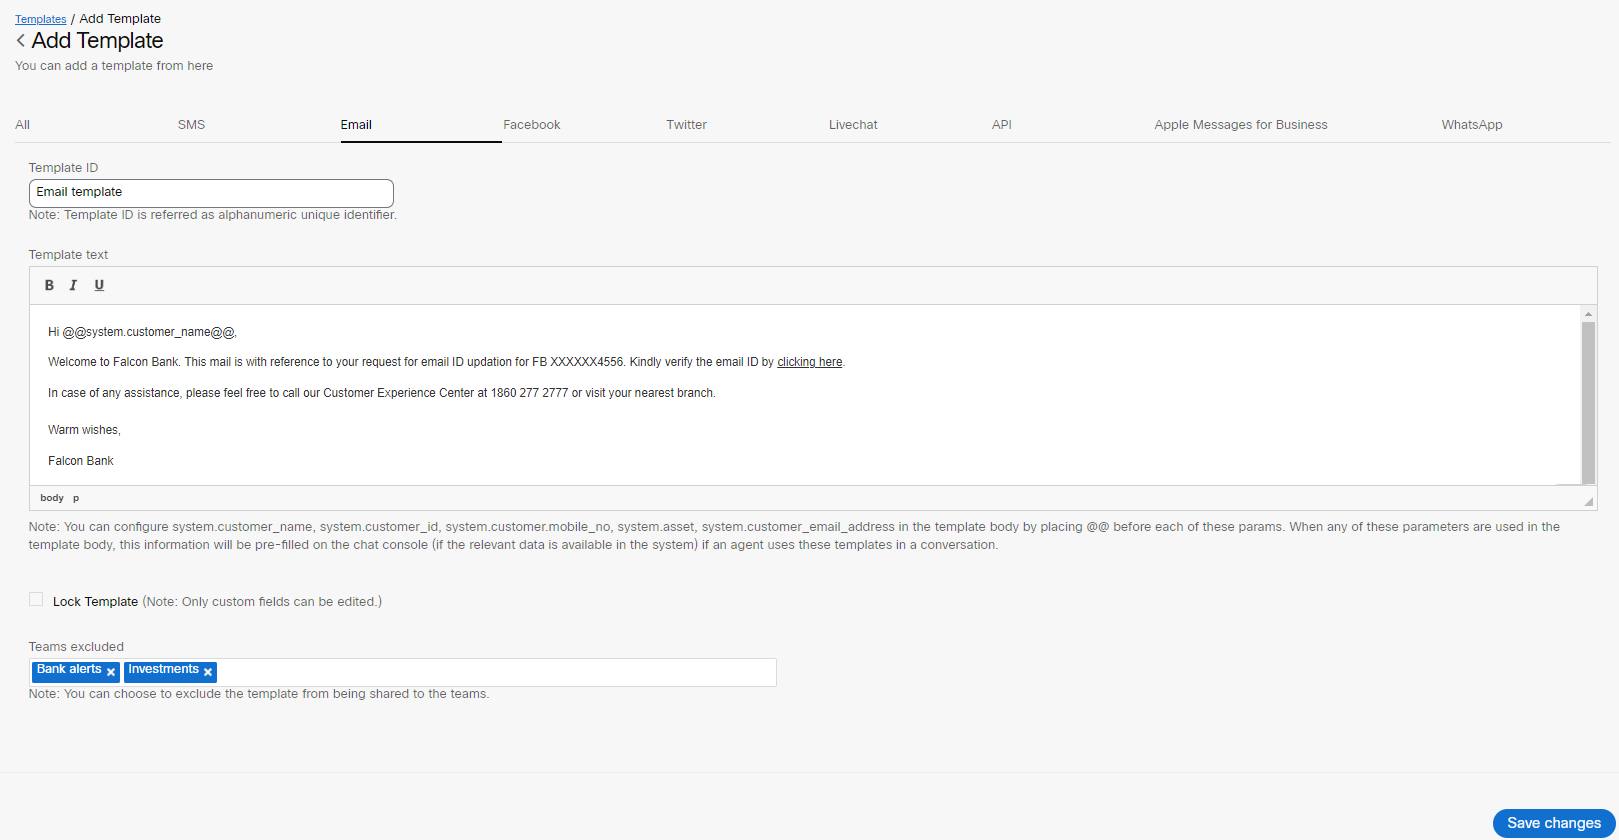
- Enter a Template Name.
- Compose the message in the Template Text field.
- Custom Fields: Enter custom/editable fields in the template body using chevron(<>) brackets. Custom fields are editable fields even in locked templates.
- System Parameters: Enter @@ to view the list of system parameters. You can select any of these parameters and compose the template text. When you include any of these parameters in the template text, the dynamic substitution of values occurs when an agent uses these templates in a conversation.

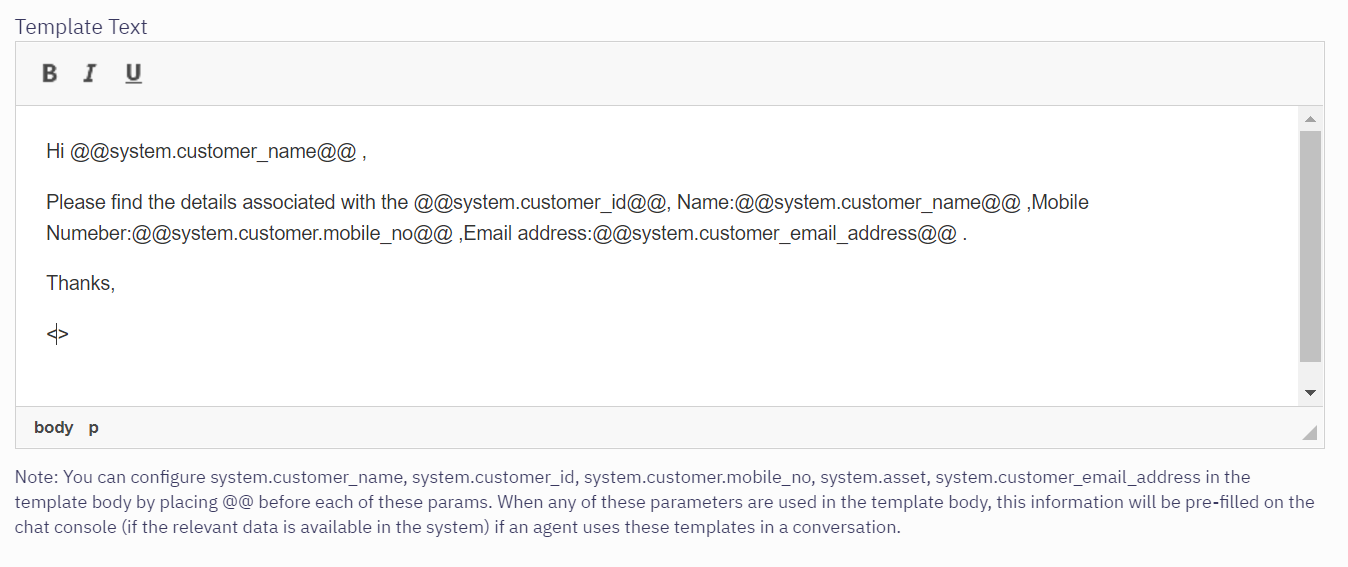
Note:
In the absence of relevant values for the configured parameters, the parameters will render in chevron braces and are yellow highlighted.
- You can even choose to enter the customized message in the text box.
- Select the Lock Template checkbox to lock specific templates. When locked, only custom/dynamic fields can be edited by the agents. A lock icon is displayed corresponding to the template.
Teams excluded
By default, the Email template is shared across all teams. But you can avoid sharing it with specific teams using the Teams excluded feature.
- Select a list of teams you want to exclude from the Teams excluded drop-down list, and the template will only be shared with the teams, not on the list.
- Click Save changes.
The success message is displayed on the screen.
Facebook Template
To create a Facebook template, follow these steps:
- Click Facebook tab. The following screen appears.
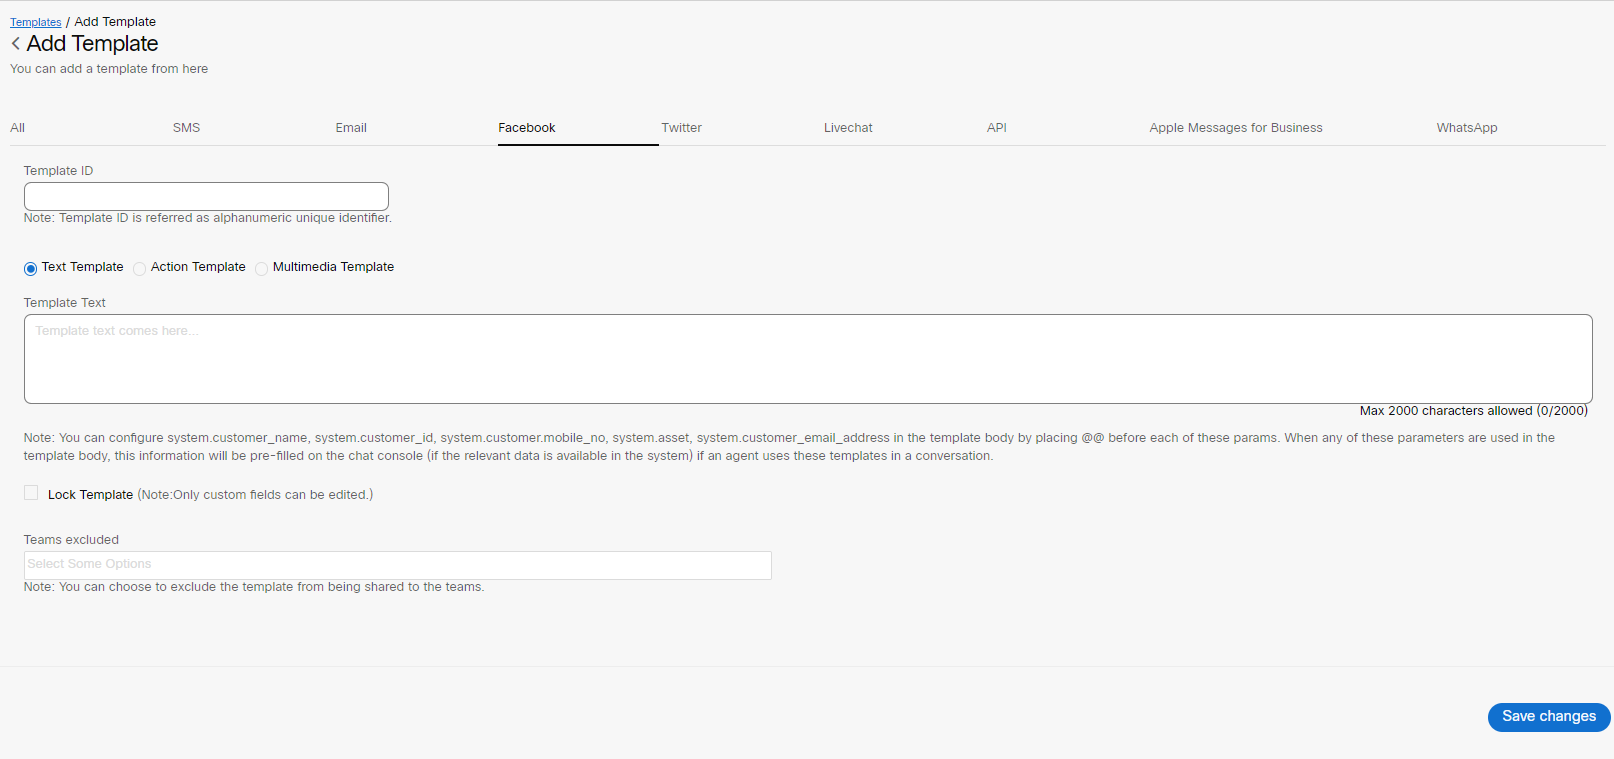
An admin can create Plain Text, Action, and Multimedia templates.
- Enter a Template Name for the template in the Template ID field.
- The Text Template radio button is selected by default.
- Custom Fields: Enter custom/editable fields in the template body using chevron(<>) brackets. Custom fields are editable fields even in locked templates.
- System Parameters: Enter @@ to view the list of system parameters. You can select any of these parameters and compose the template text. When you include any of these parameters in the template text, the dynamic substitution of values occurs when an agent uses these templates in a conversation.


Note:
In the absence of relevant values for the configured parameters, the parameters will render in chevron braces and are yellow highlighted.
- Compose the message in the Template Text field and click Save Changes.
- To create an Action Template, select the Action Template radio button. This option is used when a quick response is expected from the customer. The message is sent with images and buttons, wherein the customer can respond with a button click.
- Click Upload Image to browse and select the required image.
Note
- The Webex Engage supports images with an aspect ratio of 1.91:1 only.
- Enter Button Names and select Button Type from the drop-down list.
- If you select the WEB URL button, enter the Call URL.
- Compose the message in the Template Text field.
- Select the Multimedia Template radio button to create a Multimedia template. The multimedia types supported are as follows:
- Image
- Audio
- Video
- File
- Select a media type in the Media Type drop-down list and enter the respective downloadable URL in the Enter Media URL field.
- Select the Lock Template checkbox to lock specific templates. Only custom/dynamic fields can be edited by the agents when locked. A lock icon is displayed corresponding to the template.
Teams excluded
By default, the Facebook template is shared across all teams. But you can avoid sharing it with specific teams using the Teams excluded feature. - Select a list of teams you want to exclude from the Teams excluded drop-down list, and the template will only be shared with the teams, not on the list.
- Click Save changes.
The success message appears on the screen. The newly added templates will be displayed under the selected template group.
Twitter Template
To create a Twitter template, follow these steps:
- Click the Twitter tab on the add template page.
The following screen appears.
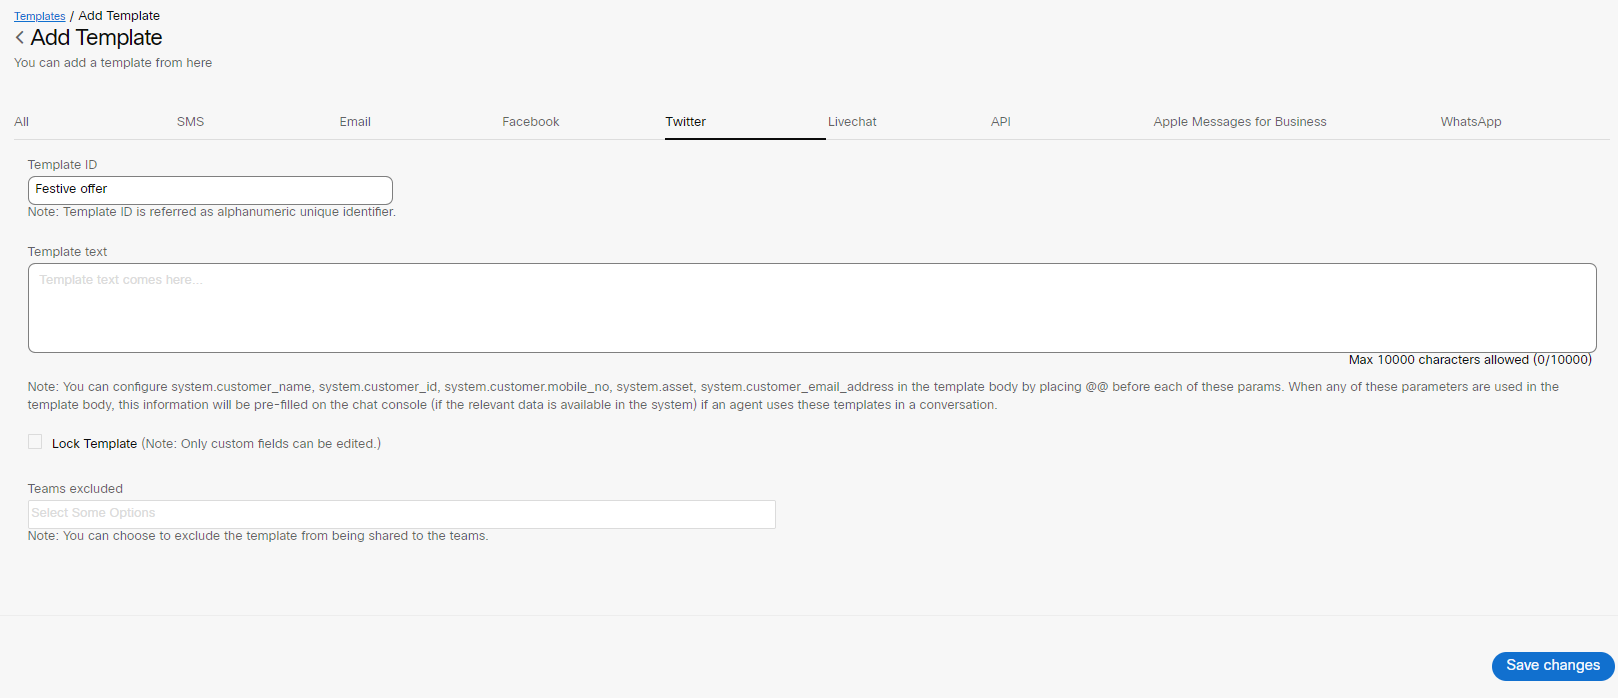
- Enter a Template Name for the template in the Template ID field.
- Custom Fields: Enter custom/editable fields in the template body using chevron(<>) brackets. Custom fields are editable fields even in locked templates.
- System Parameters: Enter @@ to view the list of system parameters. You can select any of these parameters and compose the template text. When you include any of these parameters in the template text, the dynamic substitution of values occurs when an agent uses these templates in a conversation.


Note:
In the absence of relevant values for the configured parameters, the parameters will render in chevron braces and are yellow highlighted.
- Compose the message in the Template Text field.
- Select the Lock Template checkbox to lock specific templates. Only custom/dynamic fields can be edited by the agents when locked. A lock icon is displayed corresponding to the template.
Teams excluded
By default, the Twitter template is shared across all teams. But you can avoid sharing it with specific teams using the Teams excluded feature.
- Select a list of teams you want to exclude from the Teams excluded drop-down list, and the template will only be shared with the teams, not on the list.
- Click Save changes.
The success message appears on the screen.
Livechat Template
To create a Livechat template, follow these steps:
- Click the Livechat tab on the Add Template page.
The following screen appears.

- Enter a Template Name for the template in the Template ID field.
- Custom Fields: Enter custom/editable fields in the template body using chevron(<>) brackets. Custom fields are editable fields even in locked templates.
- System Parameters: Enter @@ to view the list of system parameters. You can select any of these parameters and compose the template text. When you include any of these parameters in the template text, the dynamic substitution of values occurs when an agent uses these templates in a conversation.

- Compose the message in the Template Text field.

Note:
In the absence of relevant values for the configured parameters, the parameters will render in chevron braces and are yellow highlighted.
- Select the Lock Template checkbox to lock specific templates. Only custom/dynamic fields can be edited by the agents when locked. A lock icon is displayed corresponding to the template.
Teams excluded
By default, the LiveChat template is shared across all teams. But you can avoid sharing it with specific teams using the Teams excluded feature.
- Select a list of teams you want to exclude from the Teams excluded drop-down list, and the template will only be shared with the teams, not on the list.
- Click Save changes.
The success message appears on the screen.
API Template
To create an API template, follow these steps:
- Click the API tab on the Add Template page.
The following screen appears.
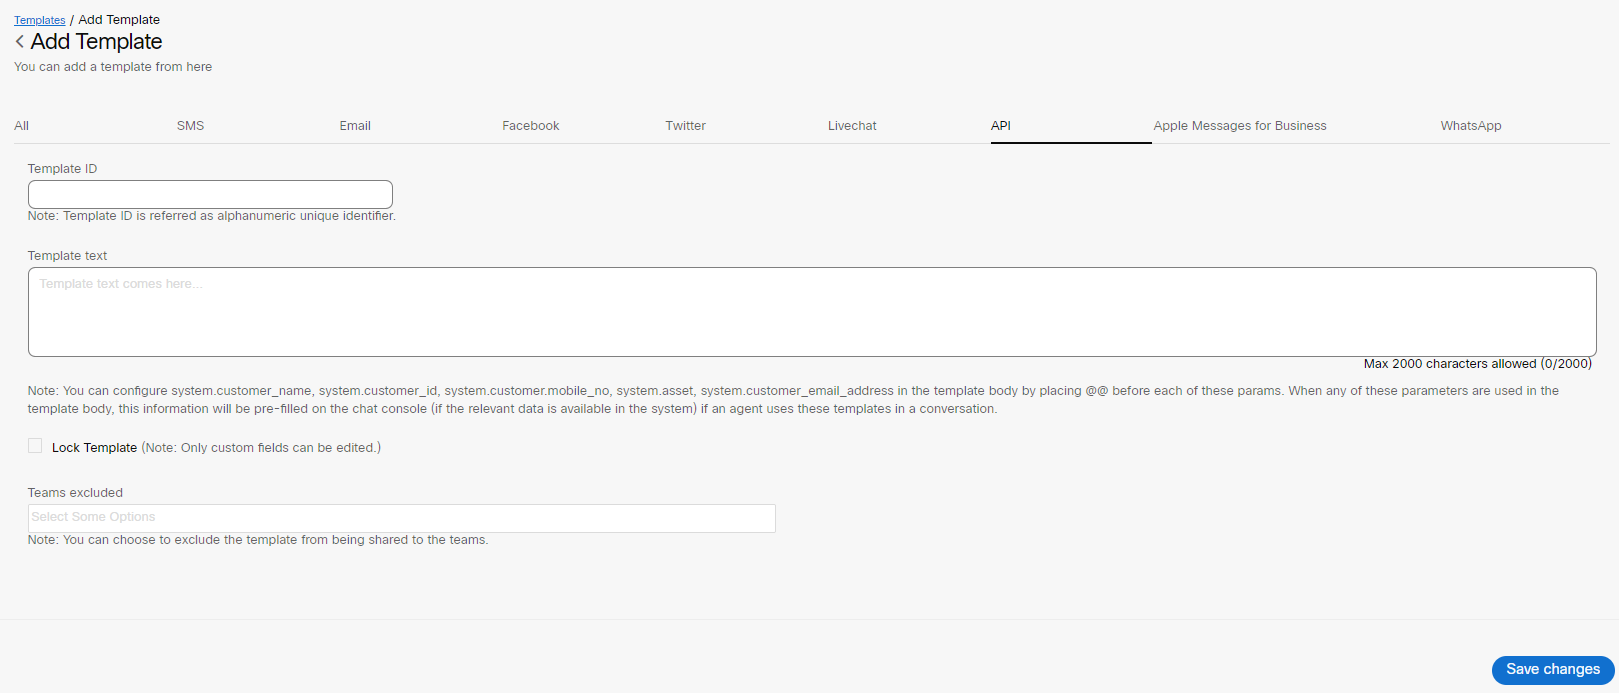
- Enter a Template Name for the template in the Template ID field.
- Custom Fields: Enter custom/editable fields in the template body using chevron(<>) brackets. Custom fields are editable fields even in locked templates.
- System Parameters: Enter @@ to view the list of system parameters. You can select any of these parameters and compose the template text. When you include any of these parameters in the template text, the dynamic substitution of values occurs when an agent uses these templates in a conversation.

Note:
In the absence of relevant values for the configured parameters, the parameters will render in chevron braces and are yellow highlighted.
- Compose the message in the Template Text field.
- Select the Lock Template checkbox to lock specific templates. Only custom/dynamic fields can be edited by the agents when locked. A lock icon is displayed corresponding to the template.
Teams excluded
By default, the API template is shared across all teams. But you can avoid sharing it with specific teams using the Teams excluded feature.
- Select a list of teams you want to exclude from the Teams excluded drop-down list, and the template will only be shared with the teams, not on the list.
- Click Save changes.
The success message appears on the screen.
Apple Messages for Business Template
To create an Apple Messages for Business (AMB) template, follow these steps:
- Click the Apple Messages for Business tab on the Add Template page.
The following screen appears.

- Enter Template Name.
- Select template type - the template type can be Text, Text with Attachment, Time Picker, List Picker, Rich Link, Quick Reply, and Form.
- If you select the Text as a template type, compose the Template Text. You can enter a maximum of 10000 characters can be entered in this field.
- If you select the Text with Attachment as the template type, the following options appear.
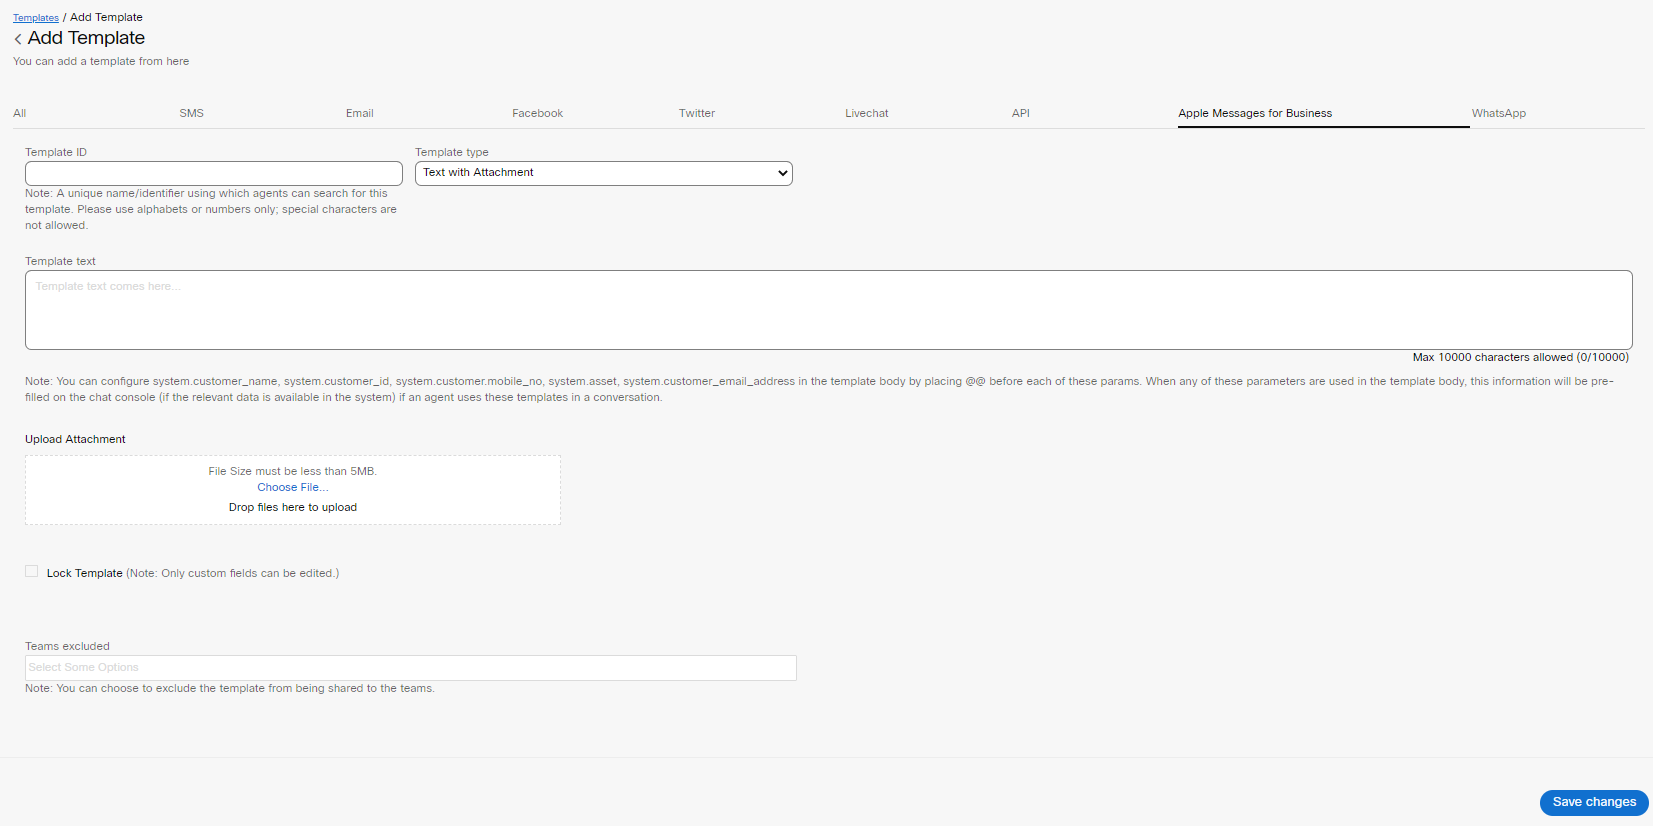
- Custom Fields: Enter custom/editable fields in the template body using chevron(<>) brackets. Custom fields are editable fields even in locked templates.
- System Parameters: Enter @@ to view the list of system parameters. You can select any of these parameters and compose the template text. When you include any of these parameters in the template text, the dynamic substitution of values occurs when an agent uses these templates in a conversation.


Note:
In the absence of relevant values for the configured parameters, the parameters will render in chevron braces and are yellow highlighted.
- Compose the message in the Template Text field.
- Click Choose File/ Drop Files Here to upload an attachment. The maximum upload file limit is ≤ 5 MB.
- Select the Lock Template checkbox to lock specific templates. Only custom/dynamic fields can be edited by the agents when locked. A lock icon is displayed corresponding to the template.
- If you select the Time Picker template type, the following options appear.
Received Message: You can configure received messages in this section.
- Enter Title, Subtitle, and Click Choose File/ Drop files here to upload an attachment. The maximum upload file limit is ≤ 5 MB.
- Here, you can configure the uploaded image and view it in the icon, small, and large sizes.
- Event Details: Turn ON the Pre-fill event details toggle to pre-fill the details (manual agent intervention). When this field is enabled, the following options appear.

- Enter the Event Title,Location Details, and Show on Map details.
- Time Slots: Select the date, time, and duration from respective fields.

- Click the Add icon to add more time slots.
Note:
You can create maximum of Ten slots.

- Click the - icon to delete a time slot.
Reply Message: A reply message can be configured in this section. - Enter Title, Subtitle, and Click Choose File/ Drop Files Here to upload an attachment. The maximum upload file limit is ≤ 5 MB.
Here, you can configure the uploaded image as icon, small, and large sizes.
- If you select the List Picker template type, the following options will appear.
- Received Message: In this section, received messages can be configured.
- Enter Title, Subtitle, and Click Choose File/ Drop files here to upload an attachment. The maximum upload file limit is ≤ 5 MB.
- Here, you can configure the uploaded image in the icon, small, and large sizes.
- List Details: Enter Section Title.
- To have multiple sections for a section, check the Allow Multiple Sections for the Section option.
- Enter Item Name and Item Subtitle.
- To upload an image, click the Drop Files Here to Upload option.
- To further add items to the list, click the Add icon.
- To further add a section, click Add Section.
- To delete a section or list item, click the - icon.
Reply Message: In this section, reply messages can be configured. - Enter Title, Subtitle, and Click Choose File/ Drop files here to upload an attachment. The maximum upload file limit is ≤ 5 MB.
Here, you can configure the uploaded image in the icon, small, and large sizes. - If you select the Rich Link template type, the following options appear.
- Enter Title and URL.
- Select the file type (Image / Video) from the drop-down list. Click Choose File and upload Image/ Video.
Note:
The maximum upload file limit is ≤ 5 MB. The video file must be in MP4 format.
- If you select the Quick Reply template type, the following options appear.
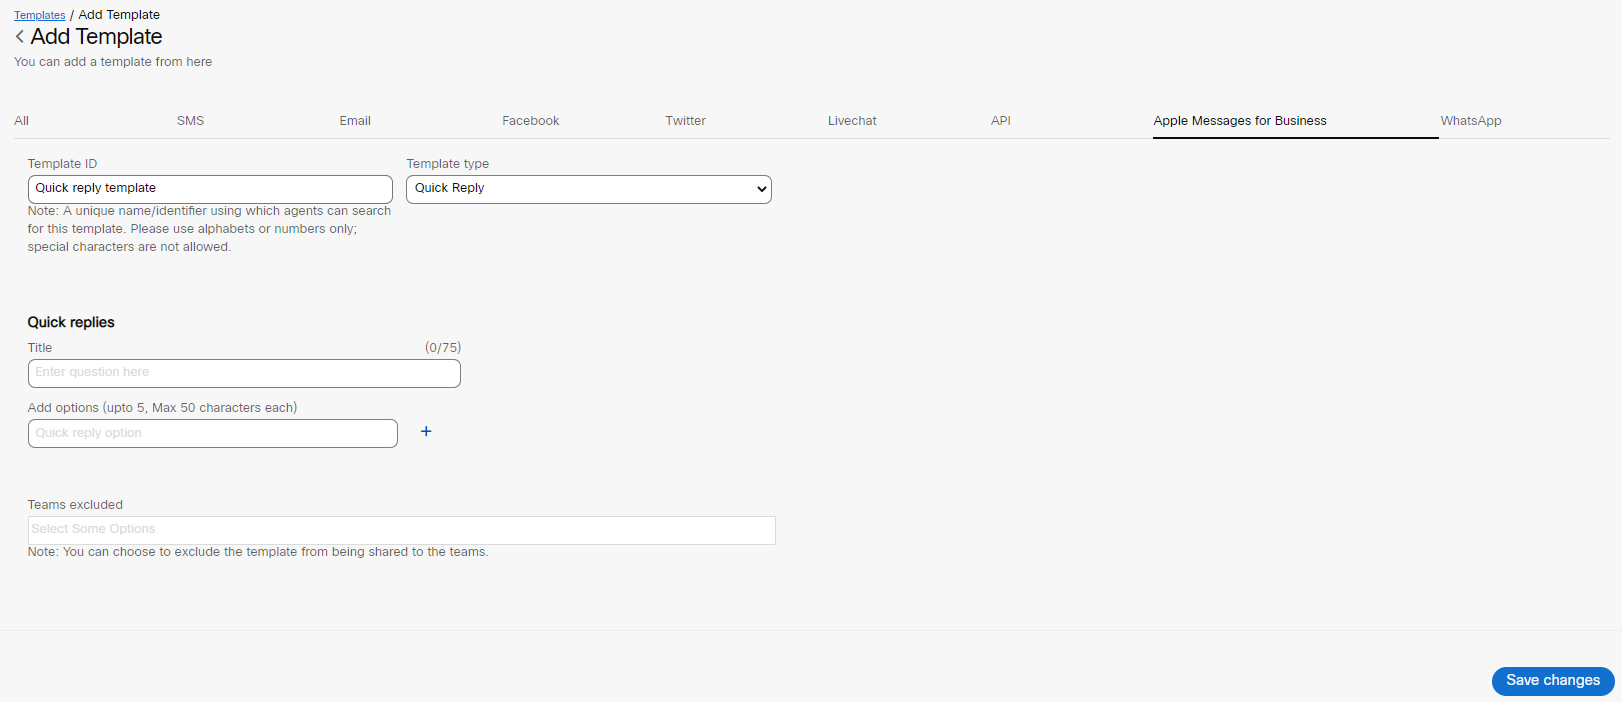
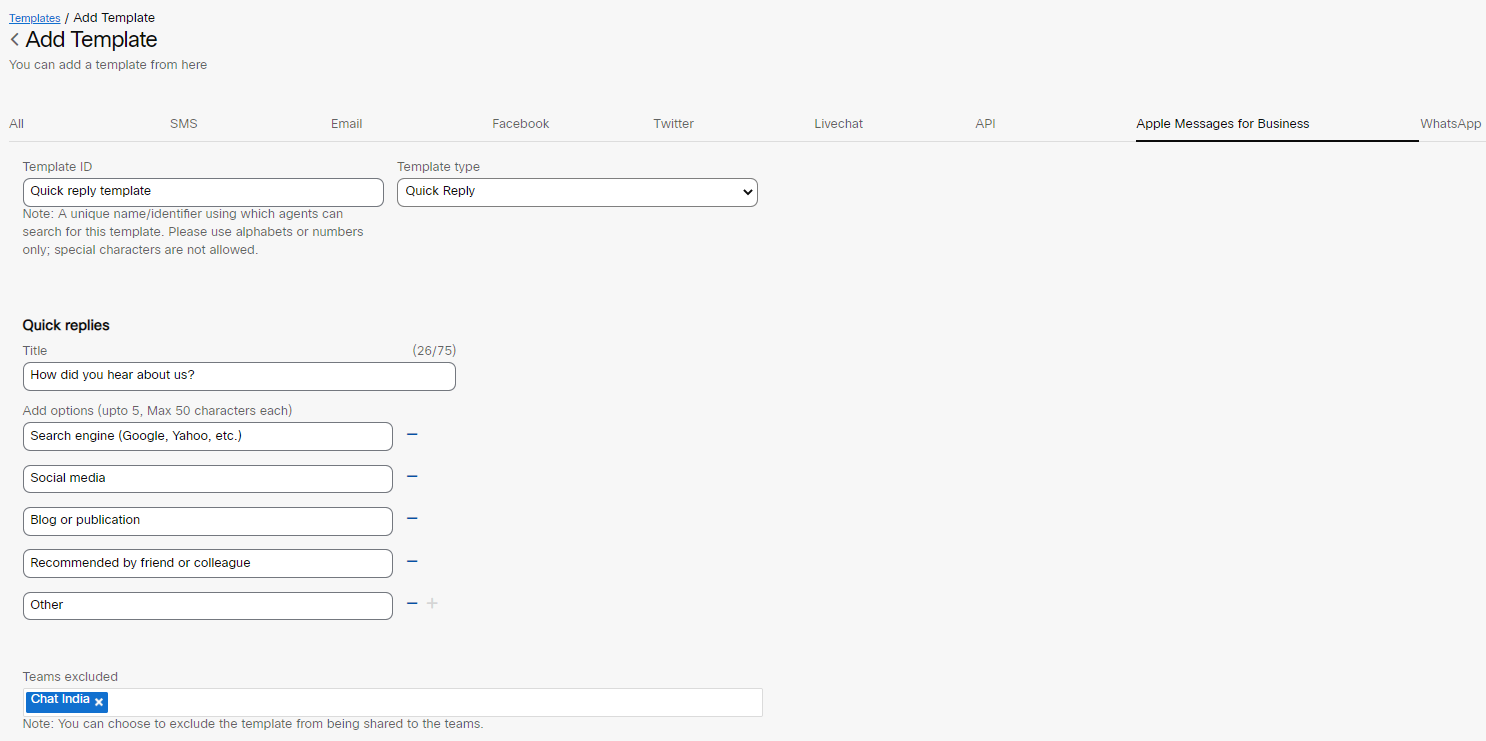
- Enter the Question in the Title field. You can enter a maximum of 75 characters in the question field.
- Enter the quick reply option in the Add options field. You can add a minimum of two and up to five customizable options for each question, with a maximum character limit for each option being 50.
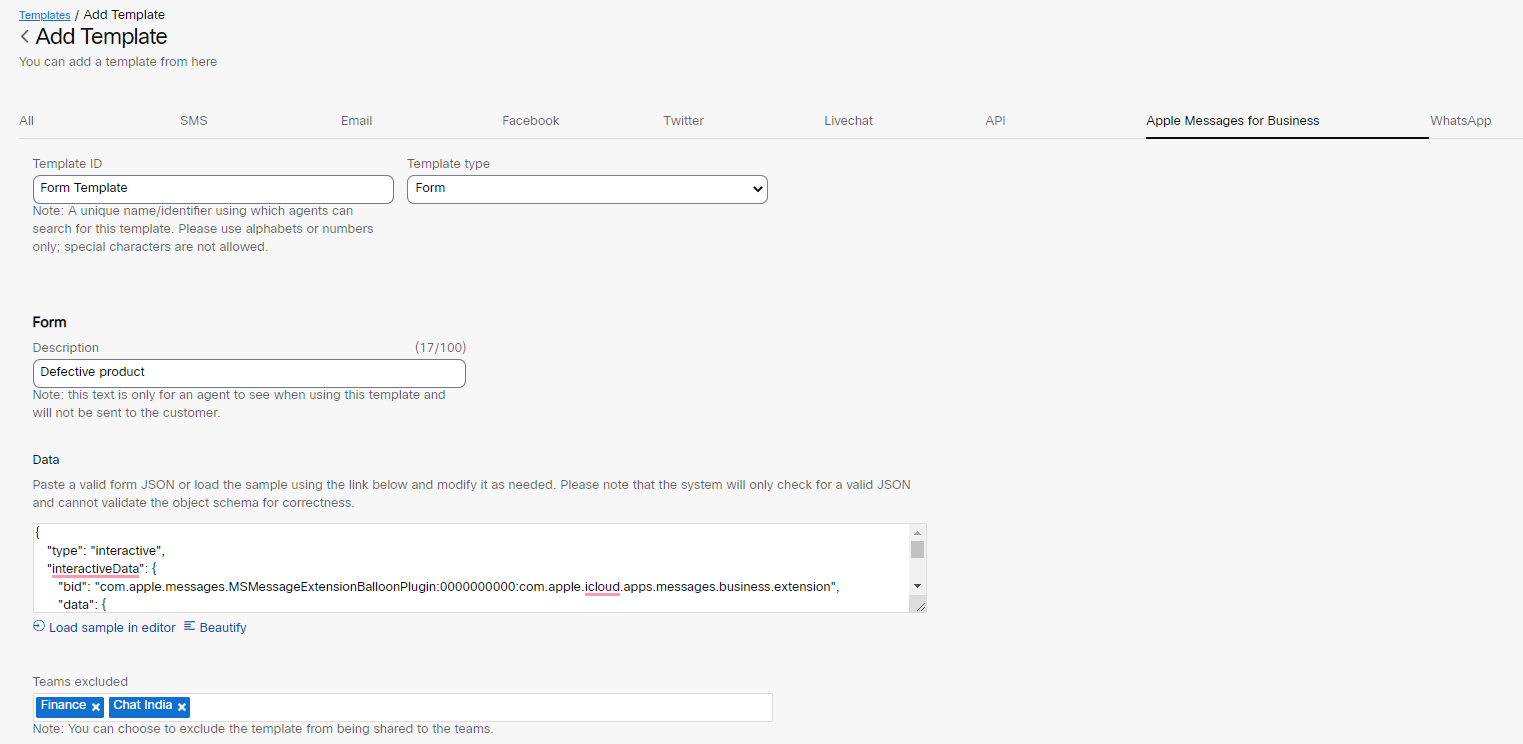
- If you select the Form template type, the following options appear.

- Enter the Template Description in the Description field. The agents can use the configured description to search the templates.
- Paste a valid form JSON. You can even load the sample JSON by clicking the Load sample in editor available below the Data field and customize it based on need.
- You can click the Beautify link beside the Load sample in the editor link to format and make the JSON readable.
Teams excluded
By default, the AMB template is shared across all teams. But you can avoid sharing it with specific teams using the Teams excluded feature.
- Select a list of teams you want to exclude from the Teams excluded drop-down list, and the template will only be shared with the teams, not on the list.
- Click Save changes.
The success message appears on the screen. This template is listed in the chosen group.
WhatsApp Template
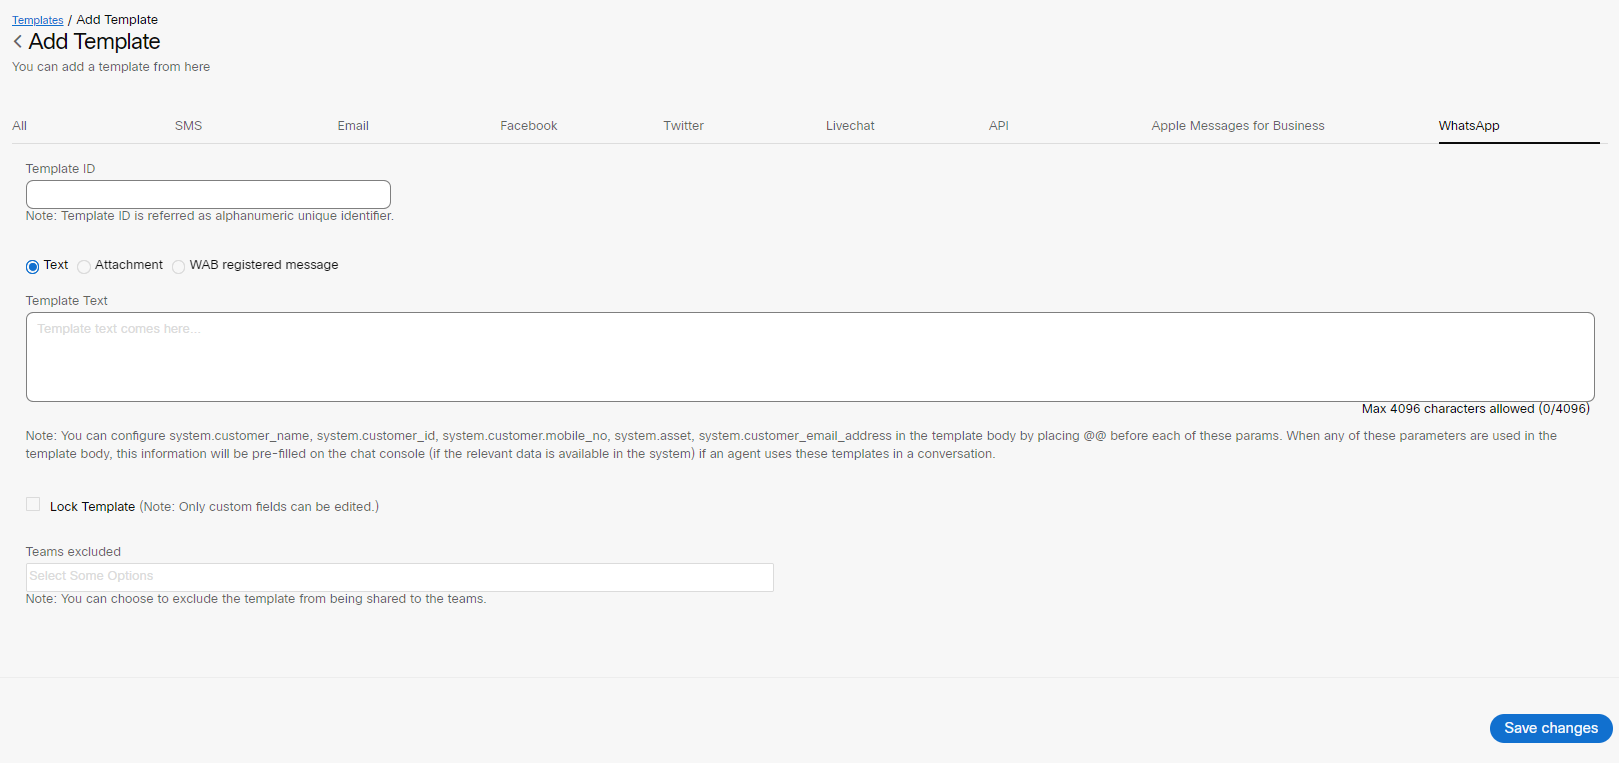
To create a WhatsApp template, follow these steps:
- Click the WhatsApp tab on the Add Template page.
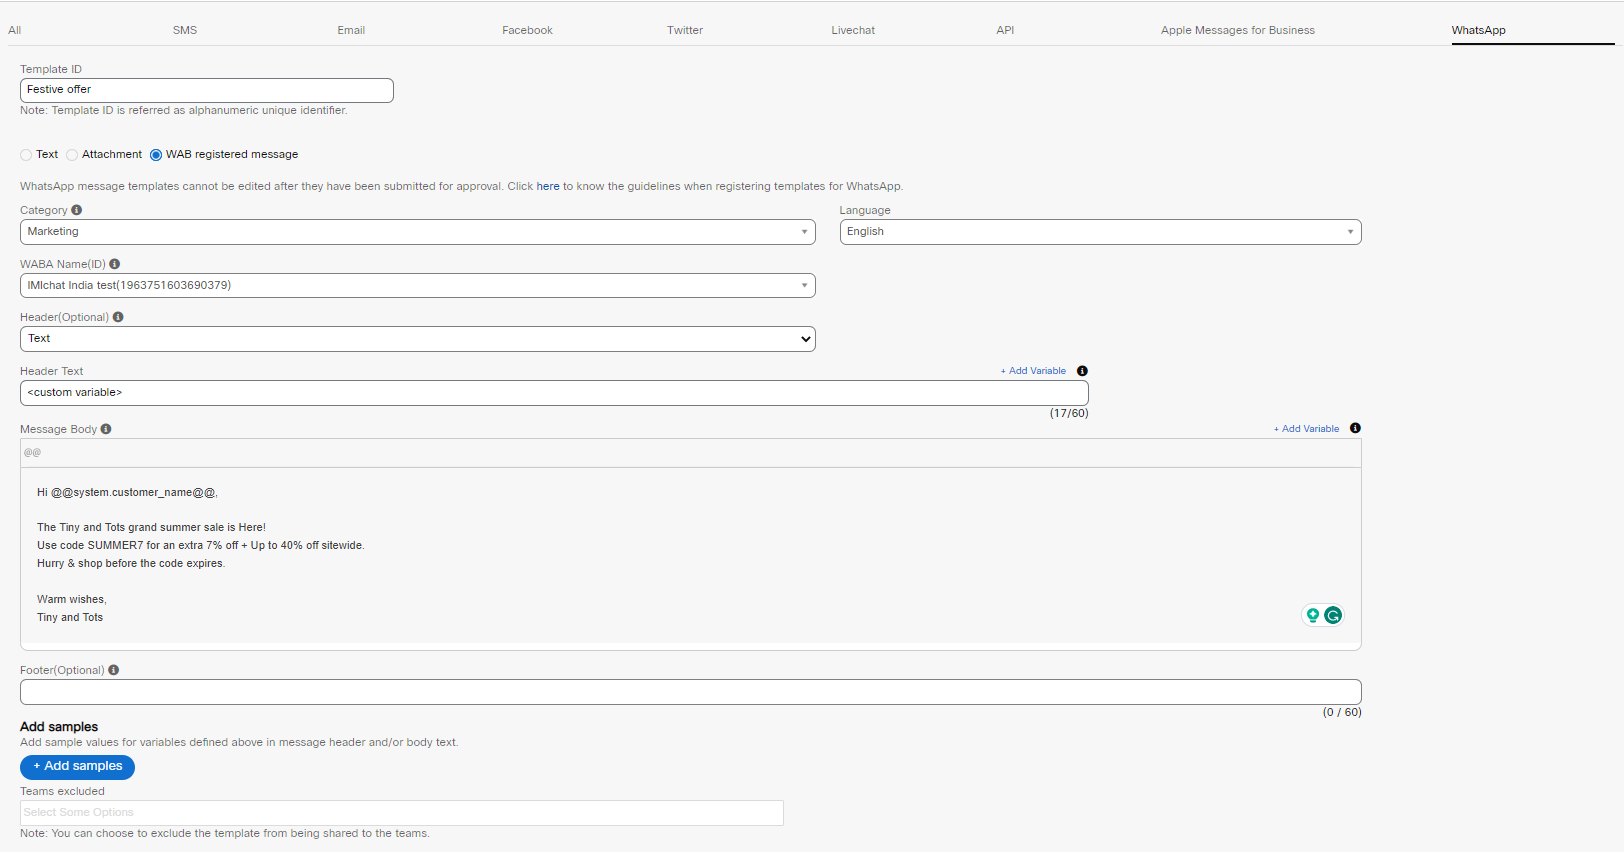
The following screen appears.
- Enter Template Name.
- Custom Fields: Enter custom/editable fields in the template body using chevron(<>) brackets. Custom fields are editable fields even in locked templates.
- System Parameters: Enter @@ to view the list of system parameters. You can select any of these parameters and compose the template text. When you include any of these parameters in the template text, the dynamic substitution of values occurs when an agent uses these templates in a conversation.


Note:
In the absence of relevant values for the configured parameters, the parameters will render in chevron braces and are yellow highlighted.
- To create a text template, select the Text radio button and enter the template text in the Template Text field. The maximum character limit allowed in the Template Text field is 4096 characters.
- To create an attachment template, select the Attachment radio button.
- Click Choose File/ Drop Files Here to upload an attachment. The maximum upload file limit is 64 MB.
Note:
To initiate a conversation with a customer, WhatsApp requires you to use pre-approved WhatsApp Business (WAB) registered message templates.
- To create a WAB registered message, select the WAB registered message radio button. The following options appear on the screen:
- Select a category from the Category drop-down list.

- Select a language from the Language drop-down list.
- Select the WABA name from the WABA Name(ID) drop-down list. These WABA names are configured at the asset level.
- To include a header for a template, select the Text header type from the Header drop-down list. The maximum character limit for the header text field is 60 characters.
- To add a custom variable in the header text, click Add Variable above the Header Text field. A custom variable is added in the Header field. Enter the required custom variable.
- Enter the template text in the Message Body field. The maximum allowable character limit in this field is 1024 characters. You can apply the following rich formatting styles to the Message Body text:
- Bold
- Italics
- Underline
- Strikethrough
You can enter both system and custom parameters in the Message Body field.
- Click Add Variable to add a custom variable.
- Enter @@ in the Message Body field to view a list of system variables. Select a required variable.
Note
When you include any of these parameters in the template text, the dynamic substitution of values occurs when an agent uses these templates in a conversation.
- The footer is a text field. To add a footer to the template, enter the footer text in the Footer field. The maximum allowable character limit for the footer is 60 characters.
You can assign sample values for the variables defined in the message header or body text.
- Click the + Add samples button, and the following pop-up window appears on the screen.

- Enter the values in the Sample value fields.
These sample values are only for representation purposes. Agents must enter the appropriate values while sending out a message using the configured template on the chat console.
Teams excluded
By default, the WhatsApp template is shared across all teams. But you can avoid sharing it with specific teams using the Teams excluded feature.
- Select a list of teams you want to exclude from the Teams excluded drop-down list, and the template will only be shared with the teams, not on the list.
- Click Save changes.

To view the approved templates on the chat console, follow these steps:
- Navigate to the Templates (Client Admin Console>Assets) tab.
- Navigate to the required group and click the Edit icon in the Actions column of a template.
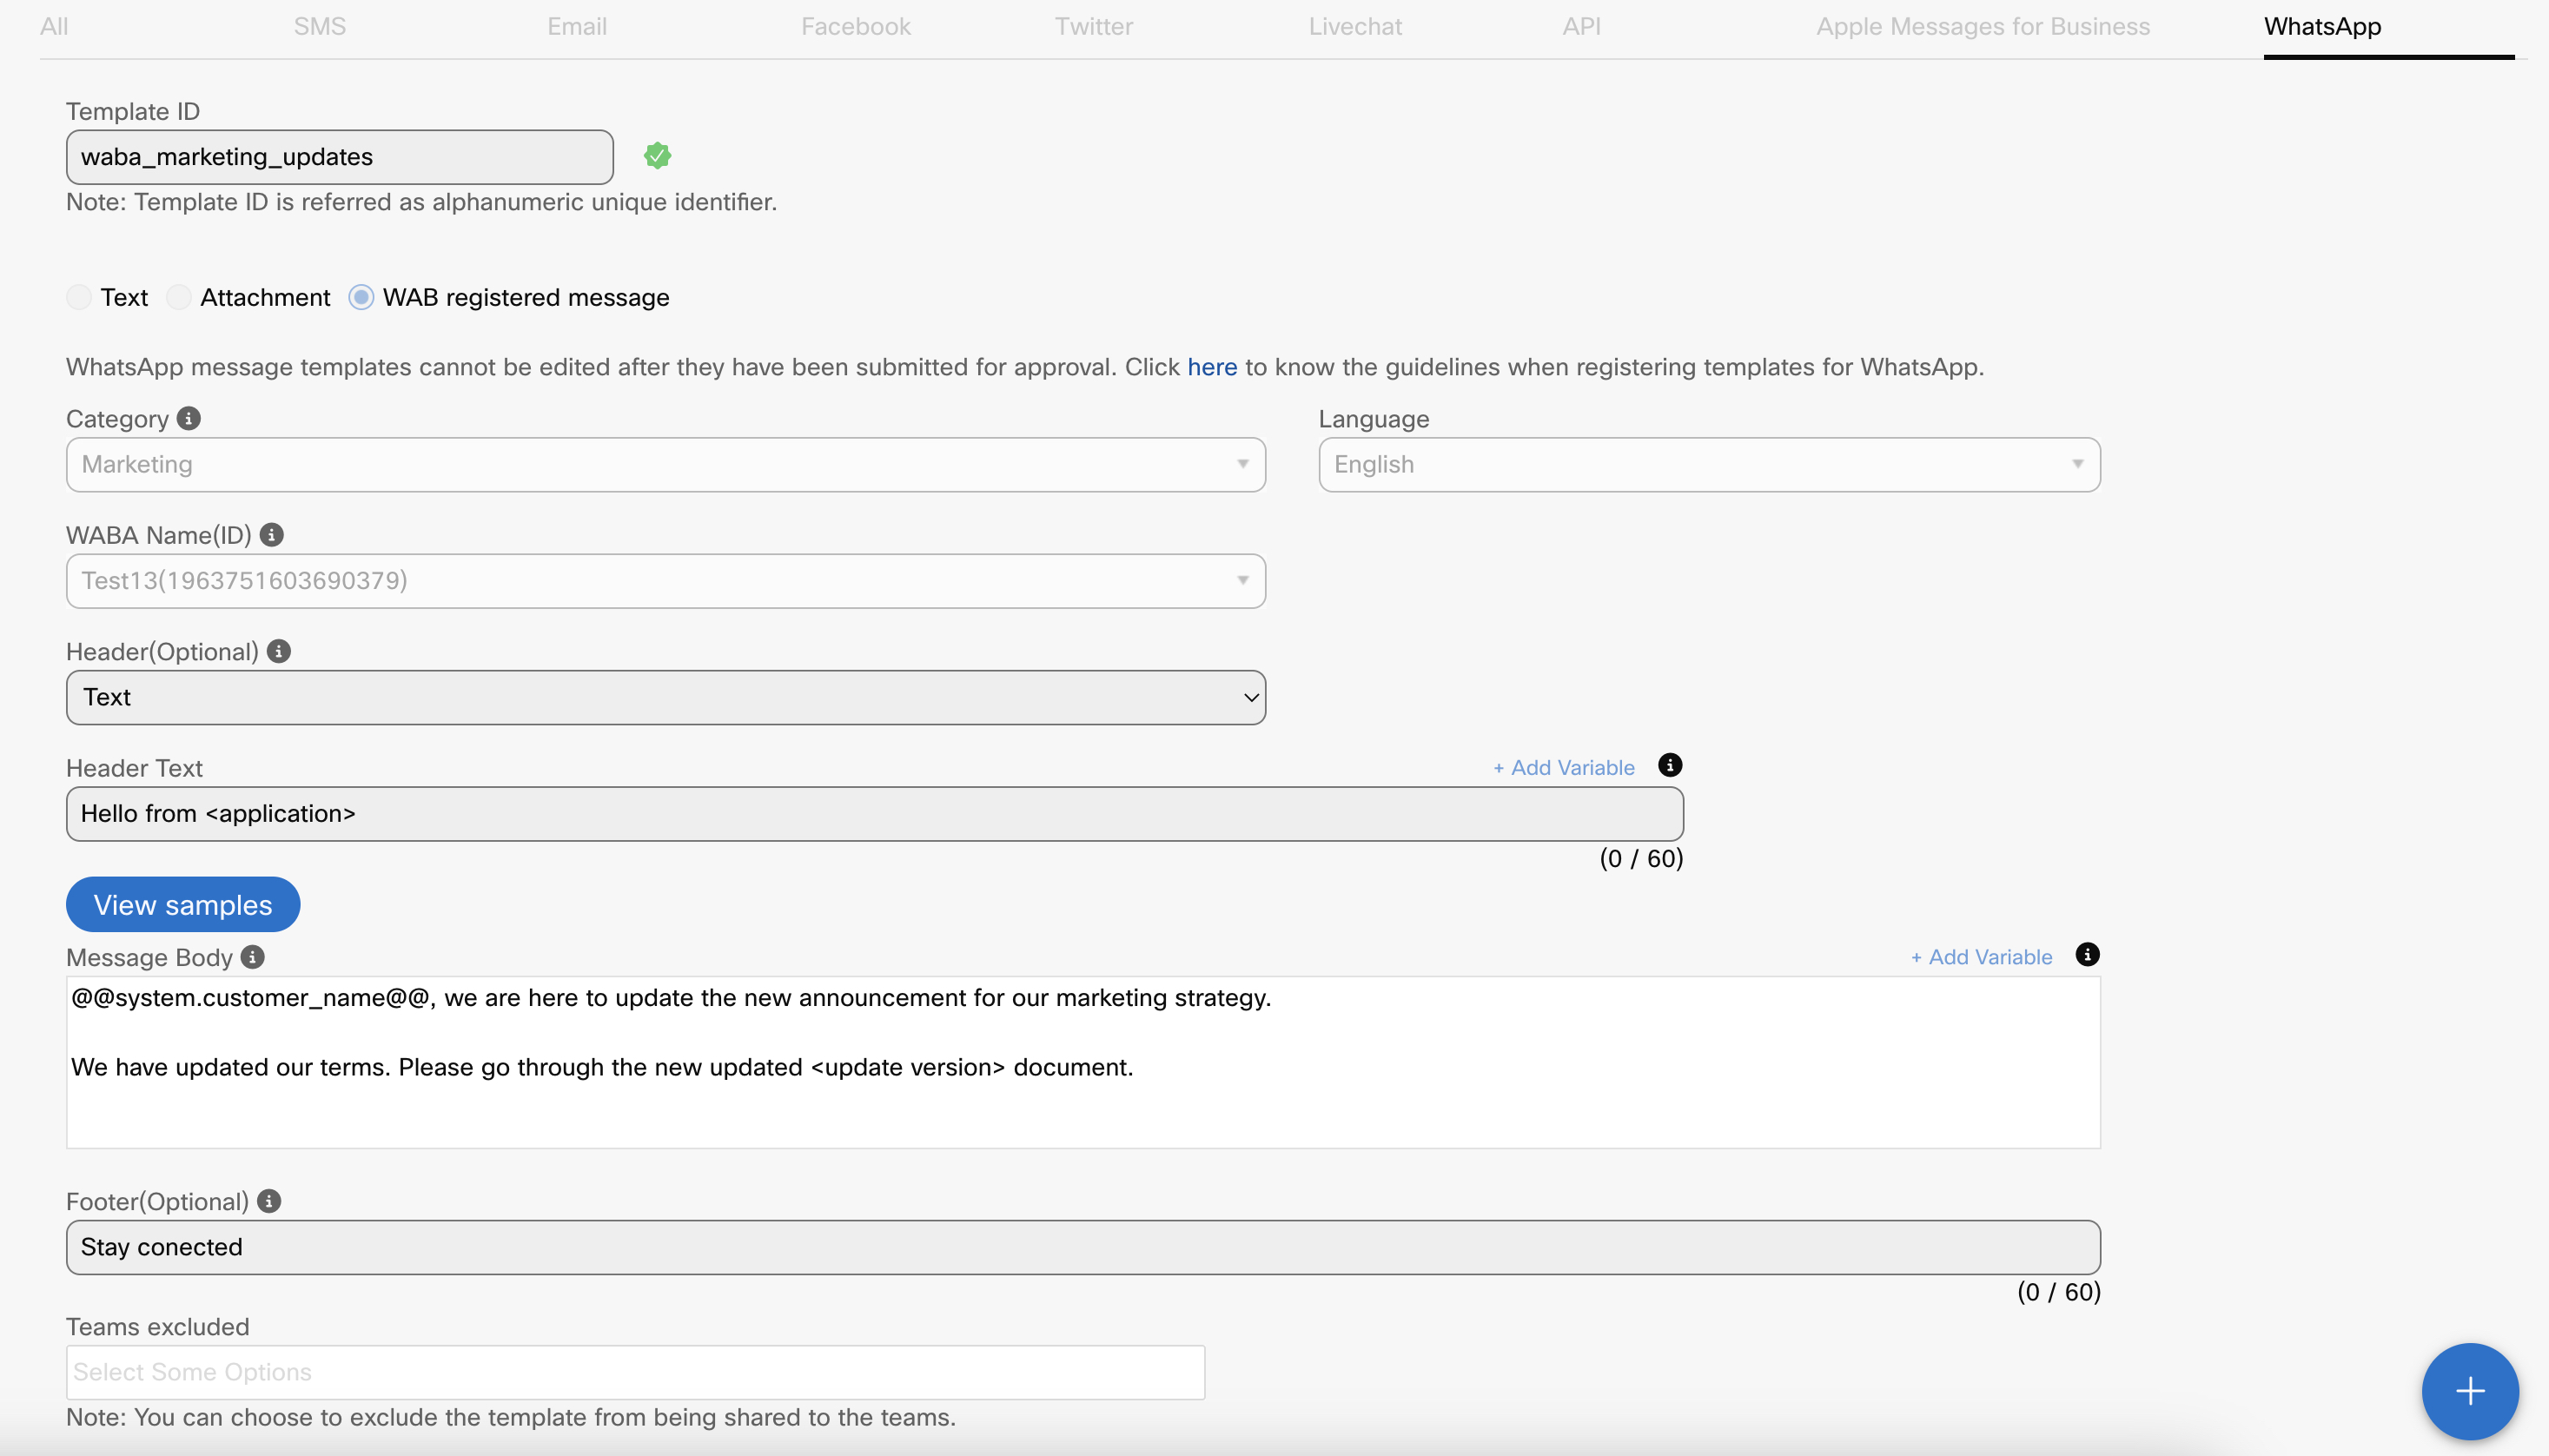
You can view only the approved WAB templates on the chat console. The template is approved if you observe a green checkmark beside the template name on the Edit template screen. You can even mouse hover on the green checkmark to view the status.
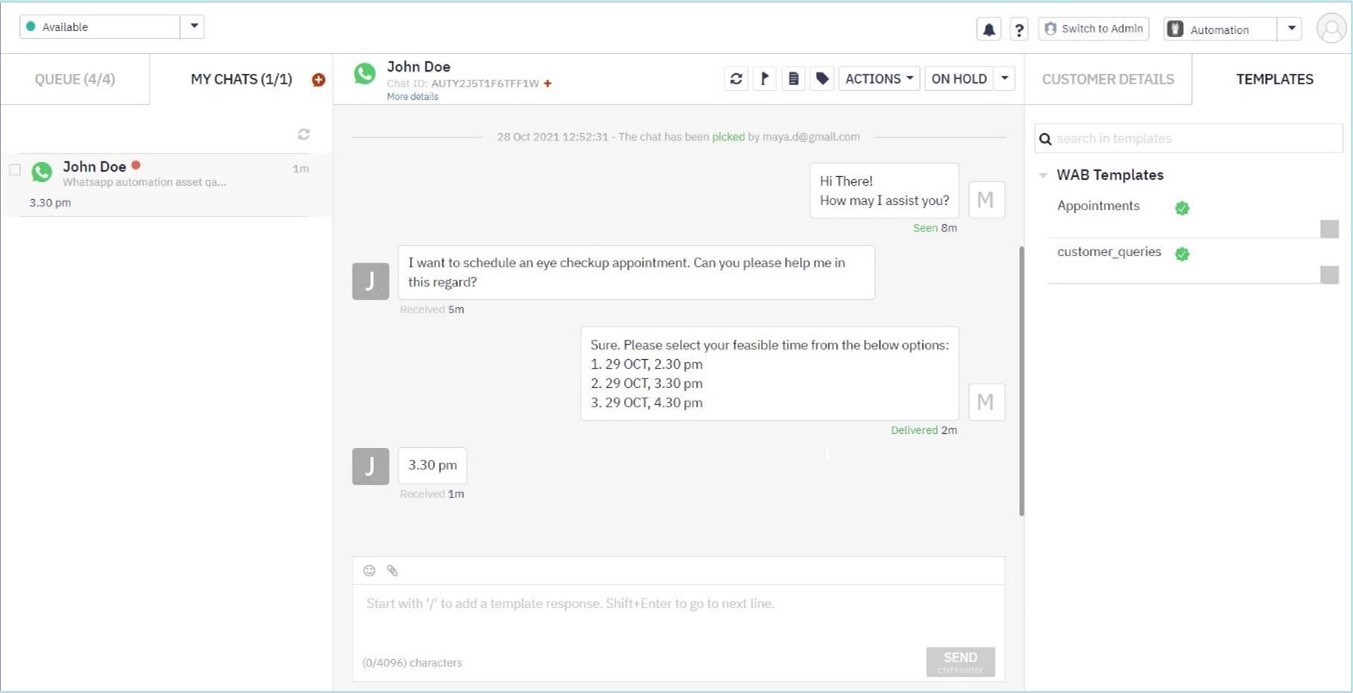
Category verification
To stay updated with the latest enhancements, you must verify if the newest category has been assigned to the WhatsApp templates by navigating to the Edit templates screen for all the existing WAB registered templates.
When you click the Edit icon, the application will display a pop-up with the current and new category details to notify users of the update. It's a one-time activity that you must complete, as any templates that still need to be updated won't be delivered to the customer when agents try to use them in a conversation.

Note:
- You can create a message template in one language at a time. The WAB registered templates do not support multi-language templates. So, to create templates in multiple languages, you need to create a separate template for each language.
- You cannot edit the WhatsApp templates once they are submitted for approval, but you can edit the Teams excluded list.
- You can delete a message template, but WhatsApp does not allow you to create a template with the same name for four weeks.
For more information on how to Add and Configure Mobile Numbers in Facebook WhatsApp Manager, click on the below link
https://developers.facebook.com/docs/whatsapp/getting-started
Edit Template
To edit a template, follow these steps:
- Navigate to Client admin console > Assets > Templates.
- Select a Template group that contains the required template. All the templates in that Template group will display on the right side of the Templates screen.
- Click the Edit icon in the Actions column of a specific template.

The following screen appears.
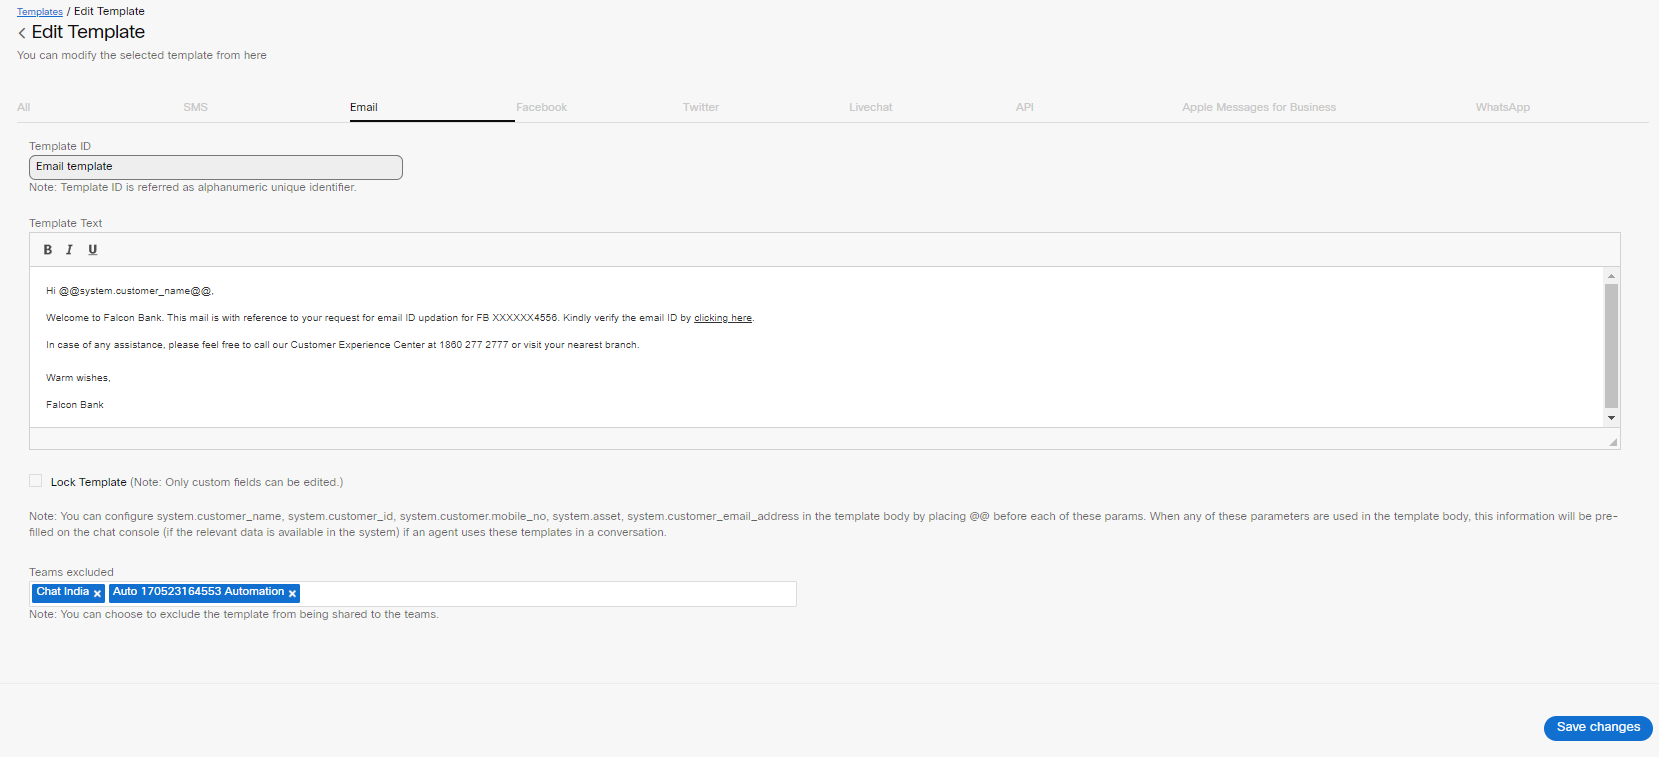
- Make the required changes to the template, and click Save changes.
The success message appears on the screen.
Edit WABA template
To stay updated with the latest enhancements, you must verify if the newest category
has been assigned to the WhatsApp templates by navigating to the Edit templates screen for all the existing WAB registered templates. You must perform this one-time activity for all the existing templates without fail.
To verify the WABA templates, follow these steps:
- Navigate to Client admin console > Assets > Templates.
- Select a Template group that contains the required template. All the templates in that Template group will display on the right side of the Templates screen.
- Click the Edit icon in the Actions column of a specific template.
The following pop-up window appears with the details of previous and new category details.
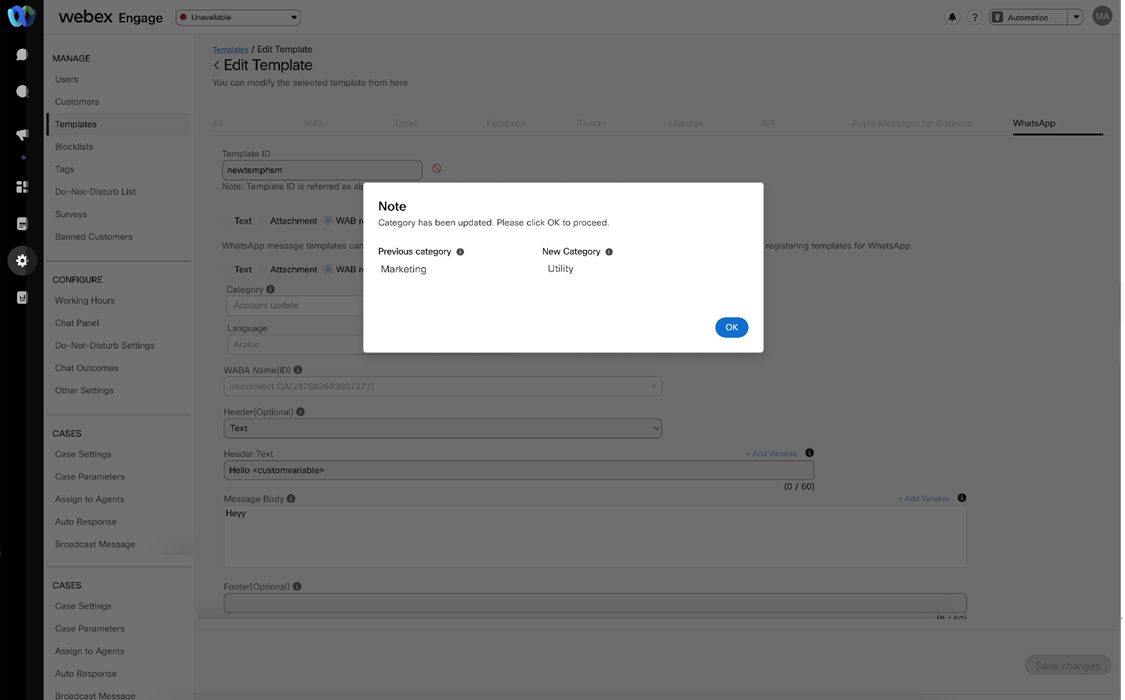
- Click Ok.
You must complete this process for all the existing WABA templates, as the templates that still need to be updated won't be delivered to the customer when agents try to use them in a conversation.
Delete Template
To delete a template, follow these steps:
- Navigate to Admin Console > Assets > Templates.

- Select a Template group in which you want to delete a template.

- Click the Delete icon corresponding to the template name.
A confirmation popup window appears.
- Click Ok to delete the template.
The success message appears on the screen.
Note:
- Client Admins can reuse the deleted template names for new templates. However, Webex Engage maintains old template details for reporting purposes. So, a soft delete action is performed while deleting the templates. The deleted template names are reflected in Template Usage Summary and Customers Response Time reports in the following format: Template Name - .
- Once you delete a WABA template, you cannot add a WABA template with the same name for four weeks from the date of deletion. This time frame holds good for only WABA templates. Where as, you can create a template with the deleted template instantly for other channels on the Webex Engage application.
Updated about 1 year ago
