User Management
Client admins can manage live and virtual agents, bulk upload users, search users, and even assign roles to them on the Users screen.
The client admin can add/edit/disable the following users:
Administrative users
- Client admin
- Group admin
Customer Care Executives
- Team Manager
- Live Agent
- Virtual Agent
- Analyst
Live agents
Add Live Agent
Follow these steps to add a live agent:
- Go to Users > Live agents.
- Click Add live agent on the top-right corner of the screen.
The following screen appears.
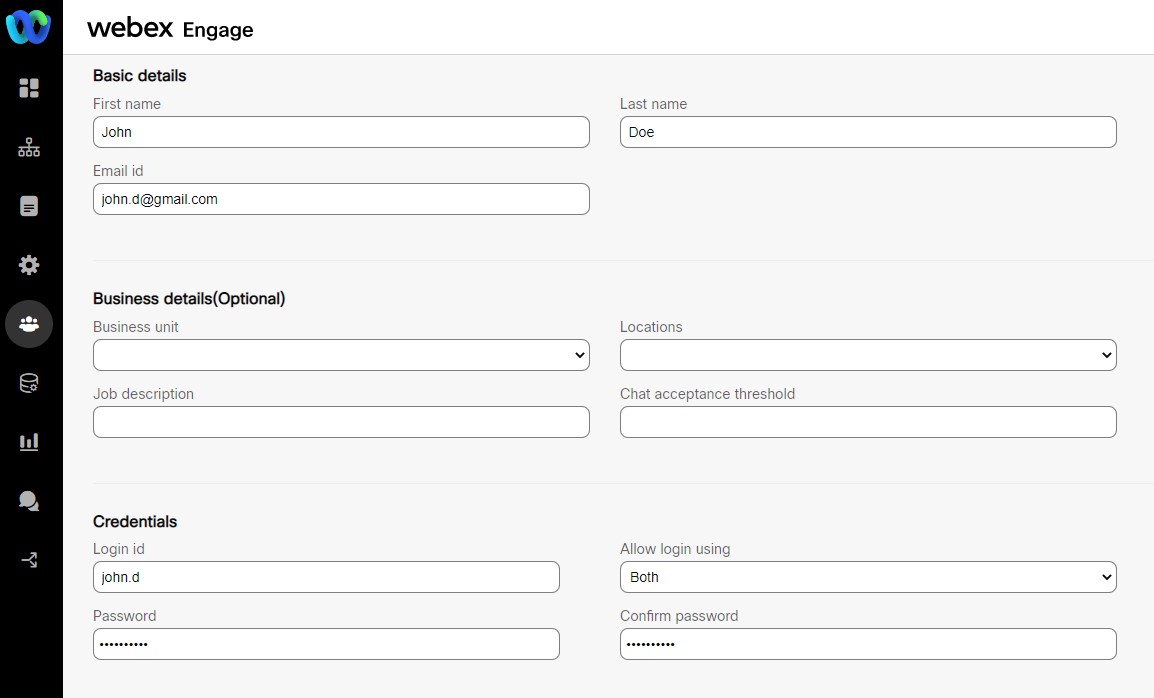
- Enter the Basic Details, Business Details, and Credentials.
Note
- You can use Unicode characters while configuring the first and last names and special characters like !#$ '*+-/=?^_`.{}~ in the Email and Login id fields.
- Webex Engage doesn't support % character in the email ids while sending a chat transcript.
Chat acceptance threshold: The chat acceptance threshold defines the number of chats that an agent can handle, and this value is set to 99 by default. An admin can change the threshold for each agent's profile. Beyond the configured threshold, agents will not be able to pick new chats from the queue, nor can they receive chats transferred by another agent or manager.
- Click Add Roles.

The following screen appears.
- Select the Role type (Administrative/Customer care) and Role (Client admin/Group admin) from respective drop-down lists.
Role Type – Administrative
When you select the Role type as Group admin, the Groups field appears. Select the groups that a group can access from the configured list.
Role Type – Customer Care
When the client admin selects the Role type as Customer care, the Role drop-down list appears with the following options:
- Agent
- Analyst
- Team manager
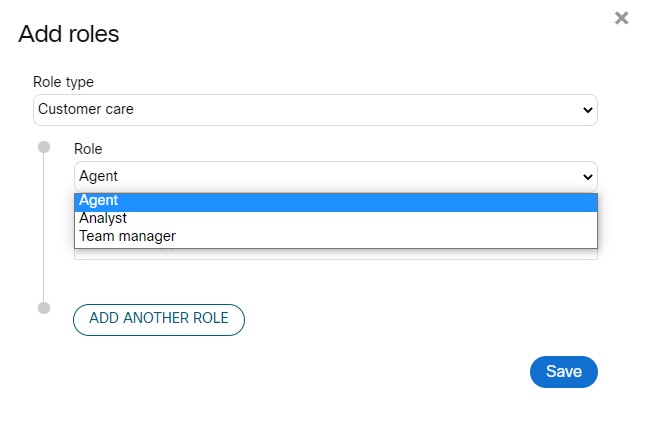
- Once you select a role type, the Team Name field appears. Select the Team Name from the list. Optionally, you can even select multiple teams.
- Click Save.
- To add multiple roles, click Add Another role and repeat the above steps.
Note
Under Customer care role type, you can add maximum of three roles.
- Select the Custom permissions from the Permission list drop-down.
- Click Add attribute under the Custom attributes section.
The following options appear on the screen.
- To further add attributes, click Add attribute and select the key and enter the value. To delete an attribute, click the delete icon in the Action column of a specific attribute.
- Click Submit to save the configured user details.
The success message appears on the screen.
Edit Live Agent
Follow these steps to edit a live agent:
- Go to Users > Live Agents.
- Click the Edit icon in the actions column of a specific live agent.
The following screen appears.
- Edit the required fields.
- Click Submit.
The success message appears on the screen.
Note:
Whenever an administrator edit's a user profile from Admin console, Customer care console, Bulk upload spreadsheet, API, or OPS console, the user whose profile got edited gets logged out of the Webex Engage application. The application logs an alert message to re-login to the application to proceed further.
Disable Live Agent
The client admin can disable a user's profile on Webex Engage. Disabling a user's profile prevents the user from logging into Webex Engage application. The profile of the user is retained and can be activated by the client admin.
Note:
If a user profile is created and was not in use, the profile will be disabled as per the settings configured in the password and account policy settings.
Follow these steps to disable a live agent:
- Go to Users > Live agents.
- Click disable (-) icon in the actions column of a specific live agent.
- In the pop-up window client admins are notified of any intelligent routing rules mapped to them thereby allowing them to make a conscious decision. Proceeding with this activity will result in the deactivation of routing rules associated with them (if any).
- Enter the disable reason in the Disable Reason text box. The Disable Reason is an optional field and the maximum character limit for this field is 150 characters.
- Click Disable.
The success message appears on the screen.
Note
The following scenarios come into play when a live agent is disabled:
- If a skill group has only one live agent assigned, then the IR rules that assign chats to this skill/events configured in individual assignee rules will also be disabled.
- If a skill group has multiple users under them, then the IR rule will not be disabled.
All the above-mentioned restrictions are not applicable if a live agent is disabled via API.
Upload Live Agents
The client admin users can bulk upload live agents by providing various details such as role types, chat acceptance threshold, business unit, locations, custom permissions, custom attribute key, custom attribute values, etc.
Follow these steps to upload live agents:
- Go to Client Admin Console > Users > Live Agents.
The following screen appears.
- Click Upload Live Agents.
The following screen appears.
- Click Download sample file here link.
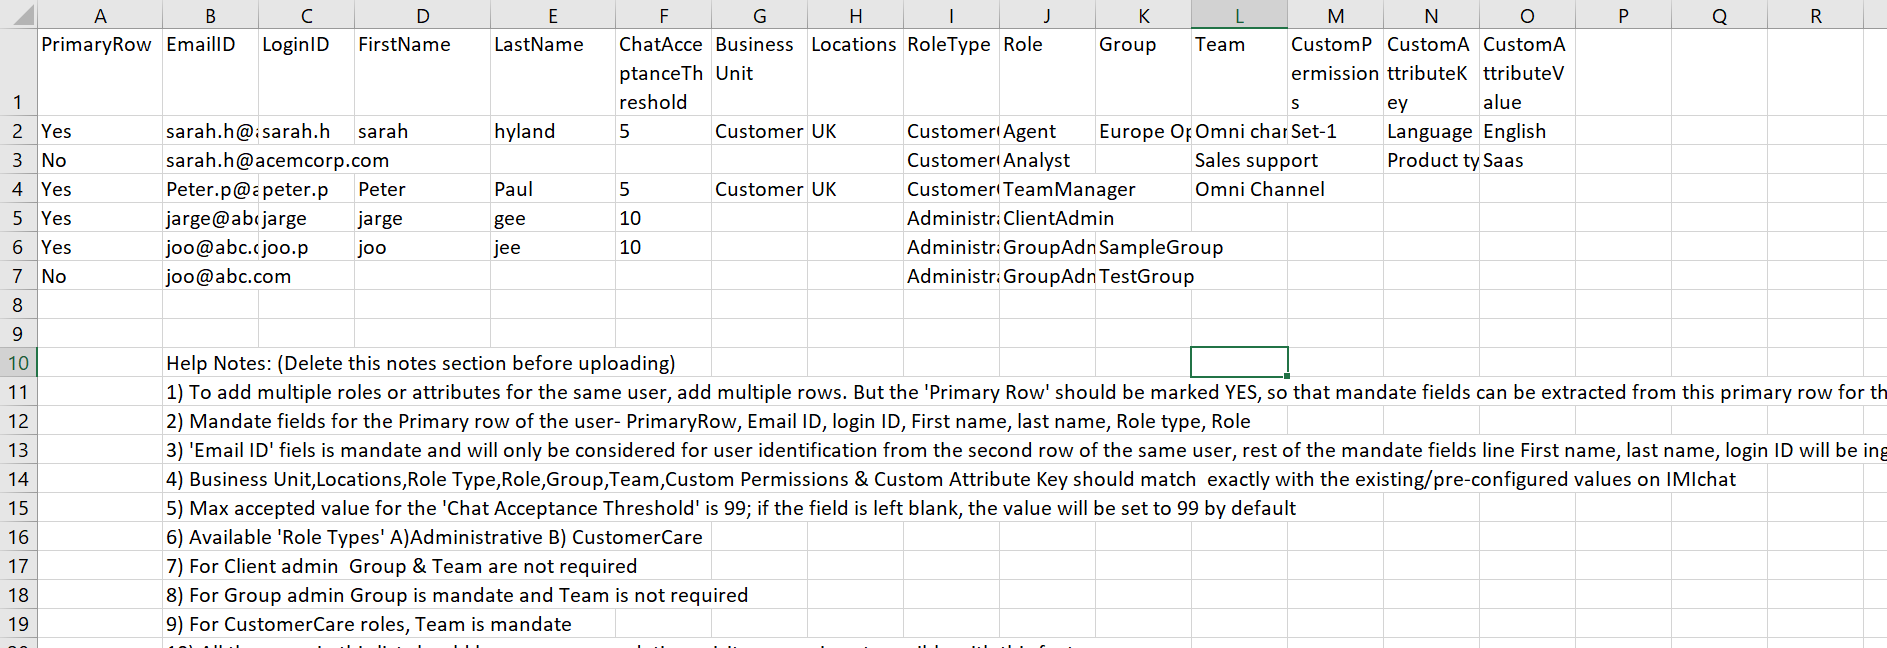
A sample file is downloaded. - Open the sample file and enter the following details in the respective cells:
PrimaryRow: Enter the value as Yes in this cell to extract mandatory fields from the primary row for a user with multiple role types.
Note:
To add multiple roles or attributes for the same user, add multiple rows.
EmailID: Enter the email id of the agent.
Note:
An EmailID is a mandatory field and is considered only for user identification from the second row of the same user.
LoginID: Enter the login id of the agent.
FirstName: Enter the first name of the agent.
LastName: Enter the last name of the agent.
ChatAcceptanceThreshold: Enter the chat acceptance threshold for the agent.
Note:
The maximum chat acceptance value for the ChatAcceptanceThreshold is 99. If you do not enter a value in this cell then its value is set to 99 by default.
BusinessUnit: Enter the business unit for the agent.
Locations: Enter the locations that an agent can initiate conversations with the customers in the configured locations.
RoleType: Enter the role type as Administrative or Customer Care,
Role: Enter a role for an agent.
Administrative role type has the following roles:
- Client Admin
- Group Admin
Note:
- For a Client Admin role type, you need not enter Group and Team Name values in the respective cells.
- For a Group Admin role type, group name is mandatory and you need not enter the Team Name value in the respective cell.
Customer Care role type has the following roles:
- Agent
- Analyst
- Team Manager
Note:
The Team is a mandatory field for the Customer Care role type users. So, you must enter the team name in the respective cell.
Group: Enter the group name.
Team: Enter the team name.
CustomPermission: Enter the custom permission set name to restrict user access in a team.
CustomAttributeKey: Enter the custom attribute key to logically group users with similar attributes into skills.
CustomAttributeValue: Enter the custom attribute value to logically group users with similar attributes into skills.
Note:
The BusinessUnit, Locations, RoleType, Role, Group, Team, CustomPermissions and CustomAttributeKey cell values must match exactly with the existing/pre-configured values on the Webex Engage application.
Note:
- You must use the Upload Live Users spreadsheet to upload only new users information.
- Webex Engage does not support updating the existing user details using the Upload Live Users spreadsheet.
- Delete the help notes in the .csv file before uploading it.
- Save the file.
- Click Upload File.
Upload the file only in the .csv format. - Click Proceed.
The file processing message appears on the screen.
- Click Track Upload Status on the top-right corner of the Upload Live Agents screen to view the status of the files that you uploaded.
You will navigate to the following screen.
- In the Show Activity Date Range filed, select a date range and click Apply.
- Click Search.
The relevant search results will appear on the screen. - Optionally, enter a file name in the Search field to filter the table results.
The Status column displays the status of the uploaded file as Completed, Completed with errors, or Failed. - If the uploaded file fails the validation or gets uploaded with errors, you will view a report in the Actions column.
- Click the Download Report in the Actions column.
- Fix the errors in the file, based on the report's findings.
- Return to Step 7 to upload the file again.
Note:
After a successful user upload, all the users will receive an auto-generated email containing a link to set a password for their account. The password configuration link available in the auto-generated email is active for 24 hours. Similarly, users will receive an email alert even when they attempt to update or reset their passwords.
User Profile
Once an administrator configures a user, the admin and customer care users (client administrator, group administrator, team manager, analyst, and agent) can view the profile details on the user's Profile Page. The users can view the profile details and configure a time zone and change the profile password from this page.
Navigating to the profile page
You can navigate to the profile page by clicking on the Profile icon available on the top-right corner of the Admin or Customer Care console. Select the Profile from the drop-down list.
The following profile page appears.
Time Zone
On the profile page, you can change the existing time zone by searching and selecting a time zone from a predefined list.
The time zone value is a combination of (UTC ± offset value), time zone abbreviation, and region.
Example: (UTC - 6:00) Central Time (US & Canada).
Search a Time Zone
You can directly type the time zone name in the Time Zone drop-down to search a time zone quickly rather than scrolling through the exhaustive time zone list. The time zones are sorted in the ascending order of their offset values. The time zones that share the same offset value are sorted alphabetically.
Note:
- In general, the default time zone value remains tenant time zone and is highlighted in grey for easier identification.
- The user time zone takes precedence over the tenant time zone.
Notifications
Webex Engage allows client admins to configure browser and sound notifications for various chat notifications on the Profile screen.
You can configure browser and sound notifications for the following events:
- Chat assignment
- Chat movement from My Chats
- New message
- Supervisor actions
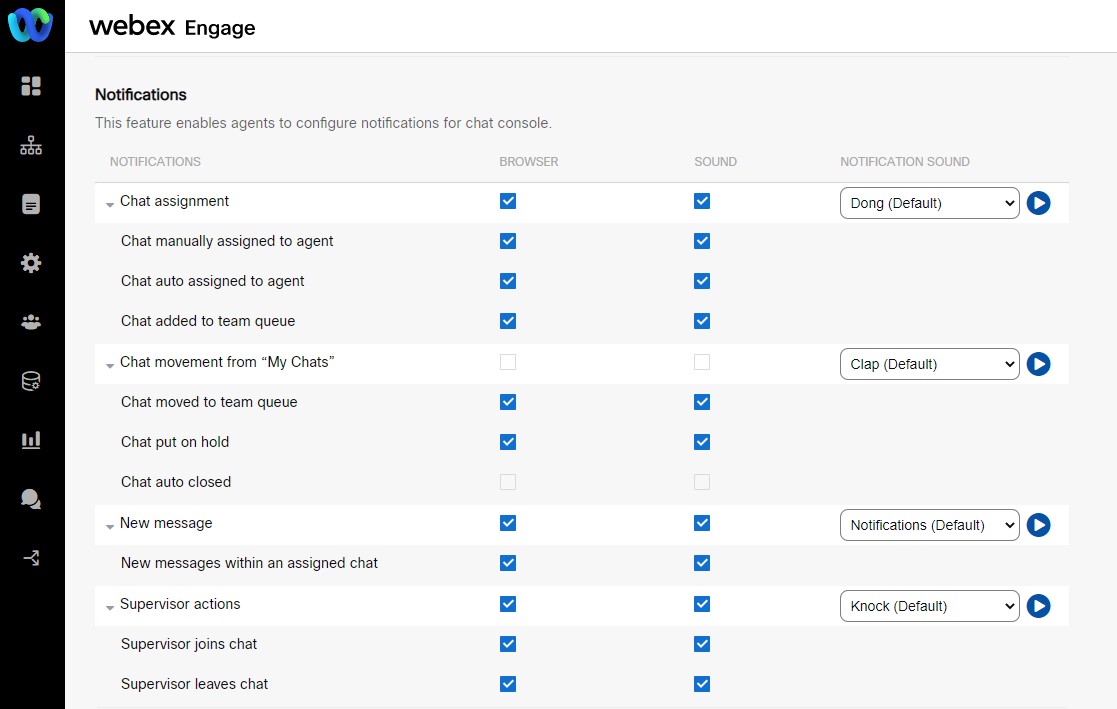
To configure browser and sound notifications, follow these steps:
- Click on the Profile icon available on the top-right screen of Admin and Customer Care consoles.
- Select Profile from the drop-down list.
You will navigate to the profile screen.
- Go to Navigation section.
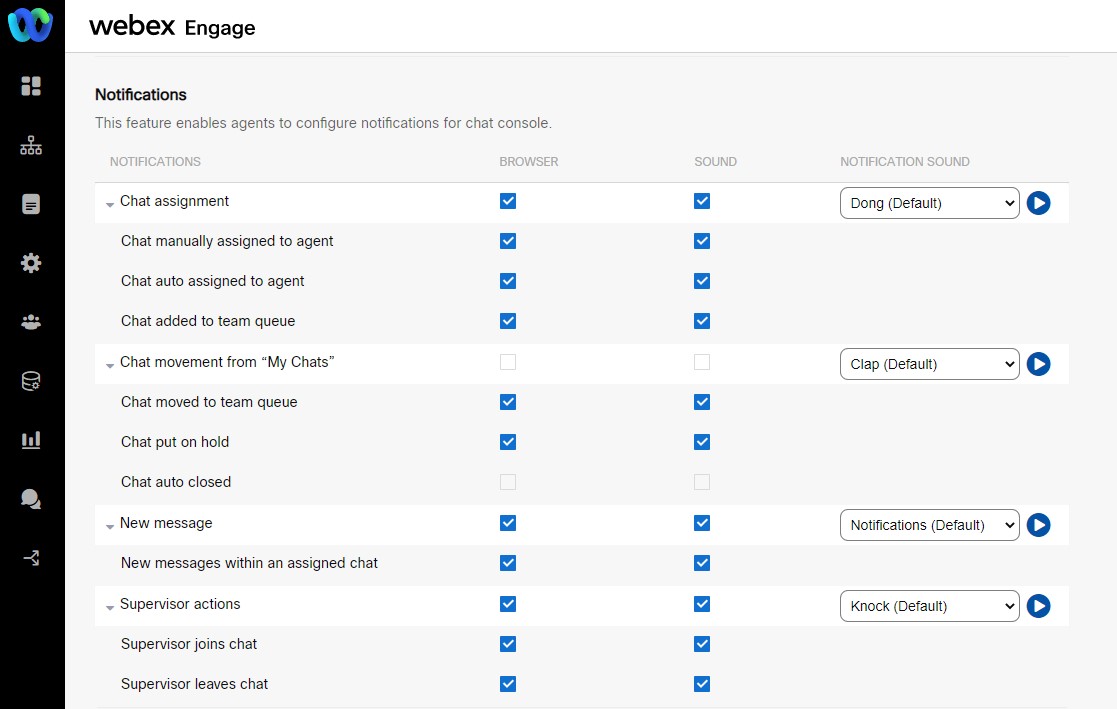
- Select the required Browser and Sound notification check boxes beside each event.
- Select the required Notification sound from the Notification Sound drop-down list. Additionally, you can play each sound notification to experience the sound type before configuring it for an event by clicking the Play icon next to the notification drop-down.
- Click Save.
Virtual Agents
Webex Engage allows client admins to add a chatbot (developed on Webex Bot or any other external
platform) or any form of an automated response engine as a special type of user called Virtual Assistant. Virtual agents are 24x7 logged in and available to accept chats. Thus, offering superior customer service experience as being there during global time zones is an important aspect. These agents offer consistent customer experience on any digital channel.
Add Virtual Agent
To add a Virtual Agent, follow these steps:
- Go to Users > Virtual Agents.
The following screen appears.
- Click Add Virtual Agent. The following screen appears.
- Enter Basic Details.
- Enter Endpoint Details.
- Select the Teams from the Team Settings drop-down list.
- Click Add Event.
The following pop-up window appears.
Note:
The client admin can choose/ignore to configure to subscriptions for a virtual agent. If subscribed, the admins should enter an endpoint URL for the subscribed events that will be used to notify the bot when the subscribed events are triggered.
Also, the existing virtual agents on the Webex Engage platform will not be impacted by the new addition.
- Select the required events and click Subscribe.
- Configure a fallback URL by selecting the Set fallback URL checkbox and enter the URL in the Webhook URL field.
- Optionally, you can transfer a chat to the default team by selecting the Transfer the chat to the 'default team' of the asset checkbox.
- Add required Custom Attributes (optional field).
- Click Add Attribute to further add attributes (optional field).
- Click Delete icon to delete an attribute.
- Click Submit.
The success message appears on the screen.
Note:
Unlike live agents, a virtual agent cannot have multiple roles on Webex Engage.
Webex Engage does not allow virtual agents to log in manually with their credentials. If a virtual agent tries to log in, Webex Engage application throws an error message Virtual agents are not allowed to log in to the application.
Edit Virtual Agent
Follow these steps to edit a virtual agent:
- Go to Users > Virtual Agents.
- Click the Edit icon in the actions column of a specific virtual agent.
The following screen appears.
- Edit the required fields and click Submit.
The success message appears on the screen.
Note:
Once a live/virtual agent is disabled, all the active chats assigned to the disabled live agent/virtual agent will be moved to the team’s queue.
Disable Virtual Agent
The client admin can disable a virtual agent's profile on Webex Engage. Disabling a user profile prevents the virtual agent from logging into Webex Engage platform. The profile of the user is retained and can be reactivated by the client admin.
Follow these steps to disable a virtual agent:
- Go to Users > Virtual Agents.
- Click Disable (-) icon in the actions column of a specific virtual agent.
- In the pop-up window client admins are notified of any intelligent routing rules mapped to them thereby allowing them to make a conscious decision. Proceeding with this activity will result in the deactivation of routing rules associated with them (if any). This would also ensure that chats are not routed to these virtual agents.
- Click OK.
The success message appears on the screen.
Note:
The following scenarios come into play when a virtual agent is disabled:
- If a skill group has only one virtual agent assigned, then the IR rules that assign chats to this skill/events configured in individual assignee rules will also be disabled.
- If a skill group has multiple users under them, then the IR rule will not be disabled.
All the above-mentioned restrictions are not applicable if a virtual agent is disabled via API.
Re-enabling Live Agent/Virtual Agent
Re-enabling a disabled live agent/virtual agent will NOT revoke the existing routing rules on the live agent/virtual agent. Nevertheless, the skills configured for these live agents/virtual agents will stay intact.
Download and Search Live Agent/Virtual Agent
The administrative users can download users from both Live Agents and Virtual Agents tabs via Download All button available beside Add Live Agent and Add Virtual Agent buttons respectively.
The users can even search and quickly view the required results and download them with the help of predefined filters i.e. filter via role (administrative/customer care) or status (active/inactive) or query or combination of all from the users list. After applying required filter, they can click Download Filtered button to download the results.
Updated over 2 years ago
