
LiveChat Channel
Webex Engage's LiveChat channel facilitates businesses to engage and support their website visitors and customers. Customers can initiate a LiveChat with an agent once messages are created as chats on Webex Engage.
Webex Engage's LiveChat channel supports the following features:
- Typing indicators on both agent and customer widgets
- Rich Messages: Quick replies and Carousels
- File sharing via attachments
- Support for emojis on the widget
- Customizable widget as per website appearance
- Ability to add the domain names on the widget to the allowlist
- Ability to ban customers
- Support for notification sound
- Ability to send chat transcripts to configured email IDs
How LiveChat Channel Works
Once the LiveChat widget script is added to a web page, the widget icon appears in the bottom-right corner.

Upon clicking on the icon, the web widget opens. The customer can enter all the mandatory fields and initiate a conversation with an agent.

A chat is created on Webex Engage, and an agent can start responding to the customer from the Webex Engage Customer Care Console. The agent can view the details (Name, Email ID, or Mobile Number) entered by the customer while initiating the chat.
In addition, the agent can also view the domain and the website page from which the customer initiated the chat.

Note
- The LiveChat widget is supported on iOS (6s and above) and Android mobile devices.
- iOS supported browsers: Chrome, Firefox, and Safari.
- Android supported browsers: Chrome and Firefox.
- The agents can view the pre-chat responses in the chat thread on the Chat Console once the customer enters all the required fields of the pre-chat form on the LiveChat widget.
- When the customers end the conversation on a LiveChat widget, the composer will be disabled, and they cannot reopen the closed conversation. A banner message, "This chat has been closed," appears on the widget.
- The customers can view the pre-chat form on the LiveChat widget even when they switch between the threads.
How to set up a LiveChat Channel
The user must be a client admin to set up a LiveChat channel on Webex Engage.
The client admin should follow the below steps to create a LiveChat asset:
- Click the Floating Action Button on the bottom-right corner of the Admin Console.
- Click the Assets icon, select LiveChat from the asset selection window, and click Add.

The configuration of LiveChat asset is covered within three sections:
- General Settings
- Website Settings
- Installation
General Settings
Follow these steps to configure general settings on the LiveChat asset:
- Enter the Asset Name.
This is only for internal use and will not be displayed anywhere to the customer. Once saved, this name cannot be updated by the client admin. - Choose a Default Team and a List of Teams across which the LiveChat widget should be shared.

- Show chat conversation history to the end user on re-login: The client admins can turn ON/OFF this toggle button to SHOW/HIDE previous chat conversation history to customers on re-login.
- Allow customers to request chat transcripts from the LiveChat widget: The client admins can turn ON/OFF this toggle button to enable/disable customers from requesting chat transcripts from the LiveChat widget.
Additionally, admins can configure either agent name or generic alias in the chat transcript as the agent identifier to protect the privacy of their agents as needed.

- Clear threads at end user's widget: The client admins can turn ON this toggle button to clear chats when the customer clicks End chat, navigates to a different website, or closes their browser.
Note:
Any messages delivered after clearing the chat transcript will not be shown to the customers.
- Close chats on the server upon chat abandonment: The client admins can turn ON this toggle button to automatically close chats when the customer abandons the chats.

- Notification sounds: The client admins can turn ON this toggle button to play a chime sound to the end user when they receive a new message.
- Turn on the Suppress working hours and agent presence checks toggle button to make the widget available 24*7 regardless of whether the team is out of scheduled working hours or no agents are available.
- Click Save Changes.
A success message appears on the screen.
Website Settings
Webex Engage provides an option to use a single LiveChat widget across multiple websites. The appearance of the widget can be unique for a website.
To configure a website, click the Add Website button on the top-right corner of the screen.

General Settings
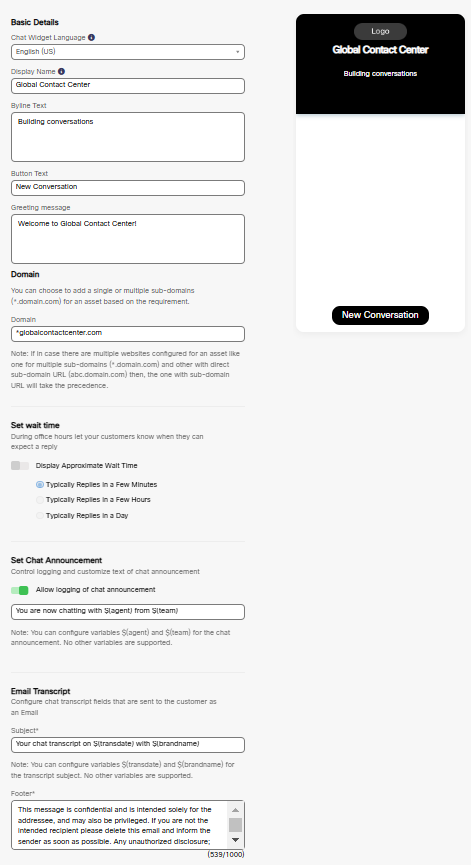
Configure the sections within the website settings by following the instructions below:
- Chat Widget Language: Select a language from the drop-down list.
After configuration, all the announcements, action button text, error notifications, and chat transcripts will be displayed in the configured language on the widget. However, the default language remains English.

Note
Please note that Webex Engage doesn't translate the conversation to the configured language on the end customer widget.
- Display Name: Enter Name, which should appear on the widget's header.
- Byline Text: Enter Support Text, which should appear below the header.
- Button Text: Enter the call-to-action (CTA) button text field. The maximum number of characters allowed in the button text field is 30.
If you don't configure the text, you will view New Conversation as a default text on the end customer widget. - Greeting message: Enter the personalized greeting message that customers will see on the end customer widget. The maximum character limit for this field is 500.
- Domain: Enter Domain Name or Sub-domain Name on which widget has to appear.
Note:
- When the number of sub-domain names are high, the "*" based domain patterns will significantly reduce the time taken to individually list the widget on each sub-domain on a website.
- When a fully qualified sub-domain and an "asterisk" based sub-domain are added, the fully qualified sub-domain listing will override the generic "*" based one.
- Set Wait Time: Turn ON the set wait time toggle and select an approximate wait time radio button to display information to the customers about when they reach out on the widget.
- Set Chat Announcement: To configure personalized announcements on the widget, turn ON the Allow logging of chat announcement toggle under the Set Chat Announcement section.
- A text field appears under the Allow logging of chat announcement toggle.
- Compose the announcement using $(agent) and $(team) as variables in the text field. This announcement will log when an agent sends the first MT from the chat console. The maximum character limit for the chat announcement field is 100 characters, and this field accepts all Unicode characters.
In general, this toggle is turned ON for all the existing and new websites, and a default announcement, ""You are now chatting with $(agent) from $(team),"" will log on to the widget. - Email Transcript:
Subject: You can configure the LiveChat transcript subject using $(transdate) and $(brandname) parameters. The subject will render in the configured language mentioned in the Subject field under the Email Transcript section. The maximum character limit for this field is 100.
Footer: You can configure the footer in the language you wish to render in the Email Transcript by entering the required footer text in the Footer field under the Email Transcript. The maximum character limit for this field is 1000 characters. - Click Save changes. A success message appears on the screen.
Appearance
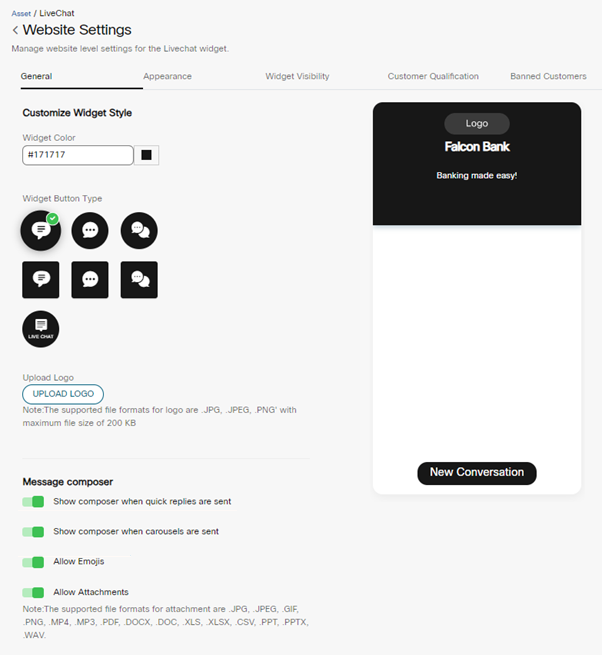
Configure the appearance of the widget on a website by following the steps below:
- Widget Color: Enter a color for the widget. Either choose from the color picker or provide a hex code
- Widget Button Type: Choose the chat widget button design that should appear on your website
- Logo: Upload a logo of your brand.
- Message Composer: The following settings can be controlled by the client admin on the LiveChat message composer
- Show composer when quick replies are sent: The client admins can turn ON this toggle to allow the customers to manually type their response if the suggested quick replies do not match the customer's intent.
- Show composer when carousels are sent: You can turn ON this toggle to allow users to compose new message in the composer when a carousel is sent. The composer is shown on the widget if the carousel is a URL.
- Allow Emojis: The client admins can turn ON this toggle to allow the customers to use emojis during the conversations on the widget. A default emoji list is provided on the widget. The customers can use any of the emojis available in the default list to communicate with the agents.

- Allow Attachments: The client admins can turn ON this toggle button to allow the customers to send attachments during the conversations on the widget.
- Confetti Background: The client admins can allow/restrict this option for the LiveChat widget. This setting will be applied on the widget refresh.
- Click Save Changes. A success message appears on the screen.
Note:
Webex Engage’s LiveChat Email Transcript designs can even inherit the appearance of the website brand, thereby allowing businesses to ensure a consistent customer experience. The design inherits the logo and base color configured on the allowlist website configuration as part of the widget settings.
Customers can request chat transcripts even when an agent is yet to join the chat and for the chats closed by the agents.
Widget Visibility
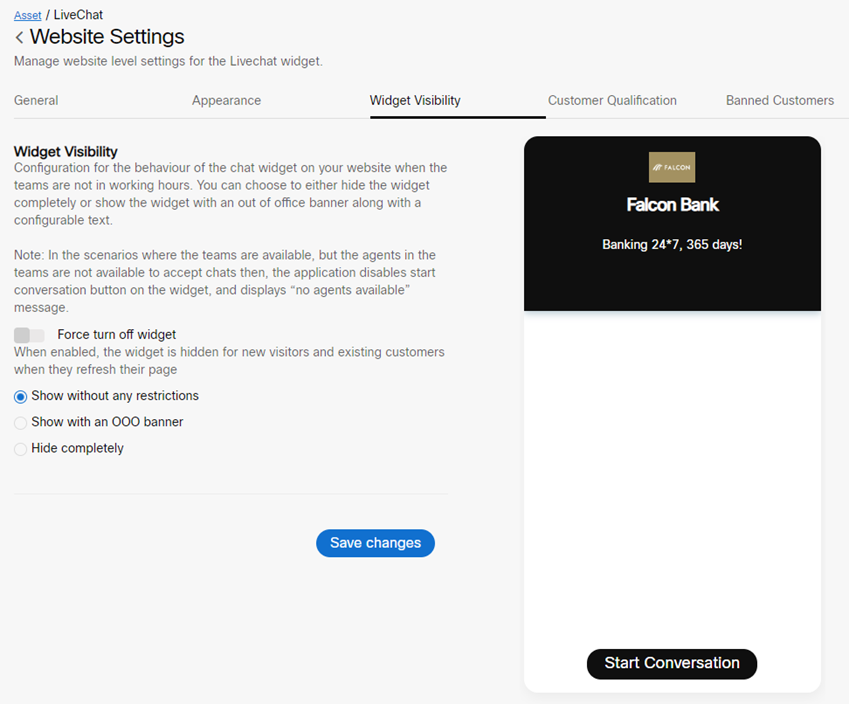
The client admins can configure the conditions to define the widget's visibility on the website.
The client admin can control the following settings under the widget visibility section:
- Force turn off widget: This option helps the client admins to Force Turn Off the LiveChat widget.
- Show without any restrictions: The client admin can select this radio button to show the widget on the website at all times, regardless of any restrictions set for widget visibility.
- Show with an OOO Banner: The client admin can select this radio button to show the widget with an out-of-office (OOO) banner message. The admins can configure the OOO message in the message composer text box.
- Hide completely: The client admins can select this radio button to hide the widget completely.
When the Force Turn Off toggle button is Turned ON, the Show without any restrictions, Show with an OOO banner and Hide completely radio buttons will be disabled.
When you hover over these radio buttons, you will view the Enabling Force turn-off widget, which will hide the widget completely message.
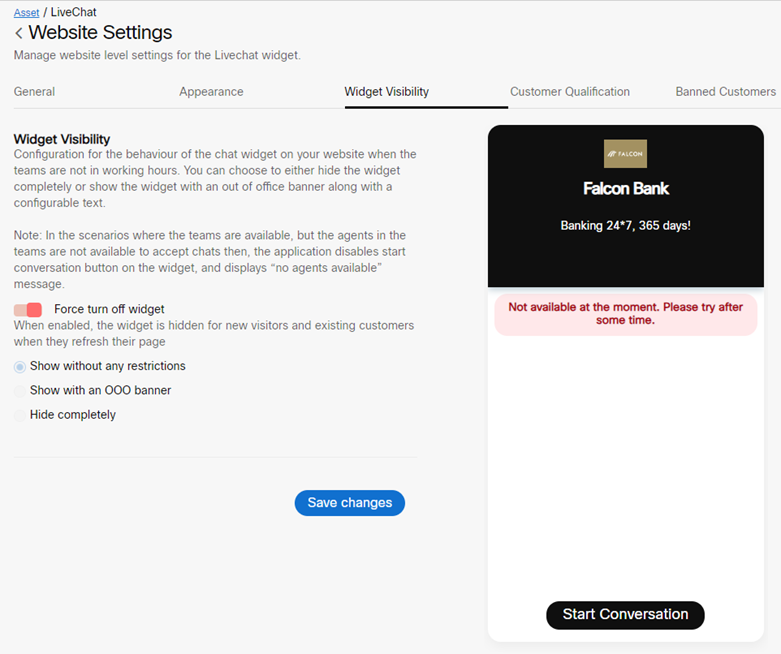
Existing customers can continue the chat conversation when this change is forced. However, the widget will be hidden if the customer exits the conversation, clicks the list of threads, or tries to view or refresh the web page.
Note
Any changes made in the widget settings will reflect only after refreshing the web page.
Customer Qualification
Customize the pre-chat survey form on the widget by configuring the customer qualification fields.
Welcome Text
A welcome message can be configured in the Welcome Text field to be displayed before displaying the form fields. The welcome text composer has various formatting options like Bold, Italics, Numbered Lists, Bulleted Lists, and Hyperlinks. All the formatting changes can be seen instantly on the preview on the right side of the screen.

Qualify Contact
Client admins can now qualify customers using a pre-chat form or a set of quick reply buttons.

Pre-chat Form
Follow these steps to add custom fields:
- Select the pre-chat form radio button to add custom fields. The following options appear.

- Click Add Field. The following pop-up window appears.

- Enter the Name of the field.
- Select a type of field from the Type drop-down list.

- If you select drop-down, a plus + icon appears, using which you can further add options to the list.

- Select Property from the drop-down list.

Note:
The properties like Name, Email, Mobile Number are categorized as Customer Property and message related fields as Chat Property.
- Mandatory Field: Enable this toggle to mark this field as mandatory in the pre-chat form.
- Description: Enter the description in the text field.
- Click Add.
The configured information is listed under the pre-chat form radio button. The preview can be viewed on the right side, as shown below.

Pre-chat form with sample custom fields
- Conditional Field: After configuring the first parameter, a setting conditional field can be enabled in the new and edit custom field screens.

- You can apply equal to and not equal to conditions and decide when to show the parameters on the pre-chat forms.


Edit Custom Field
Follow these steps to edit a custom field:
- Go to assets>LiveChat channel>widget visibility>customer qualification>qualify contact.
- Click the Edit icon in the actions column of a specific custom field. The following screen appears.

- Edit required fields and click Save.
A success message appears on the screen.
Delete Custom Field
To delete a custom field, click the Delete icon in the actions column of a specific field.
Quick Replies
Webex Engage supports quick replies on the LiveChat widget. These quick replies allow customers to initiate a chat conversation with an agent.
Follow these steps to configure quick replies on the LiveChat widget:
- Go to LiveChat asset >website settings>customer qualification.
- Select the Quick Replies radio button. The following options appear.

- Click the Add Another Quick Reply button. The following pop-up window appears.

- Enter Button Text and Payload.
- Click Add. The button will be listed under the quick replies section.
- Click the Add Another Quick Reply button to add quick replies. You can view the configured button list on the LiveChat preview on the right side of the screen.

- Click Save Changes.
A success message appears on the screen.
Note:
The admin can configure up to Seven quick replies to qualify a customer.
- Additionally, quick replies can also be viewed in chat history.


Note:
Webex Engage supports rendering quick replies onto the agent console using the Create Chat and Append Chat API endpoints (public). This capability comes in handy when having a pre-chat journey or a post chat journey on the LiveChat widget.
On receiving a message with quick replies, the widget’s message composer will be disabled, and the user will have to choose one of the quick replies to continue the conversation. This condition is valid only when show composer when quick replies are sent toggle (website settings>appearance>message composer) is disabled.
Unattended quick replies will persist on a thread even when the customer switches between the chats.
Quick replies and responses are auto-updated for both team managers and agents during group conversation (Supervise Chats).
Banned Customers
Client admins can ban the customers from contacting agents on the LiveChat widget by configuring their IP addresses in the banned customer list.

Add Banned Customer IP Addresses
Follow these steps to add banned customer IP addresses:
- Click Add IP on the banned customer's screen. The following screen appears.

- Enter IP Start Range, IP End Rage, and Reason for banning a customer in the respective text boxes.
- Click Submit. A success message appears on the screen, and the IP details will be listed on the banned customer's screen.

Edit Banned Customer IP Addresses
To edit a banned customer IP address, click on the Edit icon in the actions column of a specific customer, edit the required fields, and click the Save icon. A success message appears on the screen.
Delete Banned Customer IP Addresses
To delete a banned customer IP address, click on the Delete icon in the actions column of a specific customer. A success message appears on the screen.
Widget Installation
Follow these steps to install the widget on a website:
Livechat cookies consent
- Turn on the Take consent from the customer toggle to take manual consent from customers on Livechat widget.
- Click Copy to copy the widget script.
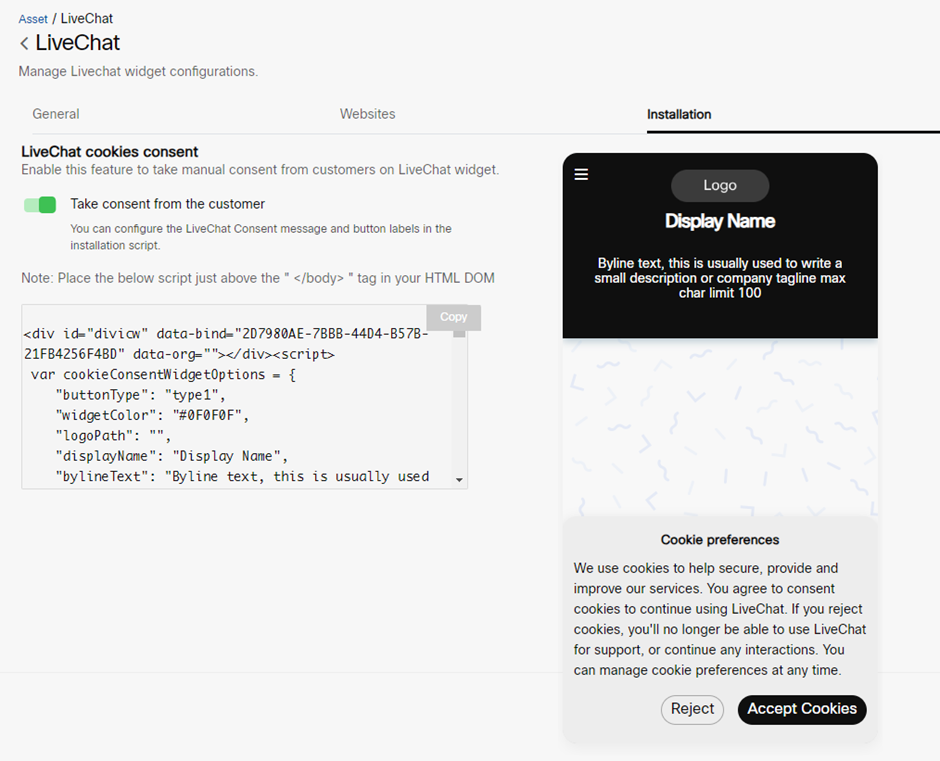
- Paste the script above the tag in the HTML DOM.

- The Webex Engage customers can pass custom chat fields while initializing a widget (in the init method). These custom chat fields and values will also be available in the other details section on the Chat Console. Custom attributes can also be updated via the update method, and the changes will be reflected seamlessly for the chats created after calling the update method rather than updating the existing values.
Note:
All the custom fields passed while initializing a widget should already be added/configured on the Webex Engage. In other words, one cannot dynamically create new custom fields through this functionality. Any custom fields that do not map to pre-configured fields but still passed during initialization will be ignored.
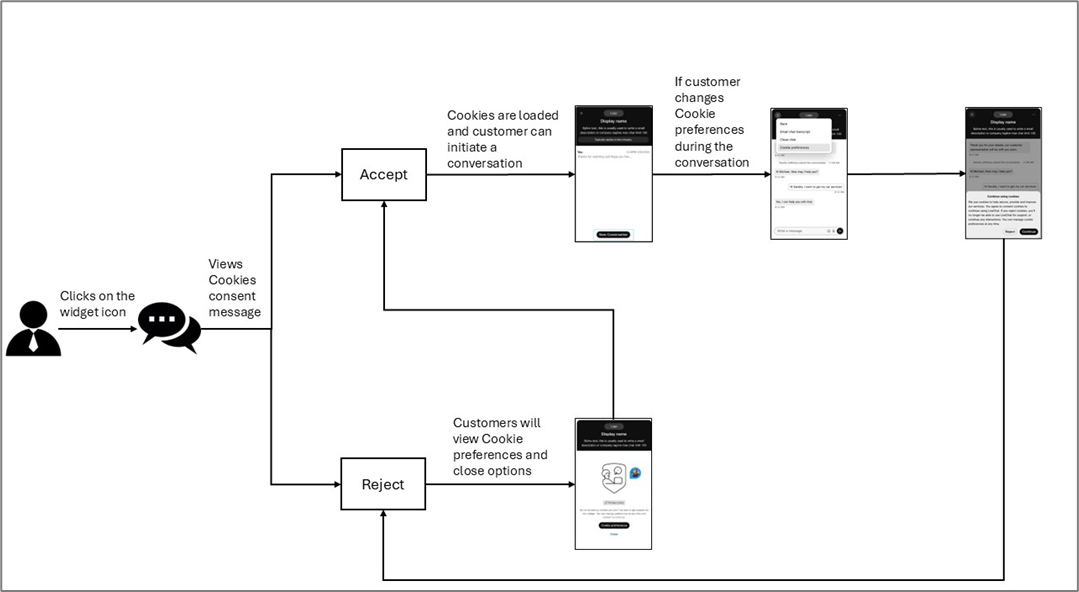
Customer experience on the Livechat widget
If Take consent from the customer setting is enabled for an asset, the customers will navigate through the following journey:
Note:
End customers will see a weak network connection banner on the Livechat widget when the connection drops.
Carousels
Webex Engage supports carousels on the LiveChat widget. Carousels are used at the beginning of a conversation as a menu or a discovery mechanism for the customer to understand the options. This feature allows users to view their options in interactive cards with an image, title, subtitle, and up to 3 buttons.
The application supports both text and text with image carousels. The maximum character limit for the carousel element is 100, and the element subtitle is 1000 characters. Additionally, you can apply various rich formatting styles to the element subtitle text of a carousel.
The visual cards of a carousel can belong to the following categories:
- Postback
- Web URL
Postback
Postbacks are used when a bot needs to receive an interaction back to the webhook to process further actions as part of its conversational automation journey. These interactions are relayed onto the webhook as an interactive response instead of a text message.
Web URL
Buttons can also re-direct users to an image URL for more signposting services. When clicking these buttons, the URL opens in a new tab, allowing the customer to continue their conversation with the widget.
Note:
Carousels are currently supported via REST APIs only as the predominant use cases for them lie with bots. They are not available for agents to send via Webex Engage’s Agent Console via the composer or templates.
Updated over 1 year ago