Proactive Messaging
Webex Engage's proactive messaging feature enables client admins to configure contextual, proactive messages to support customers and engage them in a conversation. These messages can be triggered based on visitor attributes such as the Current Page URL, Time Spent on the Page, etc., and HTML events (such as On Click, On Change, etc.) on the business’s website.
Configure a Proactive Message
Follow these steps to configure a proactive message:
- Navigate to Administrative Console > Proactive Messaging.
The following screen appears.
- Click Add Message.
The following screen appears
- Enter Name.
- Select the asset from the Asset Name drop-down list.
- The client admin has to configure the following sections, to configure a proactive message:
- Onset
- Construct Your Message
- Qualifying Trigger
- Publish Message
Onset
- Click Onset, the following screen appears
Here, client admin can define how to trigger an automated message. This can be achieved either by choosing Rules on Visitor Attributes or Native Website Events option.
Rules on Visitor Attributes: The client admin can define a rule in Rules on Visitor attributes field to trigger an automated message. A contextual proactive message is triggered if the visitors (on a business page) satisfy the conditions set in Rules on Visitor Attributes field.
- If Rules on Visitor Attributes option is chosen, the following options appear
- Define the Rules and click Save Changes.
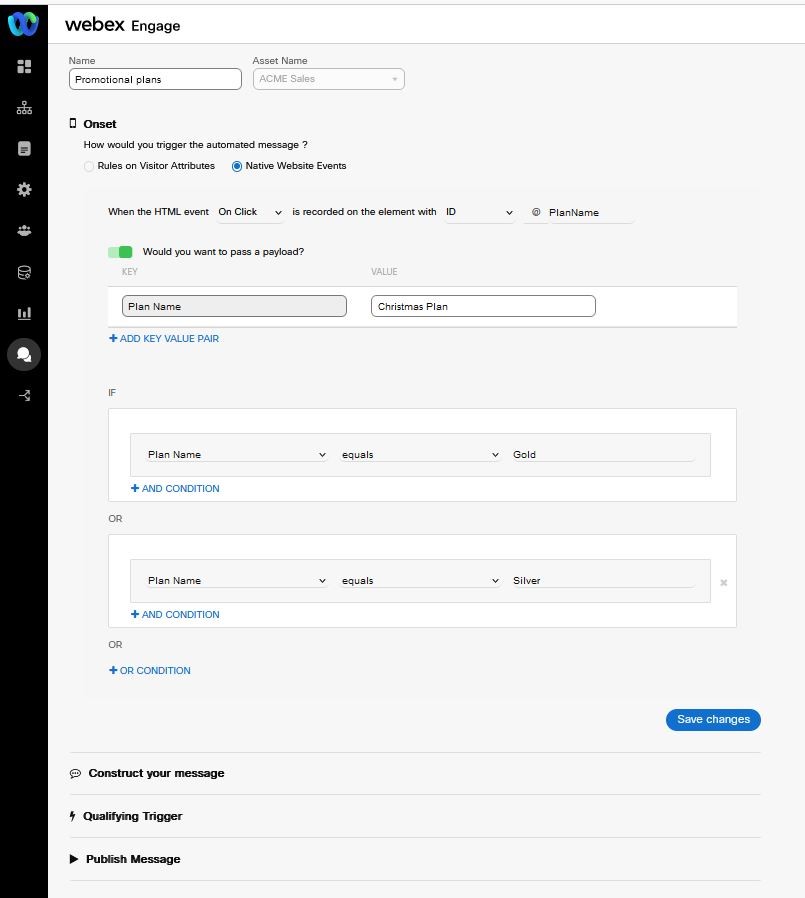
Native Website Events: The client admin can define HTML events (i.e. On Click, On Change, and On Hover) to trigger a proactive message based on visitor actions on businesses page. The client admin can also pass a pay load and define rules to trigger a proactive message.
- If Native Website Events option is chosen, the following options appear
- Choose how to trigger the event i.e. either by On Click or On Change or On Hover from the respective drop-down list.
- Choose element i.e. ID or Class from the respective drop-down list and enter the Attribute Value.
- To pass the pay load, toggle would you want to pass a payload? option. The following options appear
- Enter the Key Name and Value.
- Enter the Condition and click Save Changes.
Construct Message
To construct message, follow these steps
- Click Construct Your Message, the following options appear.
- Enter From Name (company name).
- Select Team from teams drop-down list.
Here, client admin can route the response either to Team Queue or Skill or Individual Assignee. - If Skill radio button is chosen, the following drop-down list appears. Select the required skill.
- If Individual Assignee radio button is chosen, the following drop-down list appears. Select the required agent.
- Compose the Message in the Message field.
- A message can be sent as Badge Notification, Portion of the Message, Full Preview of the Message, and Center Page Post.
- Badge Notification – This notification displays as a silent notification. The customers have to click on the notification to view the message.
- Portion of the Message – This notification displays only a portion of the message. The customers have to click on the ellipses to view the complete message.
- Full Preview of the Message – This notification displays complete message.
- Center Page Post – This notification displays message on the center of the page. Generally, this will be used to provide mandatory information to the customer.
- Click Save Message.
Qualifying Trigger
- Click Qualify Triggers, following options appears.
- Working Hours: Enable this option to check the availability of above chosen team.
- Agent Availability: Enable this option to check the agents presence.
- Slots Left : Enable this option to check the slots availability with the agents to attend the chats.
- Click Save Changes.
The success message appears on the screen.
Publish
To publish this message, click Save and Publish Changes.
The success message appears on the screen.
This proactive message will be Live and listed on the proactive messaging screen.
Note:
In case, the business experiences unexpected volume of chats due to these invites, the client admins can also deactivate the proactive messages by un-publishing the rule. Once the situation is sorted, the client admins can republish the rule.
Un-publish a Proactive Message
Follow these steps to un-publish a proactive message:
- Navigate to Administrative Console> Proactive Messaging.
- Click Edit in the actions column of a specific proactive message.
The following screen appears.
- Go to Publish Section and Click Unpublish Changes.
A confirmation message appears on the screen. The proactive message status will be changed from Live to Draft and listed on the proactive messaging screen.
The proactive message will be available to edit and this can be published as a new message.
Manage Proactive Messages
The client admins can Edit, Delete, and Search the proactive messages.
Edit Proactive Message
Follow these steps to edit a proactive message:
- Navigate to Administrative Console>Proactive Messaging.
- Click Edit icon. The following screen appears

- Make the required changes and click Save and Publish Changes.
The success message appears on the screen.
This proactive message will be Live and listed on the proactive messaging screen.
Delete Proactive Message
Follow these steps to delete a proactive message:
- Navigate to Administrative Console > Proactive Messaging.
- Click Delete icon in the actions column of a specific proactive message.
The success message appears on the screen.
Search Proactive Message
Navigate to Administrative Console>Proactive Messaging. Enter the Name in the search field. Based on search criteria the results will be listed on the proactive messaging screen.
Updated almost 3 years ago
