
Users
You can manage Live and Virtual users on the Users screen.
Further, you can manage the following user personas on the Users screen:
Administrative users
- Client admin
- Group admin
Customer Care Executives
- Team Manager
- Live Agent
- Virtual Agent
- Analyst
Live agents
Add live agent
To add a Live agent, follow these steps:
- Login to Webex Engage and click the Try new version button on the top-right corner of the application.
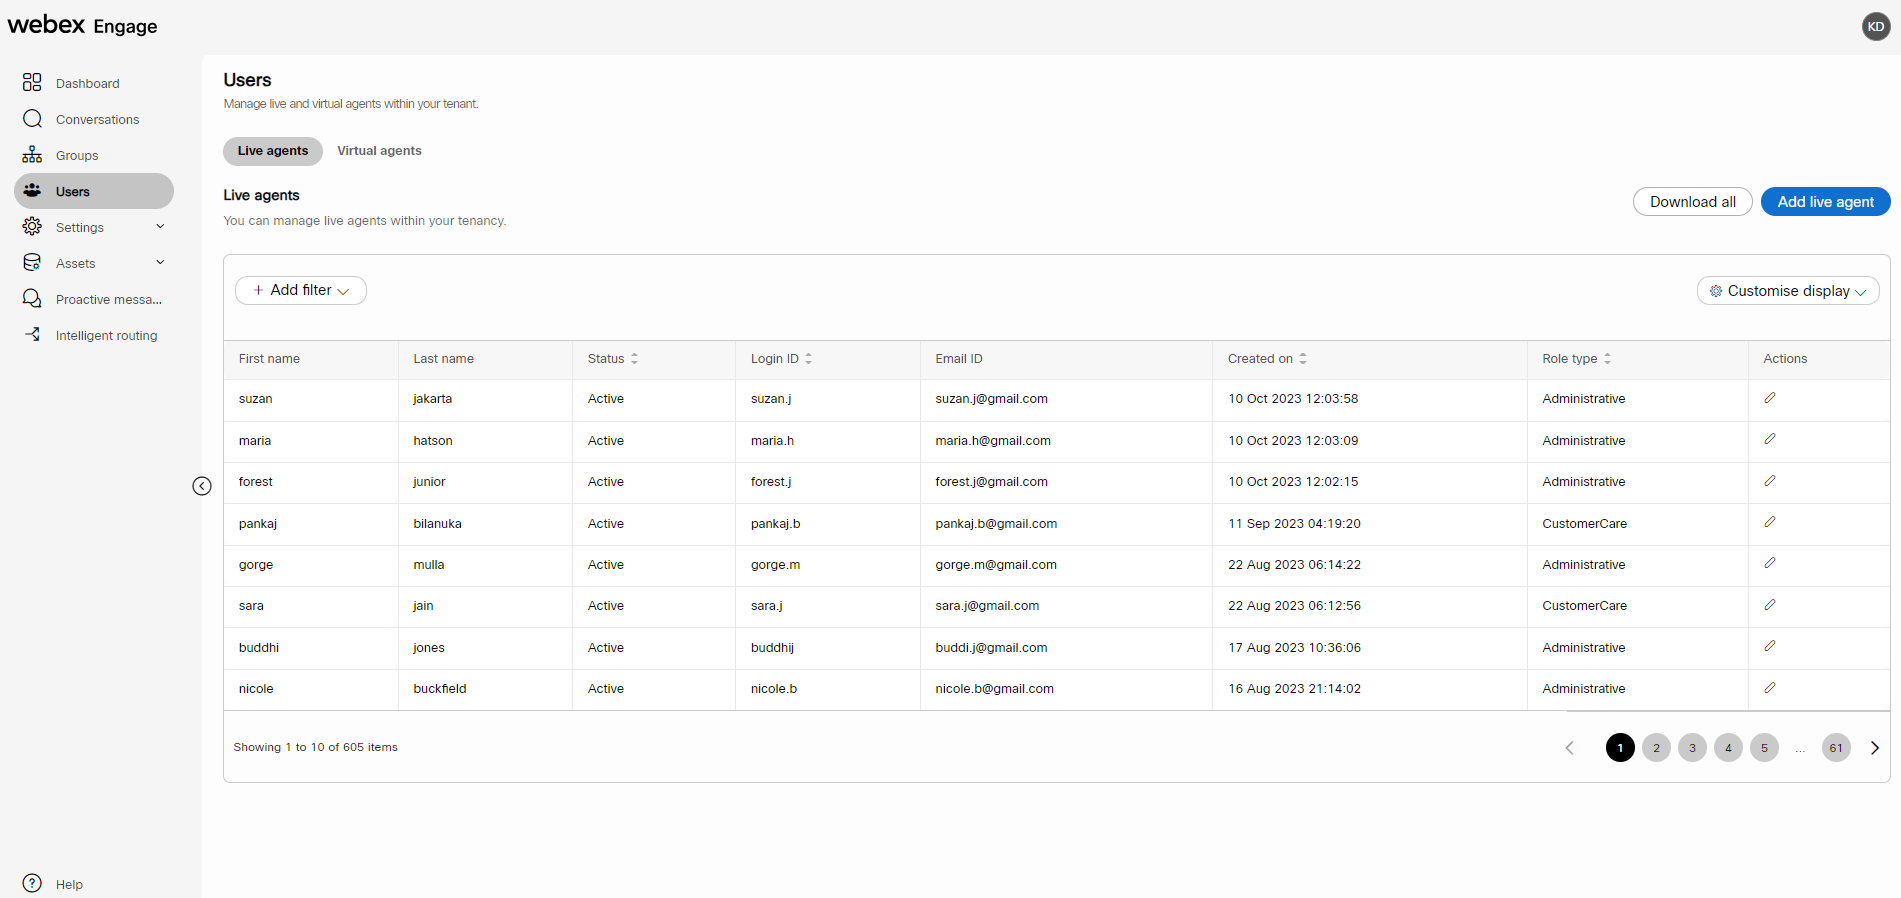
The Webex Engage React application will launch. - Click the Users menu on the left pane.
The following screen appears.

- Click the Live agents tab.
- Click the Add live agent on the top-right corner of the screen. The following screen appears on the screen.
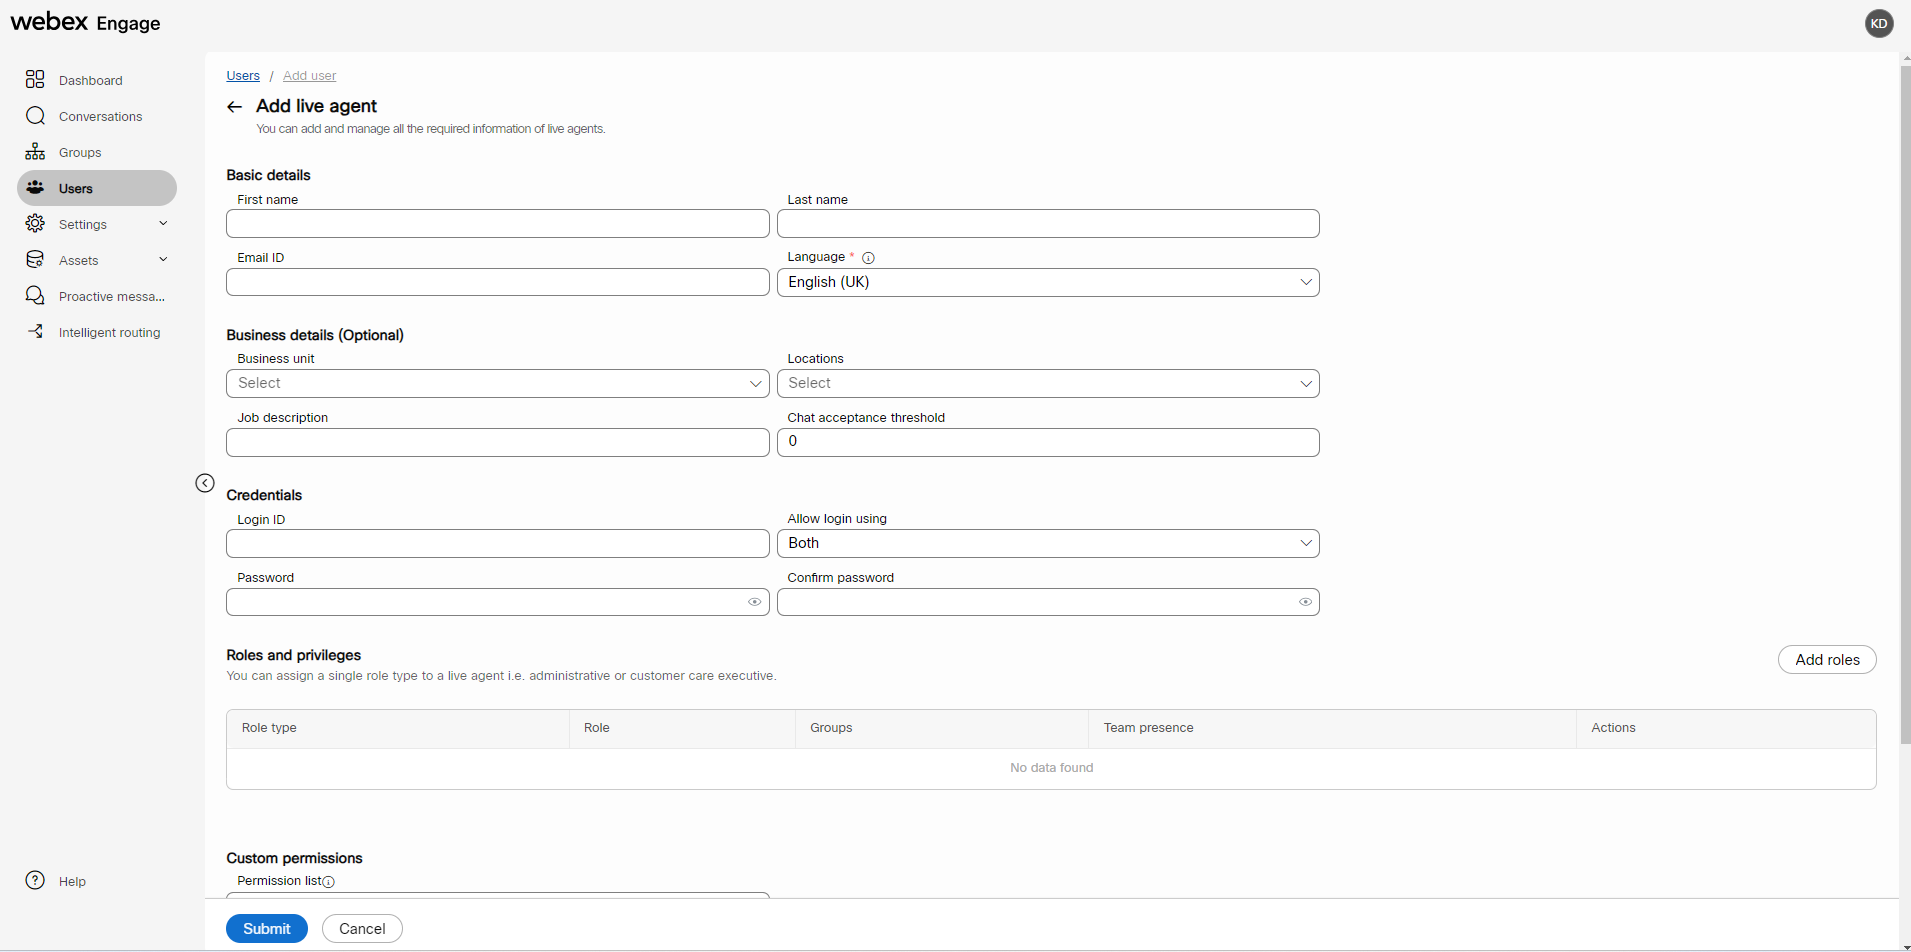
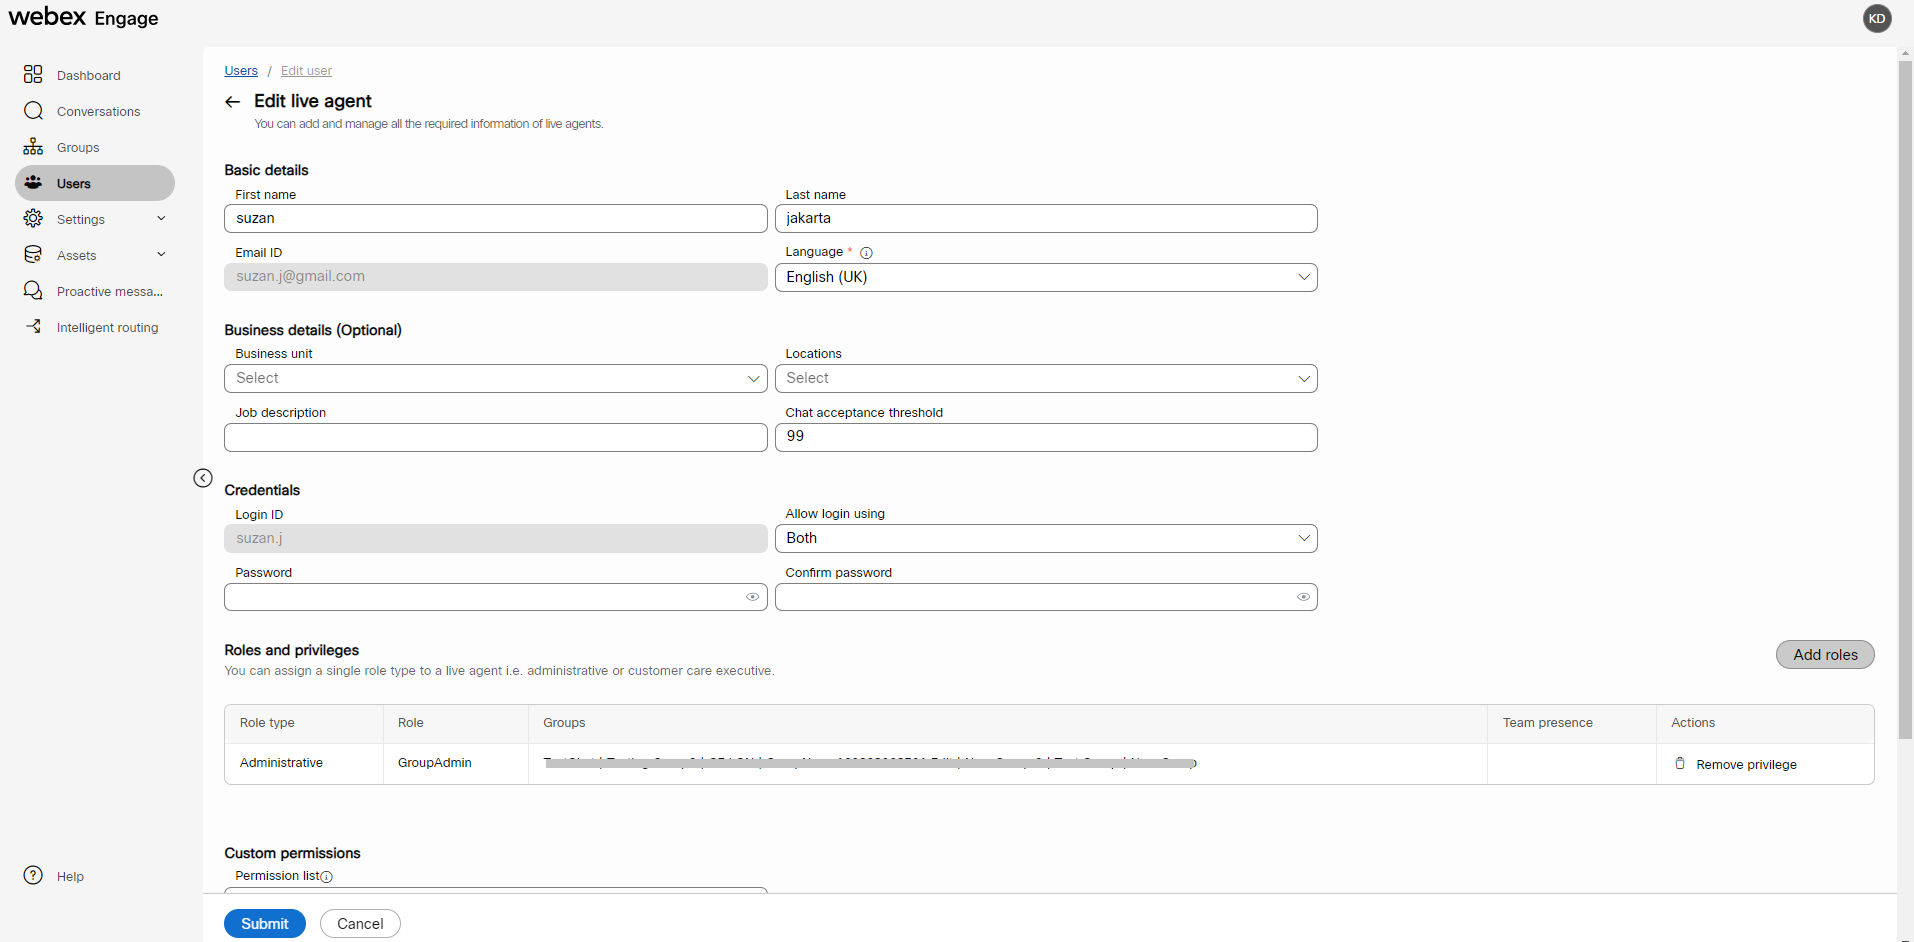
Basic details
- Enter the First name, Last name, and Email ID in the respective fields.
- Select a language for the user from the Language drop-down list. This setting will override the default tenant language.
Business details (Optional)
- Select the Business unit and Location from the respective drop-down lists.
- Enter the Job description and Chat acceptance threshold.
Chat acceptance threshold: The chat acceptance threshold defines the number of chats an agent can handle, and this value is set to 99 by default. Beyond the configured threshold, agents cannot pick new chats from the queue or receive chats transferred by another agent or manager. You can change the threshold for each agent's profile.
Credentials
- Enter the Login ID, Password, and Confirm Password.
- Select an option (Login ID, Email, or Both ) from the Allow login using drop-down.
Roles and privileges
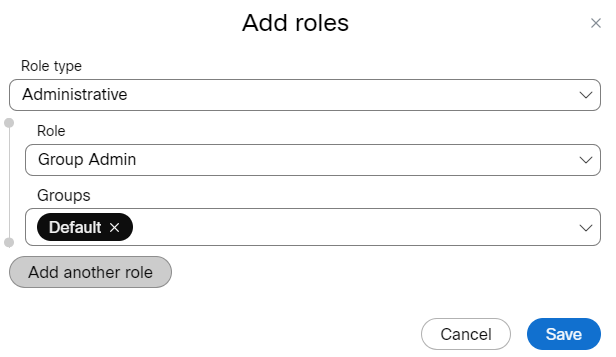
- Click Add roles. The following pop-up window appears on the screen.
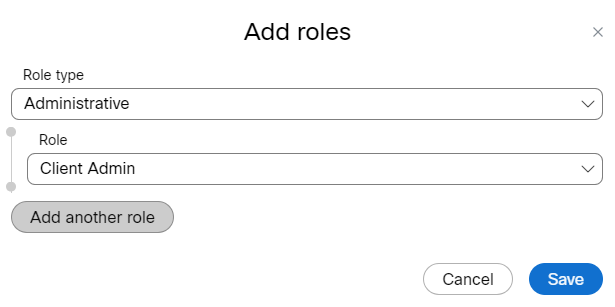
- Select the role type from the Role type drop-down list.
Role Type – Administrative
When you select the Administrative role type and role as Group admin, the Groups field appears. Select the groups that a group can access from the configured list and Save the settings.
Role Type – Customer Care
When you select the Role type as Customer care, the Role drop-down appears with the following options:
- Agent
- Analyst
- Team manager
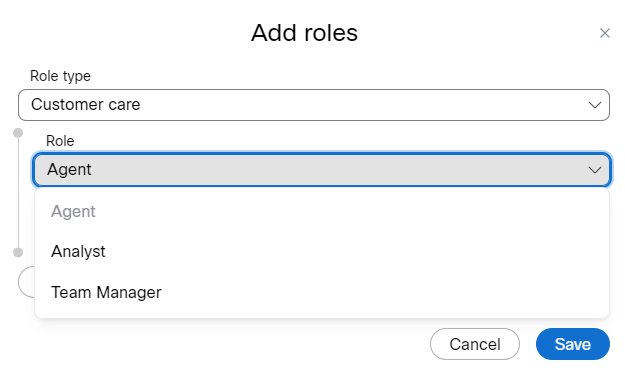
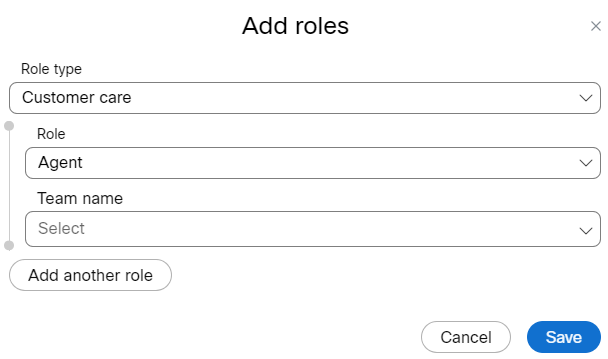
Select the Team name from the drop-down list and click Save.
To add multiple roles, click Add Another role and repeat the above steps.

Note
Under Customer care role type, you can add maximum of three roles.
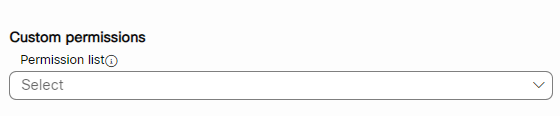
Custom permissions
- Select the Custom permission from the Permission list drop-down.
Custom attributes
- To add a custom attribute, click Add attribute.

The following options appear on the screen.

- Select Key from the drop-down list and enter the Value.
- To add attributes further, click Add attribute, select the key, and enter the value. To delete an attribute, click the delete icon in the Action column of a specific attribute.
- Click Submit to save the configured user details.
The success message appears on the screen.
Edit live agent
To edit a Live agent, follow these steps:
- Login to Webex Engage and click the Try new version button on the top-right corner of the application.
The Webex Engage React application will launch. - Click the Users menu on the left pane.
The following screen appears.
- Click the Edit icon in the Actions column of a specific live agent. The following screen appears.
- Edit the required fields and click Submit.
A success message appears on the screen.
Virtual agents
As a client admin, you can add a chatbot (developed on Webex Bot or any other external platform) or any form of an automated response engine as a special type of user called a Virtual agent. Virtual agents are 24x7 logged in and available to accept conversations. These agents offer consistent customer experience on all digital channels. Thus, an important aspect is offering a superior customer service experience as being there during global time zones.
Add virtual agent
To add a virtual agent, follow these steps:
- Login to Webex Engage and click the Try new version button on the top-right corner of the application.
The Webex Engage React application will launch. - Click the Users menu on the left pane.
The following screen appears.

- Click the Virtual agents tab.
The following screen appears.
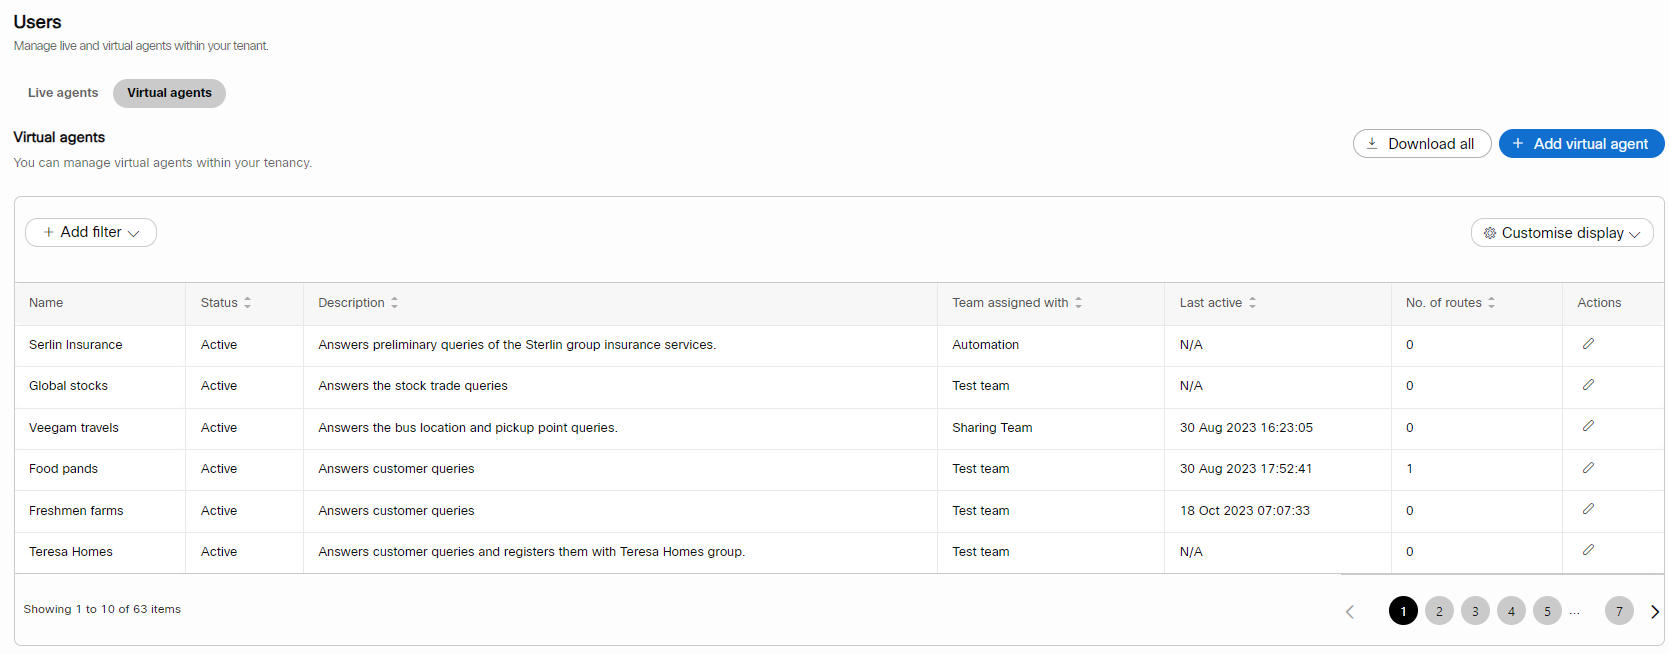
- Click the Add virtual agent on the top-right corner of the screen.
The following screen appears.

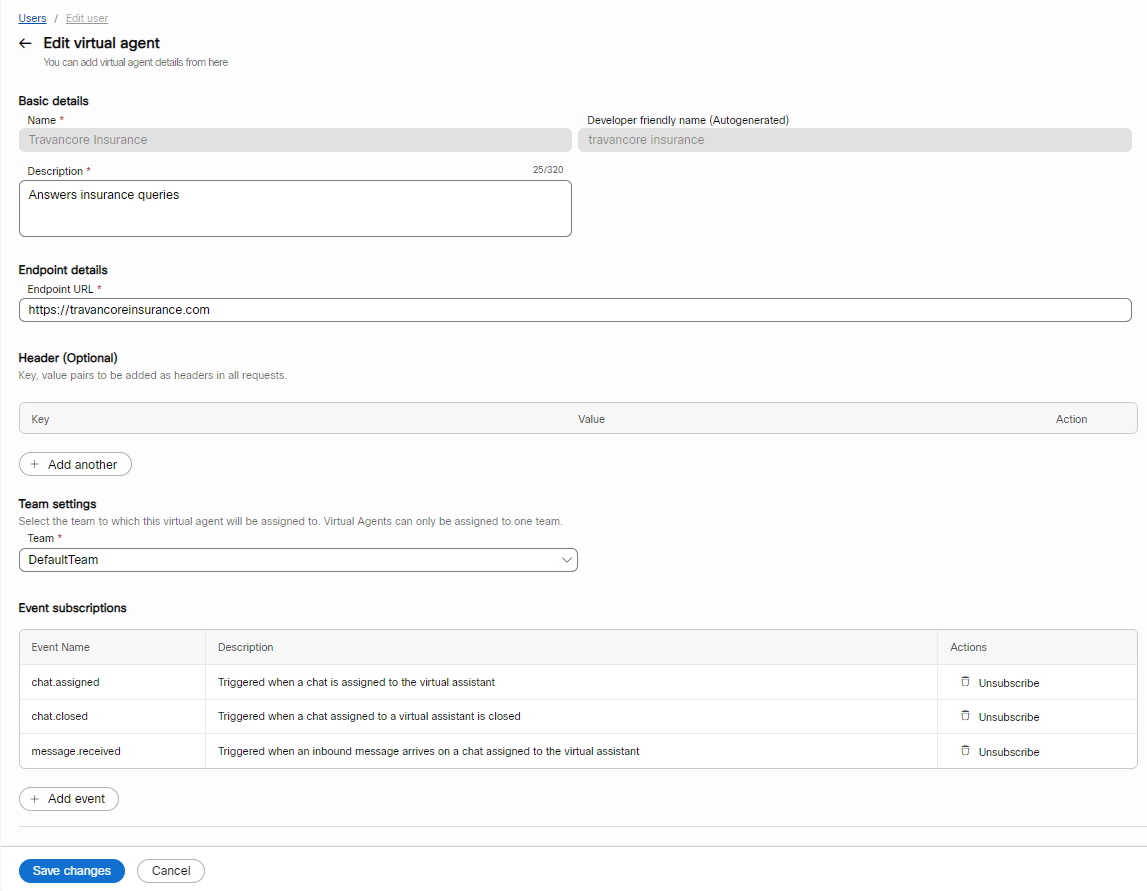
Basic details
- Enter Name. The Webex Engage application would auto-generate a developer-friendly name, and it is not an editable field.
- Enter Description.
Endpoint details
- Enter the URL in the Endpoint URL field.
Header (Optional)
- Click the Add another button in the Header section to add key-value pairs. The key and value fields will appear.

- Click the Add another button to add key-value pairs further.
- Click the Delete icon in the Action column of a specific key-value pair to delete it.
Team settings
- Select a team from the Team drop-down list to assign a virtual agent to a specific team.

Event subscription
- Click Add event.
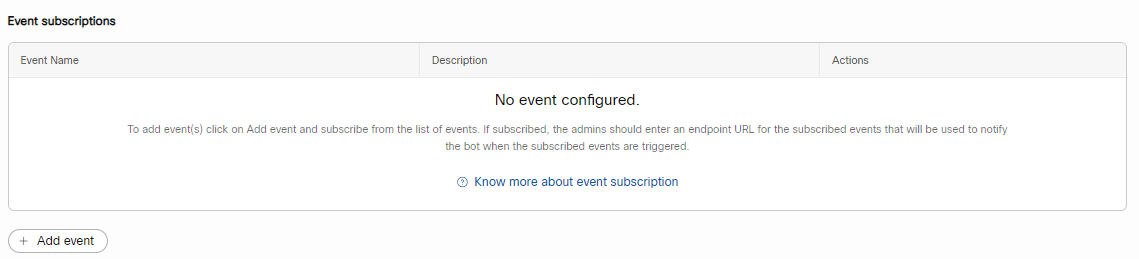
The following pop-up window appears on the screen.
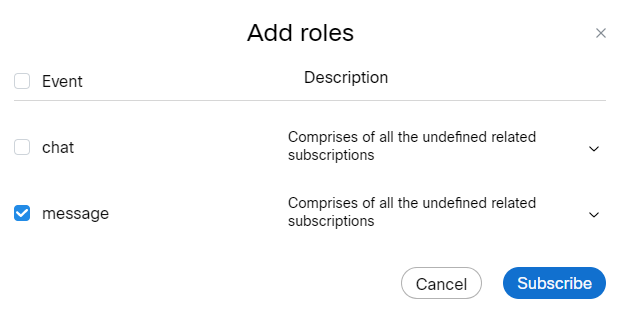
You can expand and collapse the settings using the expand/collapse arrow beside the event description.
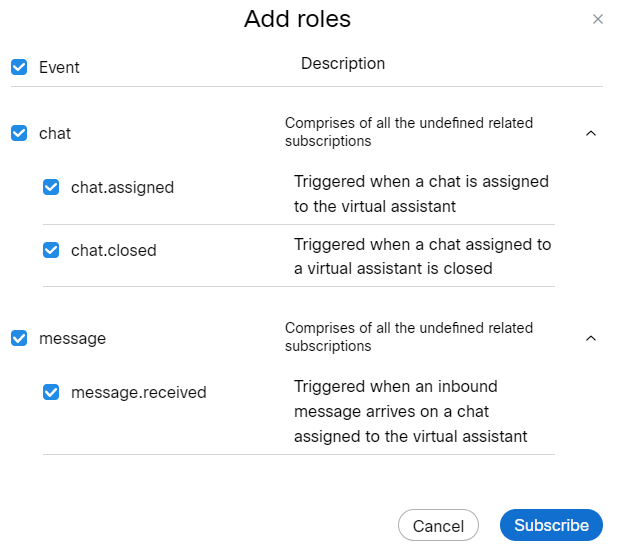
- Select the required Event checkboxes and click Subscribe.

Note
You can choose/ignore to configure to subscriptions for a virtual agent. If subscribed, the admins should enter an endpoint URL for the subscribed events that will be used to notify the bot when the subscribed events are triggered.
Fallback settings
- Select the Setup a fallback URL checkbox. The Webhook URL field gets enabled.

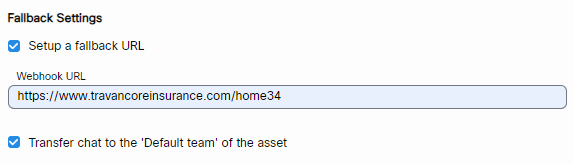
- Enter the URL in the Webhook URL field.
- You can also transfer a chat to the default team by selecting the Transfer the chat to the 'Default team' of the asset checkbox.
Custom attributes
- Click Add attribute to add custom attributes.

The key and value fields will appear on the screen.

- Enter Key and Value.
- Click Add attribute to add custom attributes further.
- Click the Delete icon in the Action column of a specific key-value pair to delete it.
- Click Submit.
Edit virtual agent
To edit a virtual agent, follow these steps:
- Login to Webex Engage.
- Click the Try new version button on the top-right corner of the application.
The Webex Engage React application will launch.
- Click the Users menu on the left side of the Admin console.
- Click the Virtual agents tab.
The following screen appears.

- Click the Edit icon in the Actions column of a specific Virtual agent.
- Edit the required fields and click Save changes.
Sort users
The Add filter feature helps to sort and view the User's table results with the help of AND and OR operands.
To sort table results, follow these steps:
- Click the Add filter button above the table results.
A Search drop-down appears, displaying all the column names in the list.
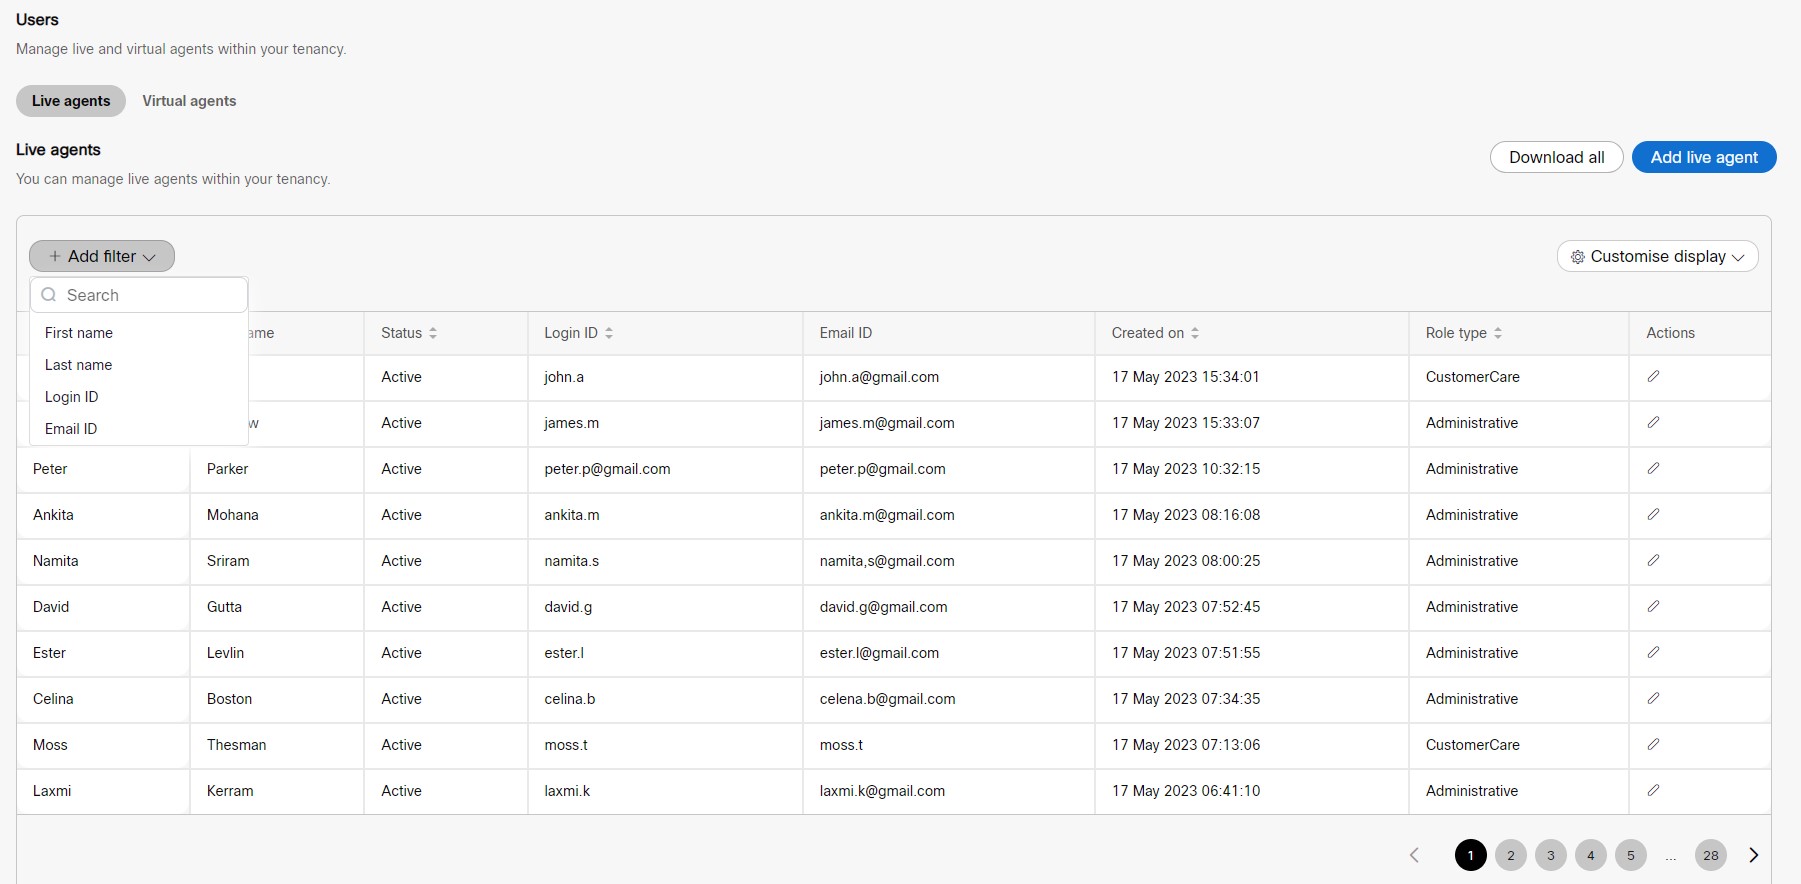
- Select a filter criterion and click Apply. The relevant results will appear on the screen.

- You can further sort the table results using the AND and OR operands.
- You can click the Hide filters button to view the search results on the screen.

- You can also click the Clear filters button to reset or clear the existing filters.
Customise Display of Table
The Customise Display helps you select a list of columns you want to preview in the table results.
To view customise table results, follow these steps:
- Click the Customise display drop-down on the top-right corner of the results table.

- Choose the required columns from the list by selecting the checkboxes adjacent to each column name.
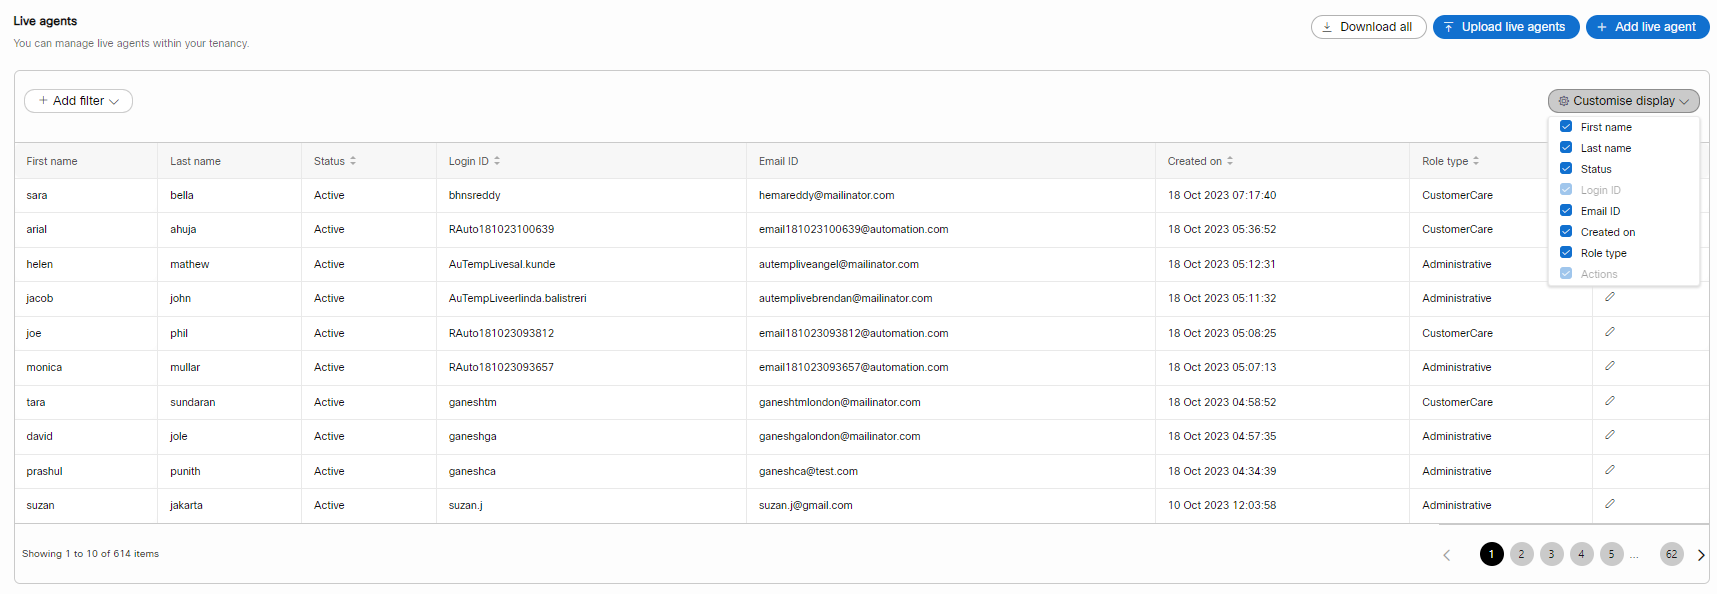
You can instantly view the results on the screen by checking and unchecking the checkboxes.
Note
By default, Login ID and Actions columns are preselected and cannot be disabled.
Download users
To download the live/virtual agents, click the Download all button beside the Add live agent/Add virtual agent button on the top-right corner of the Live agent's screen. A spreadsheet containing live agents created on the platform is downloaded.
Updated over 2 years ago