Groups
Client Admins can manage business divisions by creating Groups and Teams within each group. They can view a tabular format of groups with the number of teams and group admins within each group.
Groups
Client admins can perform the following actions in a group:
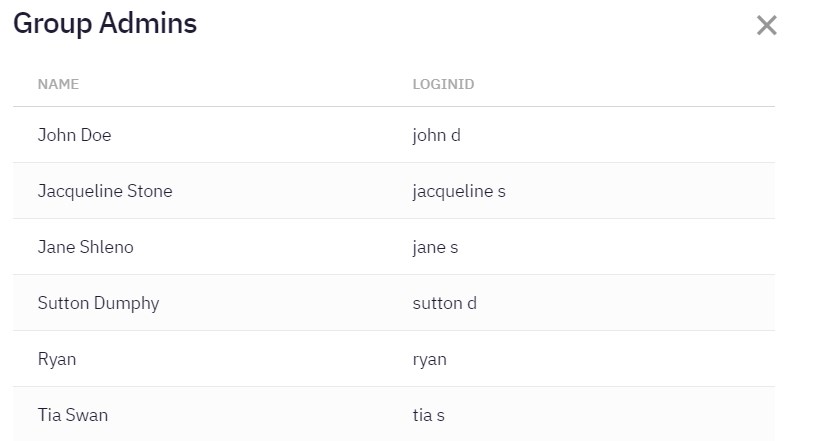
View Group Admins List
Follow these steps to view the group admins list:
- Go to Client Admin Console > Groups.
The following screen appears.
- Click a Group under the groups column to view information related to that group.
- Click the information icon (i) in the Number of Group Admins column (of a specific group) to view the list of group admins assigned to each group.

Add a Group
Follow these steps to add a group:
- Click + - Floating Action Button on the bottom-right corner of the Admin Console.
The following pop-up window appears.
- Click the Add Group icon.
The following pop-up window appears.
- Enter the Name and Department.
- Click ADD.
The success message appears on the screen. The newly added group will be listed on the Groups screen.
Edit a Group
Follow these steps to edit a group:
- Click the Edit icon in the actions column of a specific group.
The following pop-up window appears.
- Modify the required fields and click Save.
The success message appears on the screen.
Delete a Group
To delete a group, click the Delete icon in the actions column of a specific group. A confirmation message appears on the screen. Click the Delete button to remove the group.
Note:
Client admin can delete only those groups that do not have teams associated with them.
Team
The client admin can perform the following actions on a team:
Add a Team
A client admin can add a team to any group within a tenant.
Follow these steps to add a team:
- Click + - Floating Action Button on the bottom-right corner of the Admin Console.
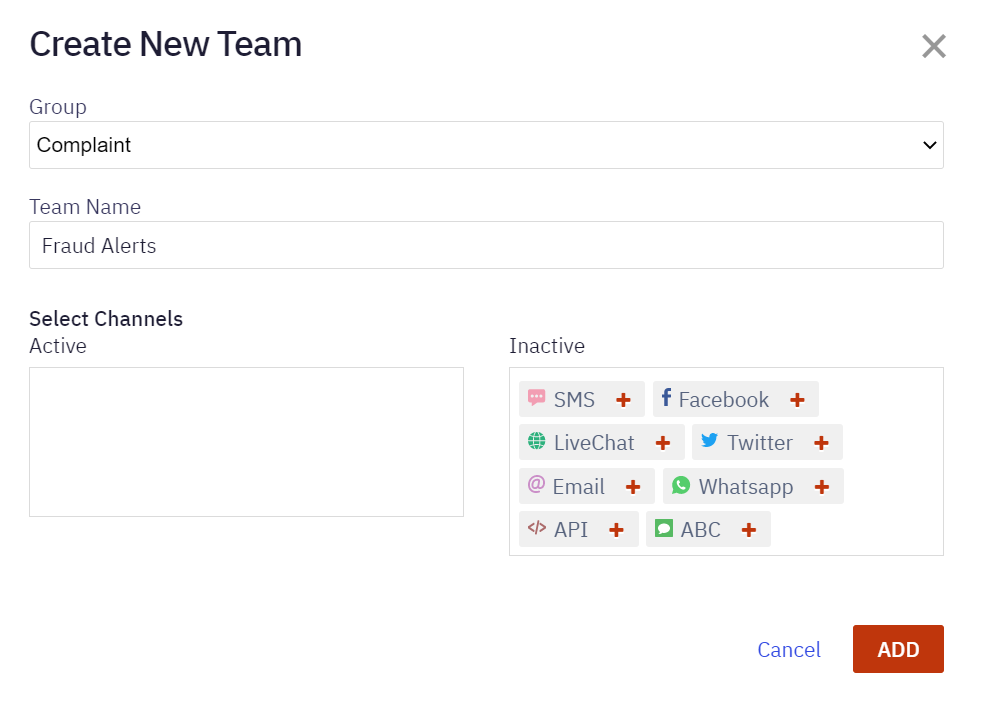
The following pop-up window appears.
The following pop-up window appears.

- Enter the Team Name.
- Select the channels you want to activate for this team by cli'kin'he '+**' icon beside each channel in the inactive channel list. All those channels will be moved to the active list.
- Click Add to save the settings. The success message appears on the screen.
You will be redirected to the Teams tab, and the newly added team will be listed under the Teams tab.
Note:
Once a channel is added/made active it cannot be made inactive.
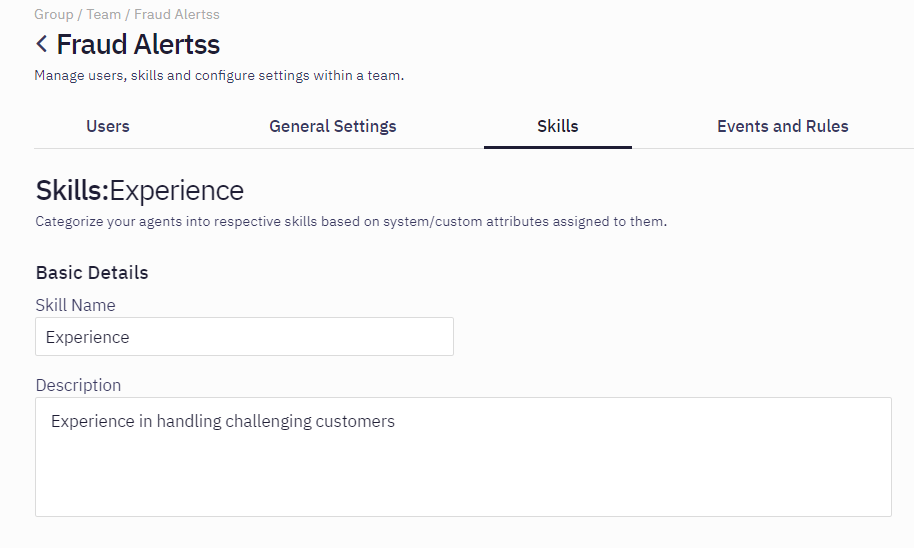
Further, the client admin can view users, manage general settings and skills, and configure events and rules for a team.
Edit a Team
Follow these steps to edit a team:
- Go to Client Admin > Groups.
- Under the Groups list, select the group within which the team is.
You will navigate to the following screen.
- Click the Edit icon in the actions column of a specific team.
The following screen appears.
- Modify the required fields and click Save.
The success message appears on the screen.
Delete a Team
Follow these steps to delete a team:
- Go to Client Admin > Groups.
- Under the Groups list, select the group within which the team has to be deleted.
A pop-up with all the implications of deleting a team will appear on the screen.
- Click Yes.
The success message appears on the screen.
Note:
Team deletion request is an offline process that will be completed within a couple of minutes after the client admin deletes the team.
Any team that has been set as a default team for an asset cannot be deleted.
All chats along with any reports will be deleted from the system and cannot be accessed once the action is performed.
Channel assets linked to the team will be de-linked.
All users will be de-linked from the team.
General Settings
A client admin can manage team-level settings by a drill-down approach to reach a particular team from the groups list.
Customer Profile Masking
Webex Engage allows client admins to maintain customer’s privacy by masking their personal information on Webex Engage. This is a team-level feature that the client admin can enable. The client admin can choose to mask any of the below-mentioned customer data:
- Mobile Number
- Email ID
- Customer Name
- Gender
- Locale
- Facebook Profile Picture
Once the client admin enables profile masking, the respective fields are masked on the Agent Console.
Note:
The client admins have to logout of the Webex Engage application and login again to view the applied customer profile masking settings on the chat console.
SMS Outbound Geographies
Webex Engage allows client admins to restrict the geographies where their agents can initiate chats.
The client admin should select at least one location to save the outbound geographies settings.
Agents can view the configured outbound geography settings on the initiate new chats screen while creating a chat.
Skills
Webex Engage allows client admins to categorize the agents based on skills-based and the attributes assigned to them.
Add a Skill
Follow these steps to add a skill:
- Go to Admin Console > Groups > Teams > Skills.
The following screen appears.

- Click Add Skill on the top-right corner of the screen.
The following screen appears.

- Enter Skill Name and Description.
- Select the Mapping Attribute and Add Condition.
- Click Save.
The success message appears on the screen.
Edit a Skill
To edit a skill, click the Edit icon in the actions column of a specific skill. Edit the required fields and click Save. The success message appears on the screen.
Delete a Skill
To delete a skill, click the Delete icon in the actions column of a specific skill. The success message appears on the screen.
Note:
The users will not be able to delete the skills that are used in the IR rules.
Events and Rules
This feature enables client admins to configure events and rules through an easy-to-use interface. The admins can also use events and rules to submit conversation-specific data to external systems. Events are triggered manually by an agent at any point of time during the chat, whereas a Rule will trigger automatically based on the configured conditions.
Add New Event
To add a new event, follow these steps:
- Go to Client Admin console > Groups > Teams > Events and Rules.
- Click Add New Event on the top-right corner of the Events and Rules screen.
.The following screen appears.
- Enter the Name of the event and the URL in the given fields that need to be called when the event is triggered.
- Select the method as GET/PUT/POST/PATCH/DELETE.
- Select the type of response format in the Expected Response Format field as JSON/XML/Plain text.
- Select the checkbox Wait for Response, which will disable re-triggering the same event until a response is received from the target system.
- Select the checkbox Display Response on Chat Console, which will display the response from the target system to the agent within the chat console.
- You can pass the payload via Key Value Pair or Custom Payload.
- Select the Key Value Pair radio button. The following options appear.
- You can form encode the parameters passed in the request body by enabling the Form Encode Request Body checkbox. Otherwise, you can configure the parameters and pass them in the API requests.
- Click Add Param. The Add Parameter pop-up window appears.
a. Select Header/Query Param/Request Body from the Pass Through drop-down list.
Note:
When initiating a request from Webex Engage to Webex Connect, ensure to pass content-type:"application/json" in the header to consider the request payload in json format. Otherwise, it will be considered as XML format by Webex Connect.
b. Enter the Parameter Name.
c. Select the checkbox Mandatory Parameter if this parameter must be selected while triggering an event.
d. Select the Value from the drop-down list.
The following options appear when you select Custom Param from the list.
- Allow agent to enter value manually: This will allow the agent to enter the values manually before calling an external URL to post the data.
- Allow agent to choose from a set of predefined values: This will allow the agent to select the pre-configured values before calling an external URL to post the data.
e. Select the respective radio button and click Add to save the parameters. The parameters are listed under the parameters field.
f. Use the Edit and Delete icons to edit and delete the parameters.
- Select the Custom Payload radio button to pass the payload in JSON format.
- The parameters should be surrounded by @@ and closed in curly {} braces in the data field.
- Enter Key and Value details to pass them in the header.
- Click Save Changes to save the configured event, and a confirmation message is displayed upon successful addition.
Add New Rule
To add a new rule, follow these steps:
- Go to Client Admin console > Groups > Teams > Events and Rules.
- Click Add New Rule on the top-right corner of the screen.
The following screen appears.
- Enter the Rule Name.

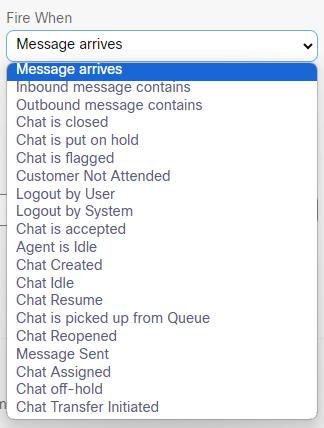
- Select the condition from the Fire When drop-down list. The rules will trigger automatically based on a specific pre-configured condition.
The list includes the following conditions to be allowed in a Rule:
- Message arrives: Rule is triggered for an inbound message.
- Inbound message contains: Rule is triggered when an inbound message contains a configured word. On selection of this condition, a text box is displayed.
Enter the word (max 30 characters) in the given text field
- Outbound message contains: Rule is triggered when an outbound message contains a configured word. On selection of this condition, a text box is displayed
Enter the word (max 30 characters) in the given text field.
- Chat is Put On-Hold: Rule is triggered when the chat is put on hold. Select whether to trigger the rule Manually, By API, or By System.
- Chat off-hold:: Rule is triggered when a conversation is of the On-hold status. Select whether to trigger the rule Manually, By API, or By System.
- Chat is Closed: Rule is triggered when the conversation is closed. Select whether to trigger the rule Manually, By API, or By System.
- Chat assigned: Rule is triggered when a conversation is assigned to an agent. Select whether to trigger the rule Manually, By API, or By System.
- Chat is Flagged: Rule is triggered when the chat is flagged. When selecting this condition, a drop-down list is displayed with the description text (set of the five colors) configured on the system. Select an option, whether to trigger the rule Manually or By API.
- Customer Not Attended: Rule is triggered when the chat is idle for a pre-configured duration. On selection of this condition, a drop-down list with time values such as 5/10/15/20/30/60/90 minutes is displayed. Select the time duration from the drop-down list.
- Logout by User: Rule is triggered when the agent logs out of the chat console manually.
- Logout by System: Rule is triggered when the agent logs out of the chat console automatically.
- Chat is Accepted: Rule is triggered when the agent accepts a chat.
- Agent is Idle: Rule is triggered when the agent is idle (not handling any chat).
- Chat Created: Rule is triggered automatically when a chat is created. A post request (third-party URL) can be made whenever a chat is created on Webex Engage.
- Chat Idle: Rule is triggered automatically when a chat is Idle. On selection of this condition, a drop-down list with time values such as 5/10/15/20/30/60/90 minutes is displayed.
- Chat Resume: Rule is triggered automatically when a chat is resumed.
- Chat is picked up from Queue: Rule is triggered automatically when a chat is picked from the queue.
- Chat Reopened: Rule is triggered when a chat is reopened. Select a checkbox, whether to trigger an event Manually, By API, or By System.
- Message Sent: Rule is triggered when a message is sent.
Chat Transfer Initiated: Rule is triggered when the conversation is transferred from one team to another and one skill to another. Select a checkbox to trigger an event manually or by API.

- Select the method as GET/POST/PUT/PATCH/DELETE.
- Enter the URL in the given field that needs to be called when the event is triggered.
- Select the type of response format in the Expected Response Format field as JSON/XML/Plain Text.
- You can pass the payload via Key Value Pair or Custom Payload.
- Select the Key Value Pair radio button, and the following options appear.
- You can encode the parameters passed in the request body by enabling the Form Encode Request Body checkbox.
- Click Add Param. The Add Parameter pop-up window appears.
a. Enter the Parameter Name, and Value.
b. Select Header/Query Param/Request Body from the Pass Through drop-down list.
c. Click Add to save the parameters. These parameters will be listed under the Key Value Pair Section.
d. Team managers can Edit and Delete a key value pair by clicking Edit icon and Delete icon respectively.
- Select the Custom Payload radio button to pass the payload in JSON format.
- The parameters should be surrounded by @@ and closed in curly {} braces in the data field.
- Click Save Rule to save the configured rule. A confirmation message is displayed.
- Rules can also be configured through JavaScript code on the parent window. To do this, turn ON the On/Off JavaScript Rule toggle on the Configure Rule page.
Additional Information
In addition to the existing parameters that can be passed from Webex Engage, a few system parameters would be passed by default as part of every request that goes out from Webex Engage. The parameters are mentioned below:
Parameters Appended to Events
- event_type : custom_event
- id (corresponds to Event ID on our system)
- transactionid (unique trace for every request)
- chatid
Parameters Appended to Rules
- event_type : {{fired_when}}
- id (corresponds to the Rule ID on our system)
- transactionid (unique trace for every request)
- chatid
Search rule/event
To search for a rule or event, enter the Name of the Rule or Event in the Search text box. The list is filtered and displayed based on the given search criteria.
Edit Rule/Event
Follow these steps to edit a rule or event:
- Click the Edit icon corresponding to the Event or Rule name to display the related page. The Configure Event/Configure Rule page is displayed.
- Make the required modifications, and click Save.
The success message appears on the screen.
Delete Rule/Event
Follow these steps to delete a rule/event,
- Click the Delete icon in the actions column of an Event or Rule.
A confirmation message appears on the screen.
- Click OK to delete the Event or Rule.
The success message appears on the screen.
Updated about 2 years ago
