Customer Details
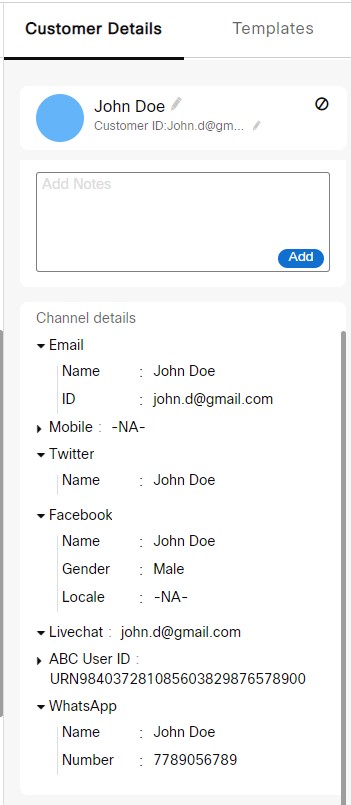
Customer details section on the right pane allows agents to view the Customer Profile Information, Conversation History, Add or View Customer-Specific Notes and Custom Fields.
For example, this section covers the details of a customer Stella:
Customer Name
Customer name is an editable field within the Customer Details section. Customer name is pre-populated based on data received from the service provider. The agent can edit the customer name anytime during the conversation.
- Facebook: Customer Name
- SMS: Mobile Number
- Twitter: Twitter ID
- Email: Email ID
- Livechat: Email ID provided by the customer while initiating the chat
- WhatsApp: WhatsApp Name
Customer ID
Customer ID is a unique ID that is used to identify a customer. The client admin can configure the character limit of Customer ID for all teams. An agent can update the Customer ID for easy reference.
The agent can edit the Customer ID anytime during the conversation.
Customer Notes
Agents can add customer-specific notes which can be seen irrespective of the channel the customer chats from the next time. Multiple notes can be added through an intuitive text box.
Follow these steps to add customer notes:
- Enter the customer notes in the text field in the customer details section and click Add.
- To view the customer notes, click View History. The related customer notes pop up window is displayed.
Chat History
The Chat History section displays the following details:
- First Seen: Refers to the number of days since the first chat was created on Webex Engage for a customer.
- Last Contacted: Refers to the number of days since the customer was last contacted by an agent.
- Total Chats: Refers to the total number of chats of the customer with the agent.
View Public Feed
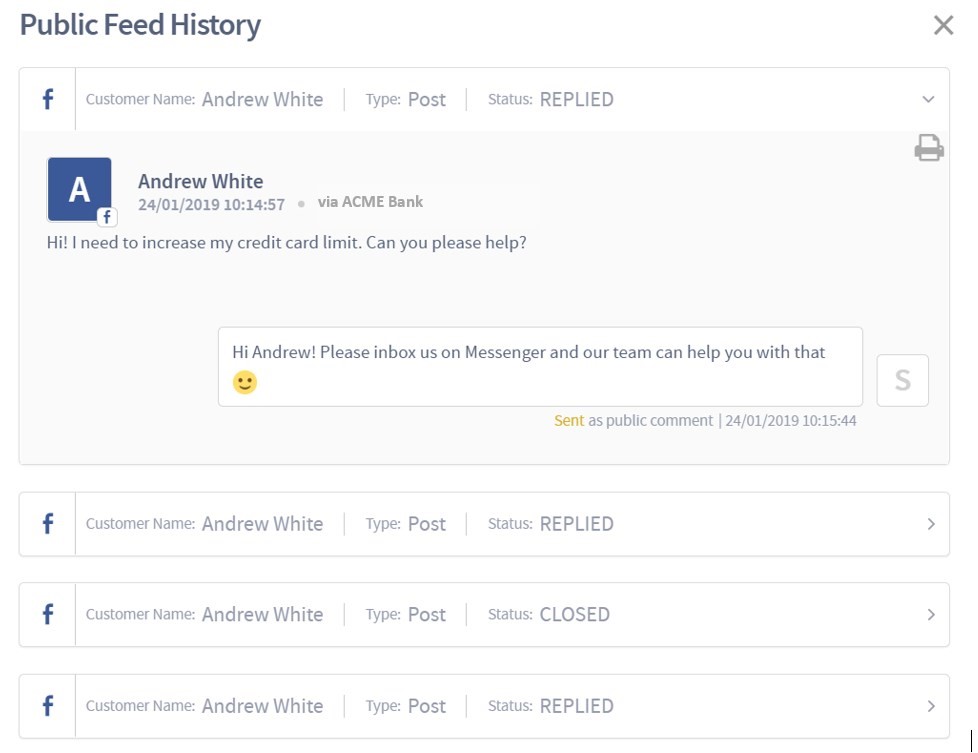
When a customer contacts the business privately over messenger, Webex Engage allows agent to view the entire context of the public feed items along with their status (Unattended, Replied, Closed) by clicking on the View Public Feed link under chat history (Customer Details Section). This option is visible on the Chat Console for only those agents to whom Social Mentions feature is enabled.

View Private Chats
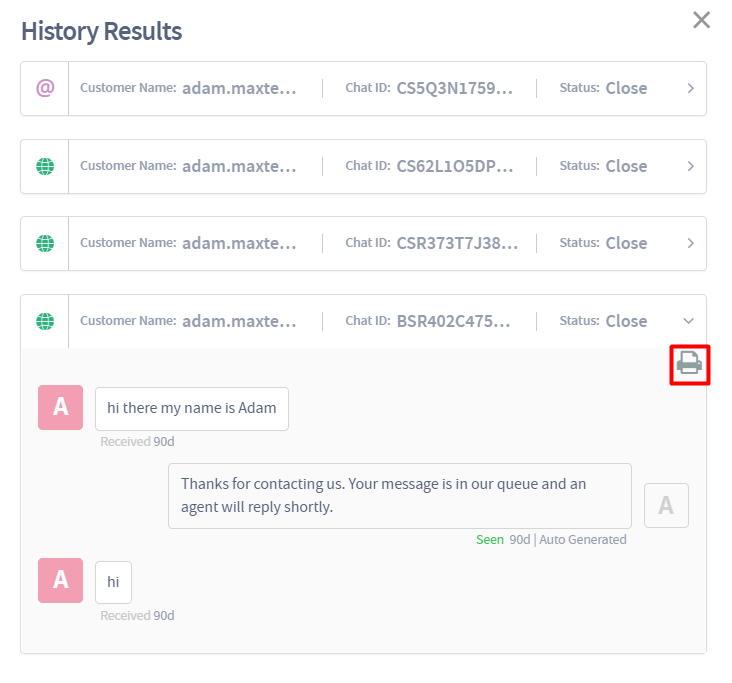
Webex Engage allows agents to view the previous chats created for the customer across all channels by clicking on the View Private Chats link.
The Chat History displays a list of all previous Chat IDs. Agent can drill-down an individual Chat ID to view the entire chat conversation.
There is also a provision for the agent to Print the Conversation History.

Channel Details
The channel details section displays the following details:
- Email: Displays the name and email ID of the customer. For a merged profile, multiple Email IDs can be linked to a single customer profile.
- Mobile: Displays the MSISDN of the customer. For a merged profile, multiple mobile numbers can be linked to a single customer profile.
- Twitter: Displays the Twitter handle name of the customer.
- Facebook: Displays the Facebook handle name, gender, and Locale of the customer.
- Livechat: Displays the Livechat ID of the customer. Additionally, you can view IP, city, country details, and customer properties (if any) that are part of the pre-chat form.
- AMB User ID: Displays the customer's AMB (Apple Messages for Business) ID.
- WhatsApp: Displays the name and WhatsApp number of the customer.

Note:
In certain scenarios, we might not get the IP-associated information. When that occurs, IP, city, and country details may not be displayed in the Channel Details section of the chat console.
Other Details
All the additional information pertaining to Custom Tags (Webex Connect Tags and Channel Tags) and Custom Fields (Mandatory and Optional Fields configured in Admin Console) are displayed in this section.
Click Add Parametersto further Add /Edit values to the Mandatory Fields. You can even choose to add Optional Fields on this screen.
Click Add Parameters in the Other details section to add mandatory and optional fields.
Note
The optional custom fields accept both European and non-European characters.
Merge Profiles
Webex Engage allows agents to merge customer profiles across chats from various channels.
This allows for a rich agent initiated chat experience. Customer ID can be used as the destination to contact customer and to view conversation history (of the customer) from various channels under the Chat History section.
Follow these steps to merge customer profiles across various channels:
- Click Edit icon adjacent to the Customer ID field. Copy the Customer ID.
- Open another chat with different customer ID. Replace the customer ID with the one copied in the first step and click tick icon.
- An alert window is displayed with current and existing profile details.
- Click Merge Profile and the same Customer ID will be mapped for both the profiles.
The success message appears on the screen.
Note
Customer history details for a merged profile will display the chat history from the channels consecutively. (Refer View Customer History).
- Once the profile is merged, the channel details section displays channel information from all the merged customer profiles.
Note
Profile Linking can also be done by the agents while initiating new chats. Please refer [Agent Initiated Chats] for more information.
Do-Not-Disturb (DND) List
Webex Engage allows agents to put a customer on Do-No-Disturb list by clicking on DND icon on the customer profile. An agent cannot send messages to a customer who exists in the Do-Not-Disturb list. The team managers can manage the list of users who have subscribed for Do-No-Disturb services. In addition, customers can themselves subscribe for DND service by sending a message with specific keywords configured by the team manager.
Please visit Do-Not-Disturb Settings for more information.
Adding a Customer to DND List
Follow these steps to add a customer to DND list:
- Click Customer Details tab.
- Click Do-Not-Disturb icon to add the customer to the DND list.
The following confirmation message appears on the screen.
- Click Yes.
The success message appears on the screen.
Ban Customers
Webex Engage allows agents to ban customer's IP address by selecting Ban Customers option in the customer details section. Once agent bans a customers IP address the customers in that range will neither be able to view the widget nor chat with agents until the ban is revoked.
Ban Customers IP Address
Follow these steps to ban a customer's IP address:
- Click Customer Details tab.
- Click the drop-down icon beside DND icon.
The following option appears.
- Click Ban Customer.
The following pop-up window appears.
- Enter the reason to ban the customers IP address.
- Click Ban Now.
The success message appears on the screen.
Further, when a visitor is banded during a conversation, the customer is notified with a banner message on the widget.

Updated about 2 years ago
