Case Settings
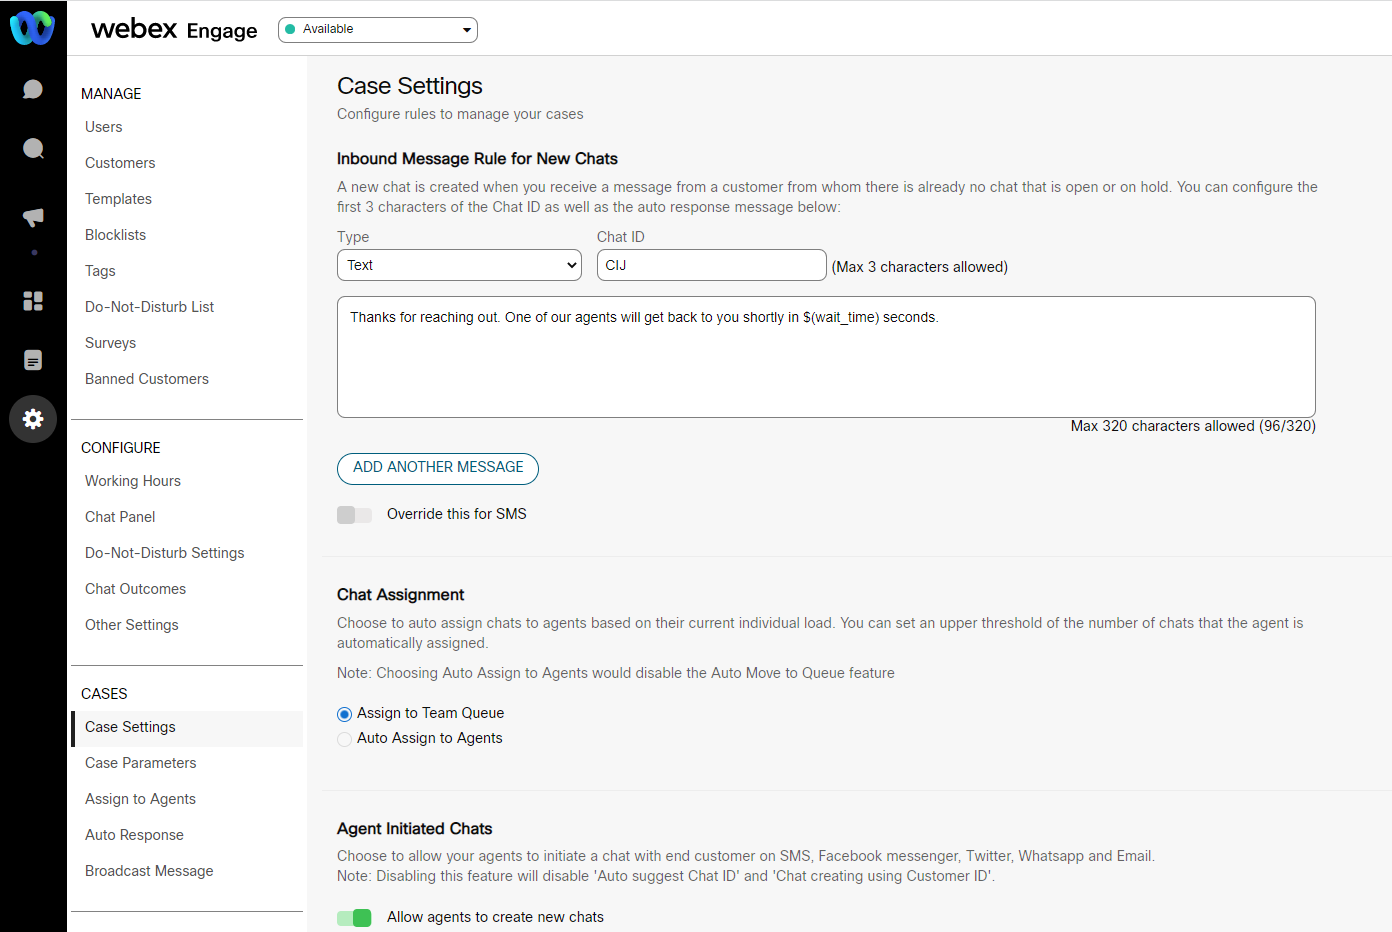
You can configure various chat settings such as inbound message rules for new rules and existing chats along with auto bounce back messages and auto move chat to queue. The auto-suggestion for chat id and chat assignment is also configured on the Case Settings screen.
To navigate to case settings, go to Customer Care Console > Settings > Cases > Case Settings.

On the Case Settings screen, you can configure the following:
- Inbound Message Rules for New Chats
- Chat Assignment
- Agent Initiated Chats
- Auto Suggest Chat ID
- Auto Assign to Last Agent
- Auto Move to Queue
- Auto On Hold
- On Auto Logout
- On Manual Logout
- Chat Creation Using Customer ID
- Suppress Agents Picking Up Chats From Search Screen
- Append Opt Out Message to Agent Reply
Inbound message rules for new chats
To configure inbound message rules for new chats,
- Select the message type of message from the Type drop-down list
- Enter the first Three characters of the Chat ID (alphanumeric of a maximum length of three characters) in the given text field. The configured information will be used while creating Case IDs on the system.
- If you select message Type as Image/Video/File/Video, then provide the respective downloadable URLs in the text field. The configured information will be displayed as a message card to the customers.
For text messages, enter the auto response message in the given text field. The configured message will be sent to the customer on successful chat creation.
4. Enable Override this for SMS toggle, to display related fields to configure a different bounce back message for the incoming messages on SMS channel.
- Click + Add Another Message to configure another auto response message (maximum of three messages can be configured). A new text field is displayed.
- Enter the auto response message in the text field.
- Click Delete icon adjacent to the text field to delete the additional auto message.
- Select Send an automated bounce back to customers with no active case radio button and enter the customized message in the given text field (max 480 characters).
Or - Select Do Nothing radio button to disable all the rules on the inbound message.
You can also add wait time in the auto responses by providing a placeholder - $(wait_time) in the message. This placeholder will be replaced with the estimated wait time for the customers when the auto-response is sent.
Wait Time Calculation
The wait time is calculated as the median wait time for all chats created in a specific team for a particular channel in the past seven days.
Chat Assignment
This feature allows you to configure the application to route incoming chats to available agents automatically. The application checks for an active agent with the least number of chats and automatically routes a new chat to that particular agent. You can define the maximum threshold for an agent. When the threshold is reached, chats wait in the queue for the next available agent.
To enable chat assignment settings, go to Customer Care Console > Settings > Cases. Select the Auto Assign to Agents radio button.
The threshold of the number of chats that each agent can take up will depend on the threshold limit set while creating an agent profile.
Note:
Visit User Management section under Client Admin settings for more information on agent level thresholds.
Agent Initiated Chats
When you enable the allow agents to create new chats toggle, agents can initiate new chats with customers on the SMS, Facebook messenger, Twitter, WhatsApp, and Email channels from the chat console.
Auto Suggest Chat ID
When the Auto suggest chat ID for new agent initiated chats toggle is turned ON, the application would auto suggest a Chat ID when an agent initiates a chat. By default, this feature is turned OFF. This ID can be modified by the agent based on the requirement.
Auto Assign to Last Agent
You can choose to auto assign a chat of existing customers to the last handled agent by turning ON the auto assign a
new chat to the last agent toggle. The chat is assigned to the team’s queue if the last-handled agent is logged out.
Auto Move to Queue
You can choose to automatically move a chat awaiting a response from an agent to queue after a specified duration by turning ON the auto move a chat to the queue toggle and entering a duration in minutes in the text field. Before moving the chat to the queue, the agent will view a toast message on the chat console.
Note:
This setting does not apply to virtual agents.
Auto On Hold
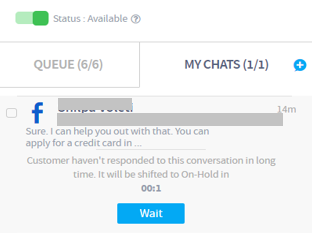
You can choose to automatically move chats to an on-hold state after a certain period of inactivity from the customers by enabling the auto move a chat to on hold after and configuring a duration. You can configure the inactivity period value between 2 to 60 minutes. The agent is notified one minute before the chat is pushed to an on-hold state.
Note:
This setting does not apply to virtual agents.
The notification is displayed on the chat console with the clocking ticking. The agent can choose to extend the wait time by clicking Wait. Refer to screen below.

By default, this setting is turned off so that the existing teams are not affected. You need to explicitly turn ON this setting to enable it.
On Auto Logout
After the user has been logged out by the system, you can choose to either move chats to queue or change chat status to on-hold by enabling the auto move chats to Queue/On hold based on the direction of the message toggle .
On Manual Logout
When the users manually logout of the application, you can choose to immediately move the chats to queue or on-hold based on the direction of the last message of a conversation by enabling the auto move chats to Queue/On hold based on the direction of the message toggle.
Note:
A user can manually log out either from the Profile page or through the Automatic Time Out prompt. All the other ways of logout are considered auto-logout on the application.
Chat Creation using Customer ID
You can allow agents to create chats using Customer ID by turning ON the allow agents to create chats by providing the Customer ID toggle. Once this toggle is turned ON, the agents can create chats for SMS, Facebook Messenger, Twitter, WhatsApp, and Email channels by entering the unique ID of the customer.
The auto suggestion of Chat ID is reflected in the Create a New Chat popup window.
Suppress Agents Picking Up Chats From Search Screen
The administrative users like client admins, group admins, and team managers can restrict agents from picking chats from search screen by enabling suppress picking up chats from search screen. Once this toggle is enabled, agents will not be allowed to pick the chats from Search page.
Append Opt Out Message to Agent Reply
You can choose to auto append an opt out message to every agent reply by enabling the Auto append opt out message to agent replies toggle. You must configure an opt out message in the text box using at least one of the below mentioned keywords in the message. This message is for information purposes alone. You can use this message to inform customers about the keywords they can use to stop receiving messages from the application.
The Keywords are:
- BLOCK
- CANCEL
- QUIT
- STOP
- UNSUBSCRIBE
The customer will be opted out only when they text in with any one of the above-mentioned keywords alone.
You must click Save changes at the bottom of the screen to save the configured case settings.
Updated almost 3 years ago
