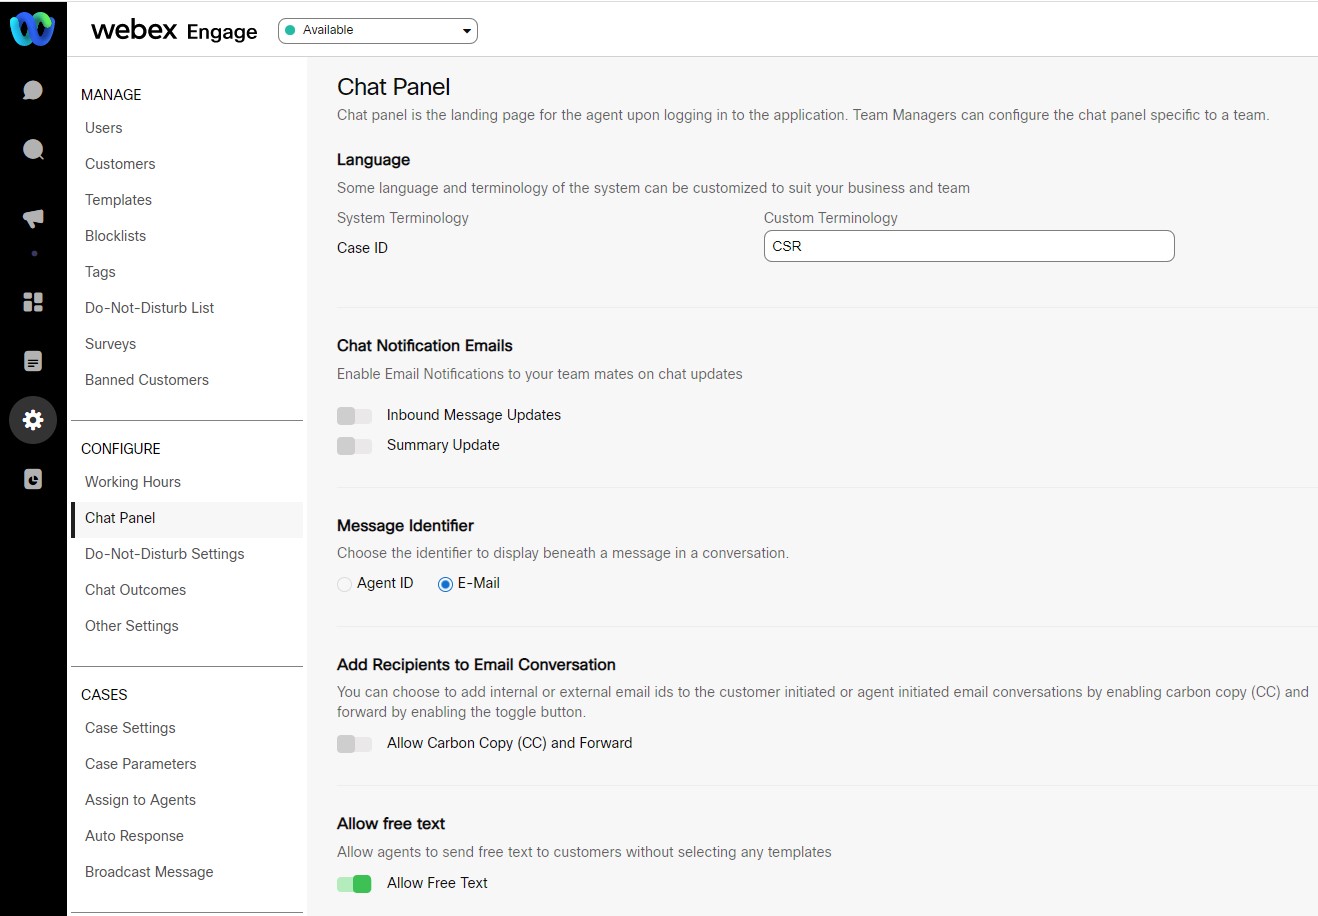
Chat Panel
You can configure the following settings on the Chat Panel screen:
- Language
- Chat Notification Email
- Message Identifier
- Add Recipients to Email Conversation
- Allow Free Text
- Message Preview
- Show Team Queue
- Transfer Chats
- Hide Chat Resolution Buttons
- Hide Agent Availability Dropdown
- Flags

Language
You can configure the terminology to refer to the Chat ID by entering the information in the Custom Terminology (maximum 25 characters textbox. This terminology will reflect everywhere on UI and in all the offline downloadable reports.
Chat Notification Emails
You can choose to enable or disable either Inbound Message Updates on existing chats or Chat Summary Update or both for the agents handling the chats.
Agents receive inbound message updates when a chat handled by an agent receives an inbound message from a customer while the agent has logged out and the chat is still assigned to the same agent.
When a chat is closed by the current agent, all agents who have handled that chat earlier will receive a ‘Chat Summary Update’.
To enable chat notification emails,
- Turn ON Inbound Messages Update toggle in the Chat Notification Emails section. This notifies the new messages to the chat handler.
- Turn ON Summary Update toggle in the Chat Notification Emails section. This enables you to notify the status of the current chat to the previous chat handler.
Message Identifier
You can choose what should appear as an identifier beneath each message in a conversation. The identifier could be either Agent ID or Agent Email.
To choose an identifier, select the radio button for Agent ID or Email option in the Message Identifier section. The Agent will be able to view either Name or ID adjacent to the sent messages.
Add Recipients to Email Conversation
You can choose to either enable/disable CC's and Forward email ids for the agents on the chat console by enabling/disabling Allow Carbon Copy (CC) and Forward toggle.
Further, you can even choose to enable/disable external email ids for the agents to include in the conversations. If both the options are enabled, agents can send emails to both inline/internal and external ids. After enabling required toggle buttons, it is mandatory to save the page so that the changes will be reflected on the chat console.
Allow Free Text
You can choose to either enable/disable free text for agents in the Send Message box by enabling Allow Free Text toggle. This option is disabled by default i.e. the agents can only use templates to respond to the customers, they cannot type anything in the message box. This feature can be enabled by team managers for a specific team.
When this option is enabled, the agent can send free text without choosing a template. However, this text will be filtered through the profanity filter.
Note
When an agent types a free text message and sends it, it will be logged against a template called ‘System Blank’.
Message Preview
This feature enables agents to view the first few characters (max. of 2 lines) of the message in the Queue or My chats section. To enable message preview, turn ON Turn Preview On toggle in the Message Preview section.
Show Team Queue
This feature enables you to control the visibility of the chat queue within a team.
To enable teams queue,
- Turn ON Show Queue toggle under Show Teams Queue section. This facilitates agents to view chat queue.
- If Show Queue option is disable, chats will have to be auto assigned to the agent.
- To do so, go to Customer Care Console > Settings > Cases > Case Settings.
- Turn ON Auto Assign Chats to Agents toggle and turn OFF Auto Move to Queue option.
Transfer Chats
This feature enables you to provide access permissions to agents to transfer chats to other agents within their team or to agents in other teams. Turn ON the Allow Agents to Transfer Chats toggle to transfer chats.
Hide Chat Resolution Buttons
You can choose to hide the on-hold and close buttons to ensure that there are no discrepancies in terms of the tasks/chats assigned to an agent (with respect to the external task router and the application) by tuning ON the Hide On-Hold Button in Chat Console and Hide Close Button in Chat Console toggles.
Hide Agent Availability Dropdown
The hide agent availability dropdown helps hide the agent status dropdown available on the top-left corner of the chat console. This setting comes in handy when you want to control the agents status from an external parent application where this application is embedded in an iframe.
Flags
This feature enables the you to customize the flags to mark the chats. Names can be defined for the available colors (i.e. Orange, Yellow, Green, Grey and Blue).
To configure tags,
- Enter the required text in the given text box corresponding to the colors.

- Turn ON/OFF the flags based on the requirement. The flags in ON position are displayed on the chat console against each of the Chat IDs.
- Click Save Changes to save the configurations for the chat panel.
Updated about 3 years ago
